Troubleshooting the GM PAL
(Corvette Version 2)
(updated 9/29/18)
The GM PAL consists of three basic parts:
1. The Installation Harness
2. The PAL Module
3. The PAL iPod cable
Let's first start with "normal" operation. This is how your PAL should operate:
Power to the PAL module
When your PAL is connected to the installation harness, the PAL module red LED should be lit when you open your car door and the car is either running or in Accessory mode. The red LED should shut off no more than two minutes after your car is shut down and locked up. If the red LED does not light up, you have a power problem with the installation harness or a module failure. The red wire on the harness (Pin 16) is 12 volt power and the black wire at the other corner pin position (Pin 9) of the connector is ground - you need both for power to the module. If you don't get power to the module, check all three connectors to make sure they are locked in tight with the locking tab. Also check to see that a wire terminal in the connector has not pulled out. There is a very small plastic lock in the connector to prevent the terminal from coming out - if it is not latched, the terminal can be pushed out of the connector and you can lose power. It is rare to have an installation harness problem, but I've seen a few. I've never had a single problem with the premium harness, but I've seen a few problems with the gray or black XM harness because of the generic connectors on them.
Power to the PAL module is fed through the RDO/SBAND/VICS fuse in the passenger footwell fuse panel. If you pull that fuse, you can reset the PAL module. Or, if the PAL module is easily accessible, you can simply disconnect the 16 pin connector for about ten seconds, then reconnect.
Do you have power to the PAL module?
Communication to the PAL module and the XM receiver
Communication to the XM receiver (if you have one) passes through the PAL module, so if you lack communication to the PAL, you will also lose XM - the XM1/2 buttons will disappear on the Nav radio or the XM band will not show up on the non-Nav radios. The communication wire is the violet wire from the body harness connector in Pin 15 (next to the red power wire in Pin 16). Communication passes on the violet wire to Pin 7 of the PAL module connector. Communication then proceeds from the yellow wire (black/yellow in the premium harness) in Pin 8 of the PAL module connector to Pin 15 of the XM receiver connector.
Do you have the XM1/2 buttons on your Nav radio or the XM band on your non-Nav radio?
The PAL menu
If you have communication to the PAL module, you should have a PAL menu in XM2. At this point you should have the menu whether or not you have the iPod cable connected, so remove the iPod cable to determine proper operation of the PAL module. This is to make sure a problem with the iPod cable is not creating a problem with the PAL operation.
There is a small relay in the PAL module that creates the PAL menu in XM2. You should hear the relay click whenever you go into XM2 or out of XM2 to XM1 or another source like AM, FM, or CD. It should only click going in or out of XM2. If it continues to click, you could have a defective PAL module. It can also drain your car battery if the module continues to click and does not shut down after a couple of minutes after locking your car.
Do you have a PAL menu in XM2?
Does the relay only click when entering and leaving XM2?
iPod Operation
If all of the above is normal, connect the iPod cable and an iPod.
Once the iPod is connected, you should have the PAL menu in Playing mode. Press the SOURCE button and try all three sources (iPod, Direct, and AUX). You should be able to select each of the sources (AUX audio only if you have an adapter cable plugged into the two RCA jacks on the PAL module and a music device attached).
Can you get into each of the three source modes?
PAL Shutdown
The PAL will continue to draw power while the car is running or you are in Accessory mode. When you shut the car down and lock the doors and hatch, the PAL module red LED will remain on for a minute or two. Then it will turn off and no power is drawn by the PAL.
It is important that the PAL shuts down properly, or it will continue to draw power and your battery will die. Unfortunately, I've seen quite a few PAL modules that won't shut down. I won't say this is a common problem, but when it happens, the module is defective and your only option is a new module (or see the Note below).
It's easy to test this function. Bring the PAL module to a location you can see through a window. If the PAL has been off, the second you touch a door button, the LED will light up. Now put the car in Accessory mode or run the car. Operate the PAL normally, then shut down the car. Lock the doors and close the hatch, then watch the red LED on the PAL module. It should turn off within a minute or two and stay off. If it won't turn off or it turns off then on again and continues to cycle, your module is defective.
NOTE:
I just had a Vette owner send me his PAL because it wouldn't shut down and his battery constantly drained. I was able to reflash the circuit board with my Version 2 software (2.2F132) and it cured the shutdown problem. Some Canadian owners had a similar PAL problem when GM updated their Onstar system. A software reflash also fixed that problem. So the bottom line is a reflash MIGHT solve the problem instead of having to buy a new PAL kit with a new module.
Also NOTE:
You can easily be tricked into thinking your PAL LED is always on, because the instant you touch a door or hatch button, the LED will light up and stay on for a minute or so. Be patient and check to see that the LED will go off after you shut the car down and lock the doors. This may take a minute or two, so leave the module where you can see it through a window and watch the LED after you lock up. If it really doesn't turn off, your battery will drain pretty quickly.
Common Problem
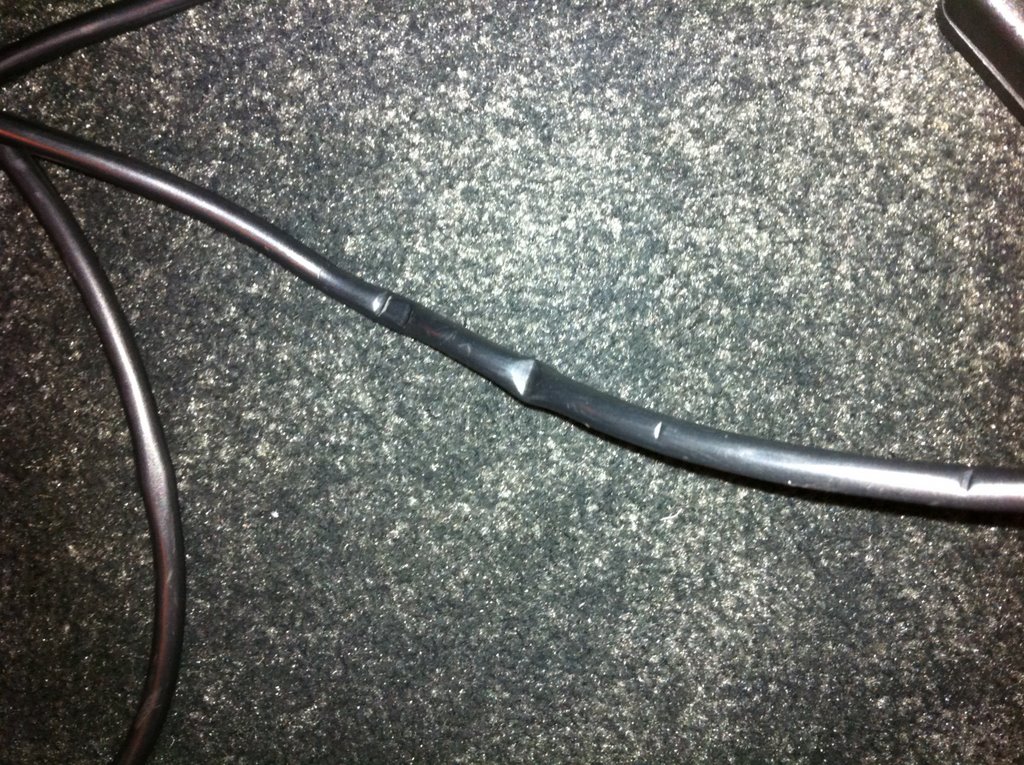
The #1 most common problem is a due to an iPod cable issue. Most common is the iPod cable getting squashed during installation, especially if it is brought in under the center console and the console is bolted down onto the cable. There are ten tiny wires in the iPod cable and just one of them damaged can cause noise, hiss, no iPod messages, no action on the PAL buttons, and other weird issues. A few iPod cables have had poor connection to the PAL module at the RJ50 connector. Be sure there is no side pressure causing a strain on the connector - it's like large modular phone jack, so a little care has to be given to it.
Can you wiggle the iPod cable or bend it and cause an operational problem?
This cable has been ruined:
Do you have an iPod Extension cable?
The early Version 2 PAL kits included a 6' iPod cable and a 6' extension cable. Some of the early extension cables had a very poorly designed female connector where the iPod cable plugged into it. These poor connectors caused all sorts of problems. I have better designed extension cables now available and 8' iPod cables which are long enough to eliminate the need for an extension. If you are having problems, remove the extension and connect the iPod cable directly to the PAL module.
Does removing the extension resolve the problem?
Isolate the problem area
If the above explanations do not lead you to the solution to the issue, isolate the problem area by first removing the iPod cable so you can check the operation of the PAL module and the installation harness. It is rare for there to be a harness problem. But with the iPod cable removed if you have an abnormal operation of the PAL module, you can probably eliminate the iPod cable as a problem source. If you have power to the PAL module and communication to the PAL module, you can probably eliminate the harness as a problem source. That leaves the PAL module itself as suspect. If you have early software in your Version 2 PAL module, it's possible a software update can resolve your issue. Software versions after Version C450A193 or after 2.2.F030 are pretty darn troublefree. But the relay in the PAL module can become a problem at any time, so check its operation by listening as explained above.
Step-by-Step Troubleshooting
With the above discussion as background information, here is the best procedure for isolating the problem component. There are three basic components: the PAL module, the installation harness, and the PAL iPod cable. Harness problems are rare. iPod cable problems are most common.
Testing the PAL module