PARTS DETAILS
1. The VCIM (Onstar Module)
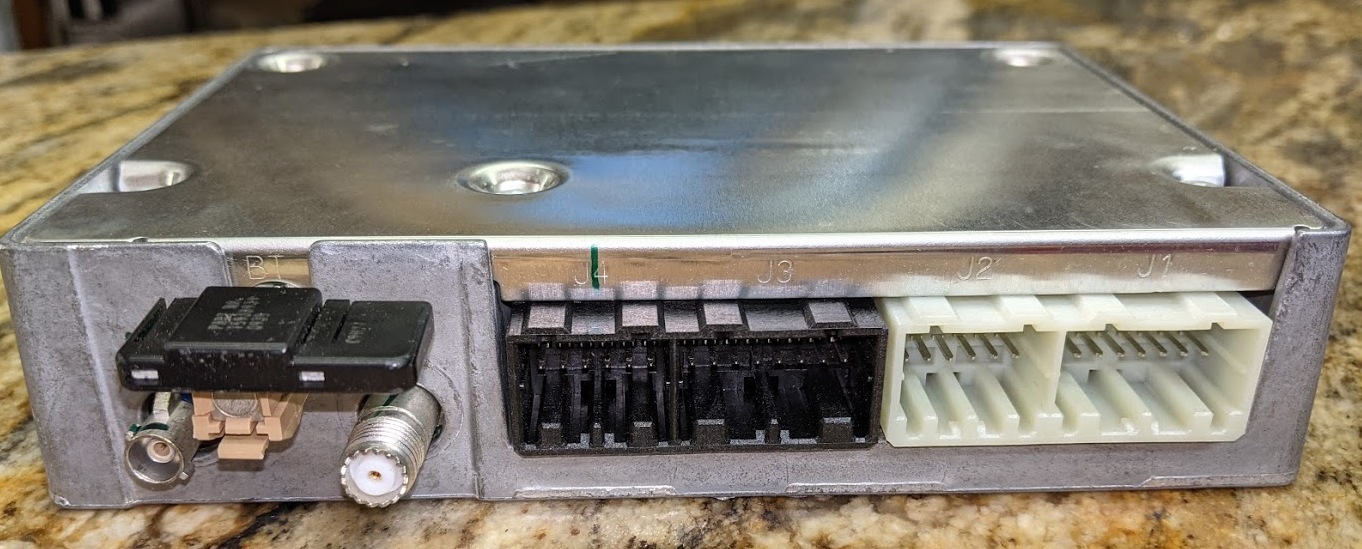
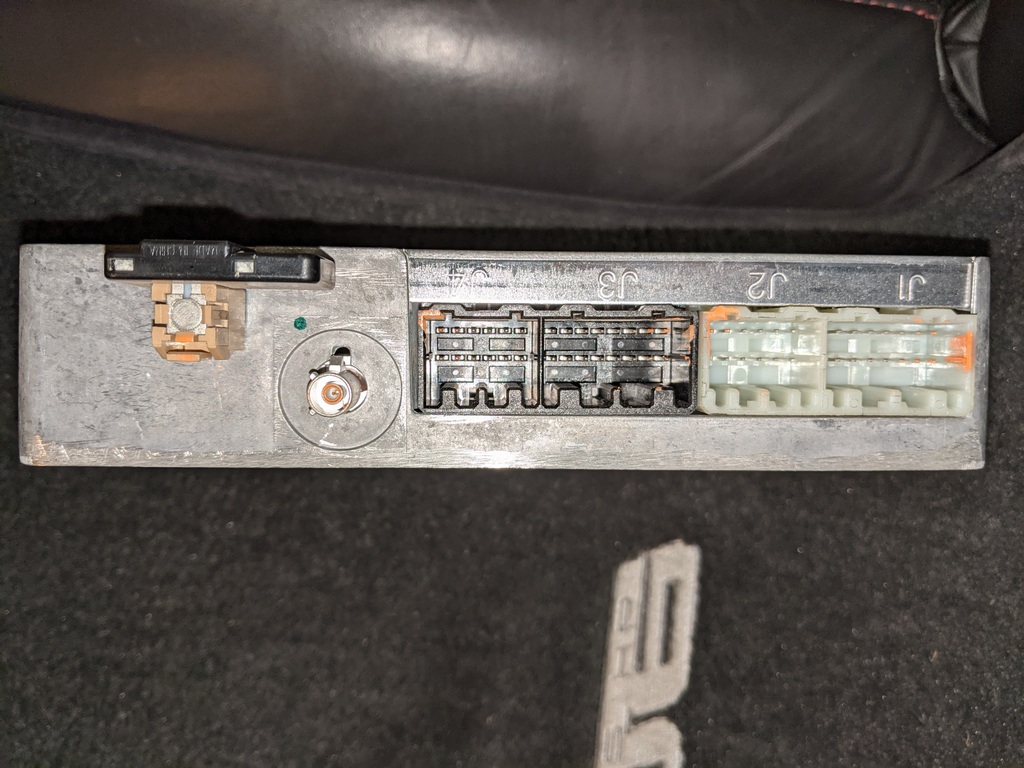
Here is my original VCIM from my '07 Z06:
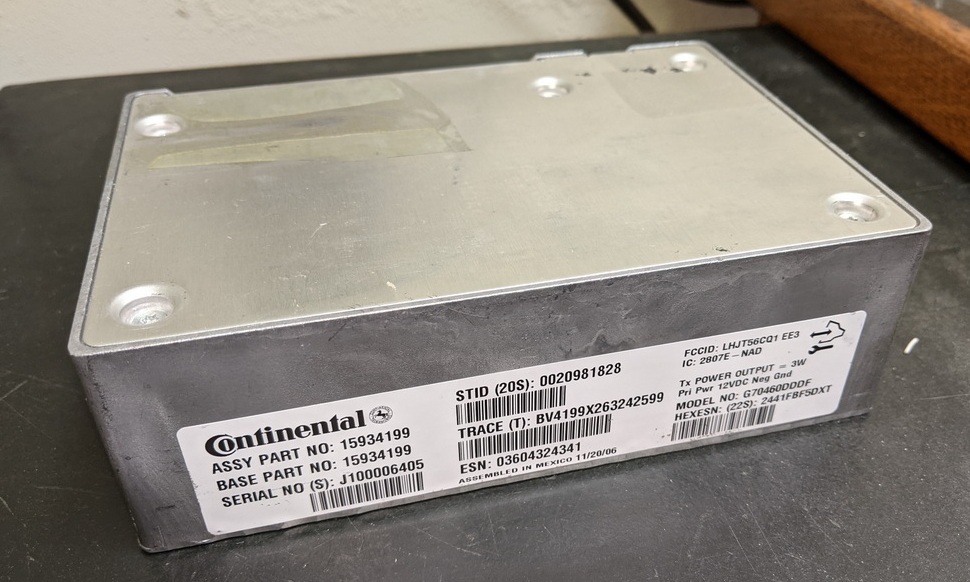

Notice it has two antenna
connections. The one on the right is for cellular communication to and from
Onstar. The one on the left is the GPS connection so Onstar can locate
your vehicle. Both coax cables are connected to the VCIM and connect to
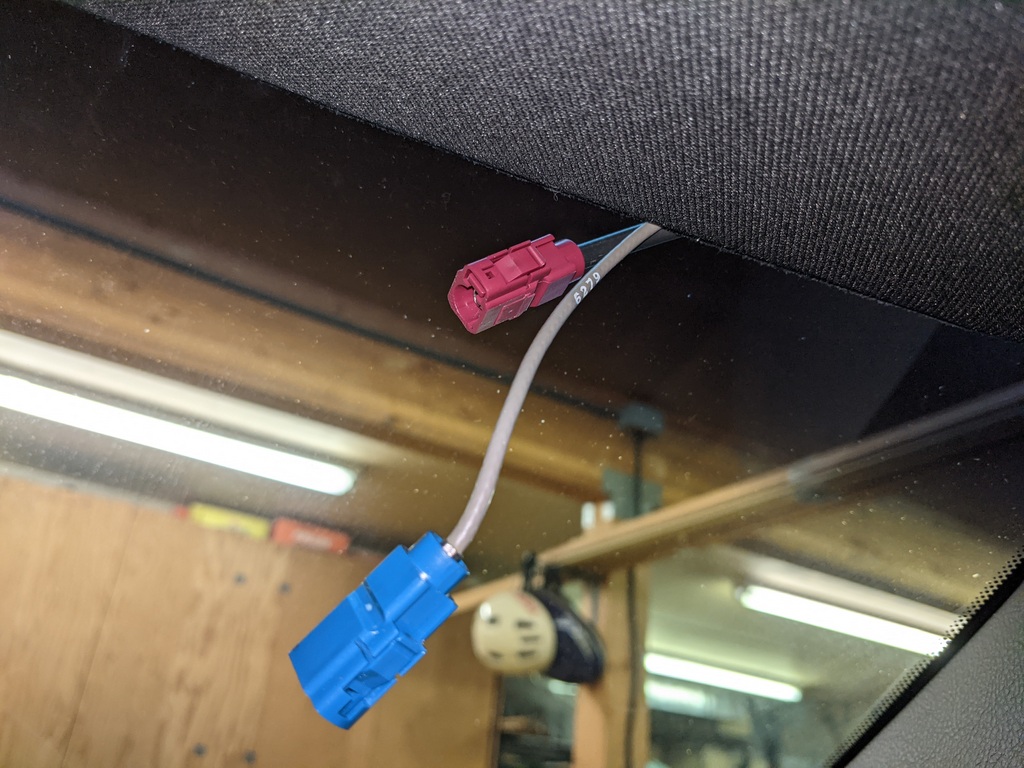
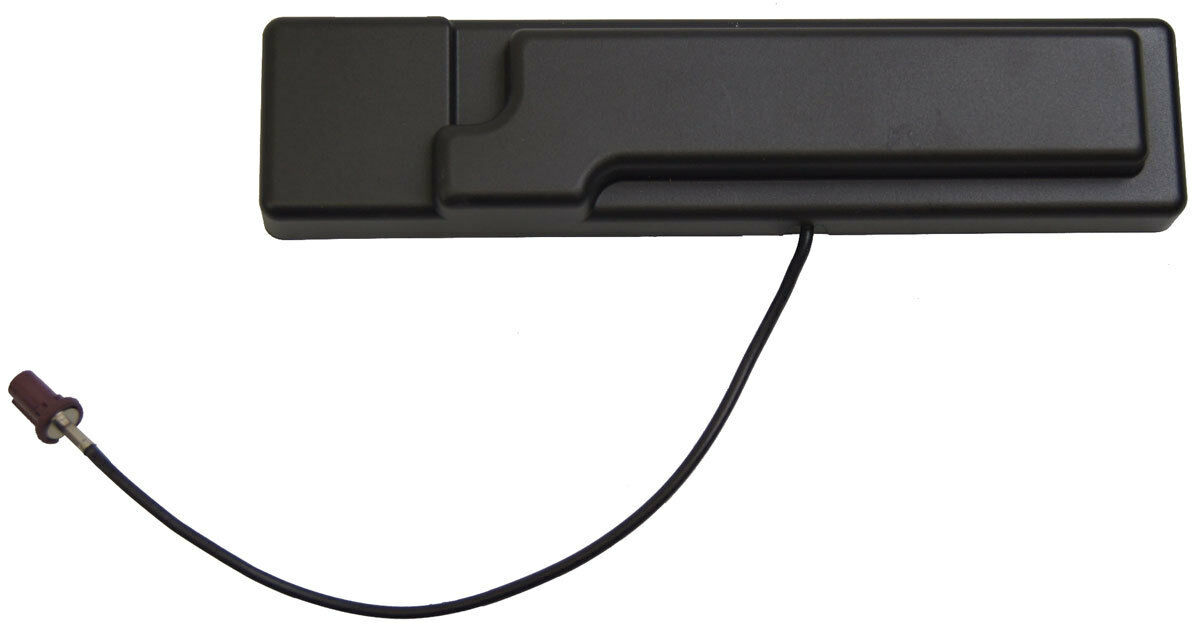
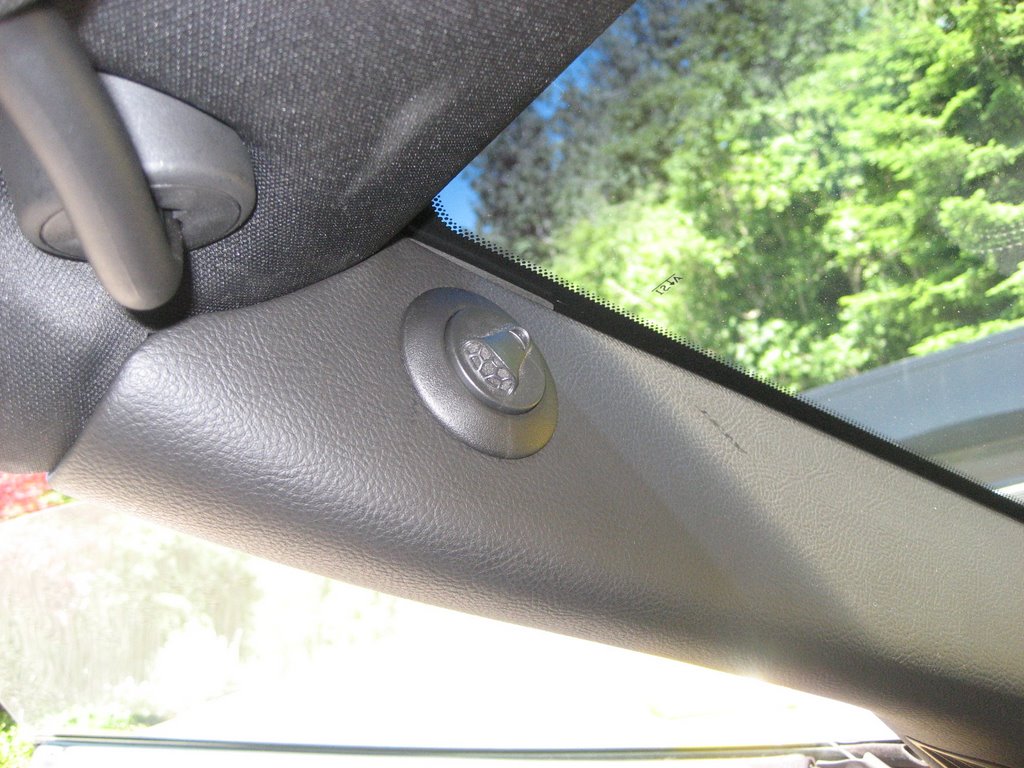
the combination Cellular/GPS antenna on the windshield. Here is my
original Onstar antenna and the windshield bracket on which the antenna is
mounted. Notice the two connectors.
If you tap the antenna near the mirror towards the right,
it will slide off of the clips. Pull it down and you will see the two
connectors.
It is only necessary to remove and replace the antenna if
you decide to use a Gen 9 Onstar module and want to communicate with Onstar.
Here is a Gen 8 Onstar Module from a 2010
ZR1:

Notice it has a connector for cellular
communications and a connector for GPS, like the original Gen 7 VCIM. But
it also has a Bluetooth antenna. You can use this module with your
original windshield antenna that has the two coax cables connecting to it.
Here is a Gen 9 Onstar Module from a 2013
Z06:
Notice it lacks the cellular antenna
connector, but it has the Bluetooth antenna. This module requires the
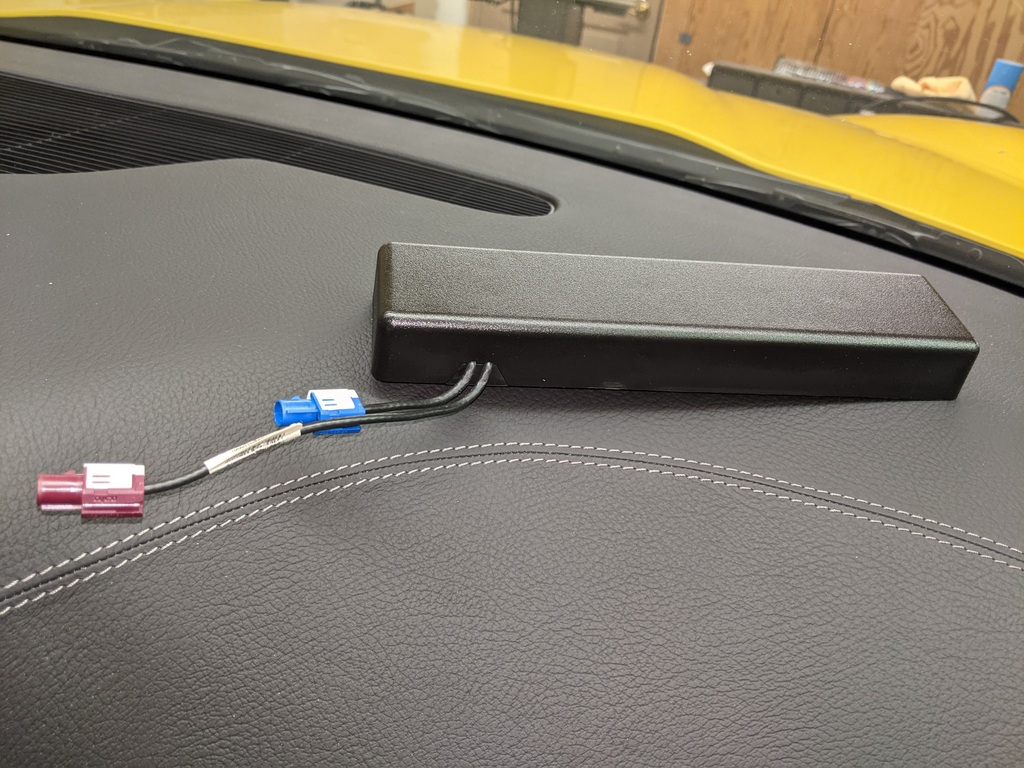
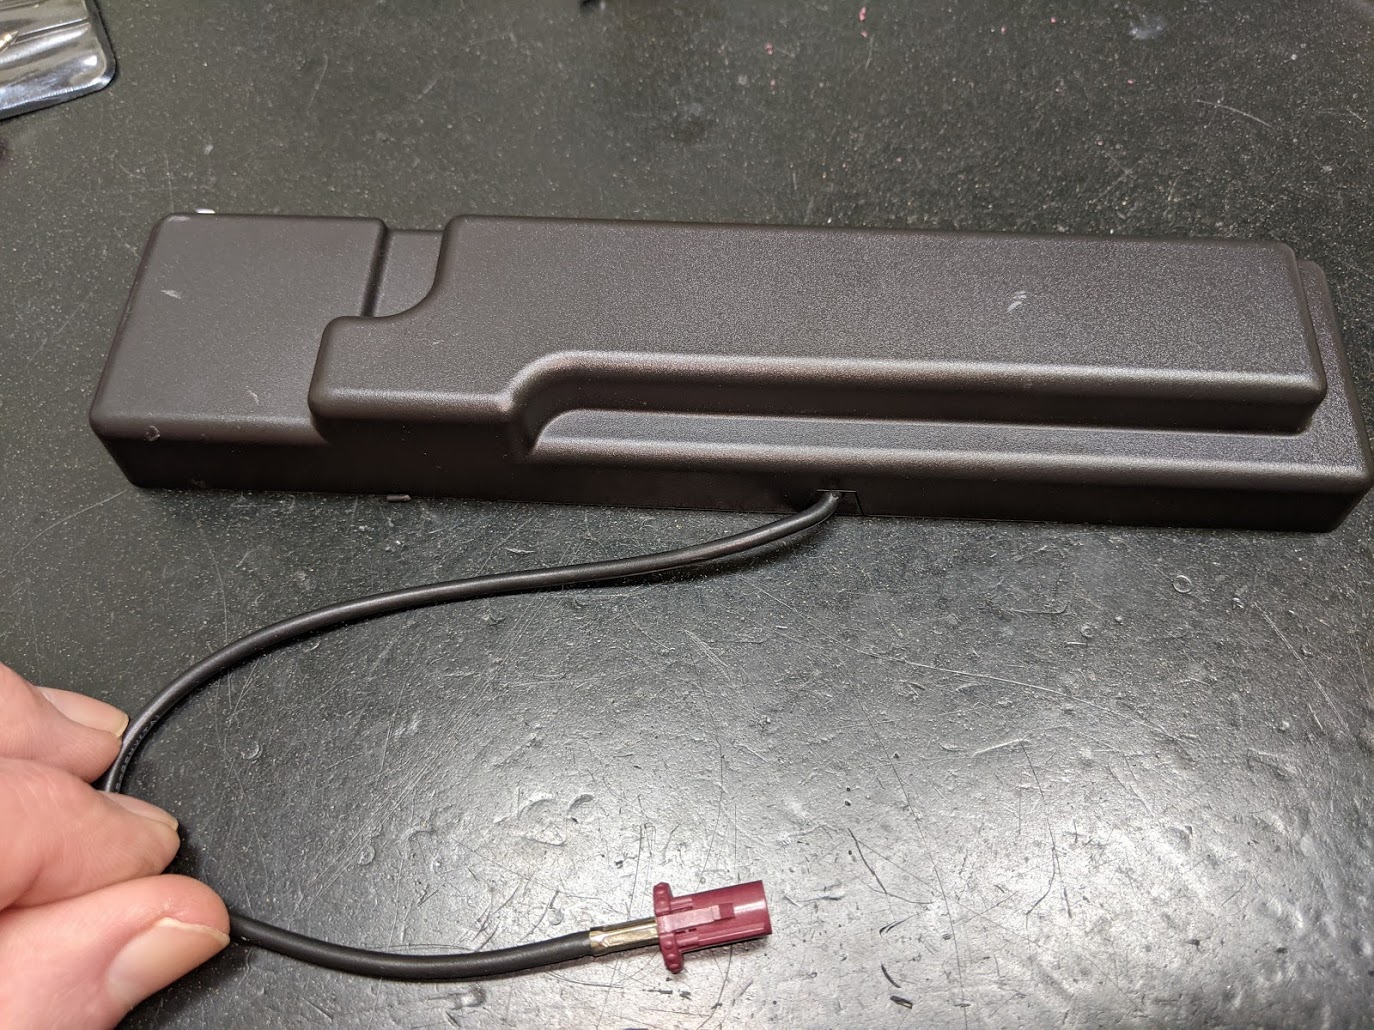
newer windshield antenna shown here:
NOTE: The antenna connections
are for communicating with Onstar. If you elect not to communicate with
Onstar or subscribe to a service, simply leave the antenna cables disconnected.
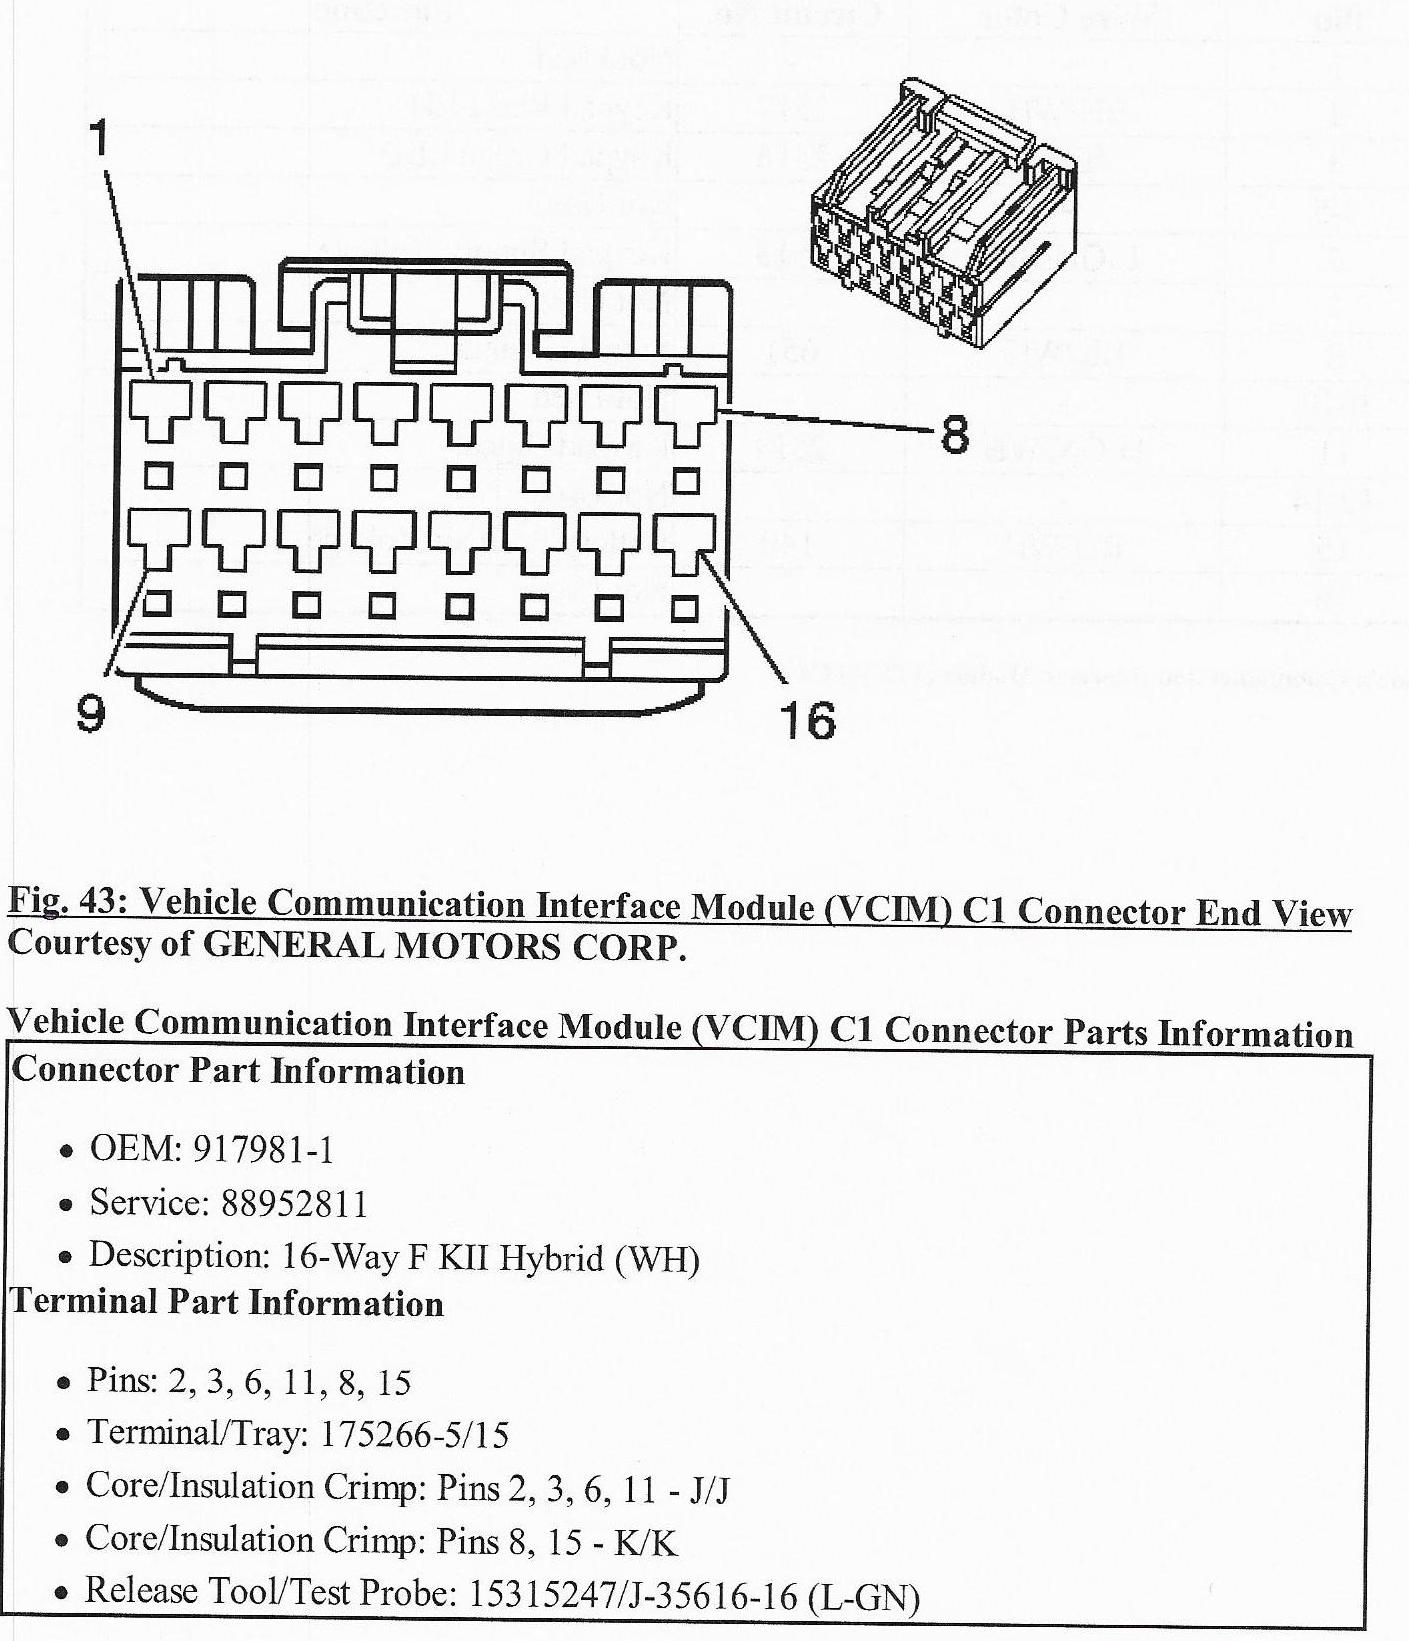
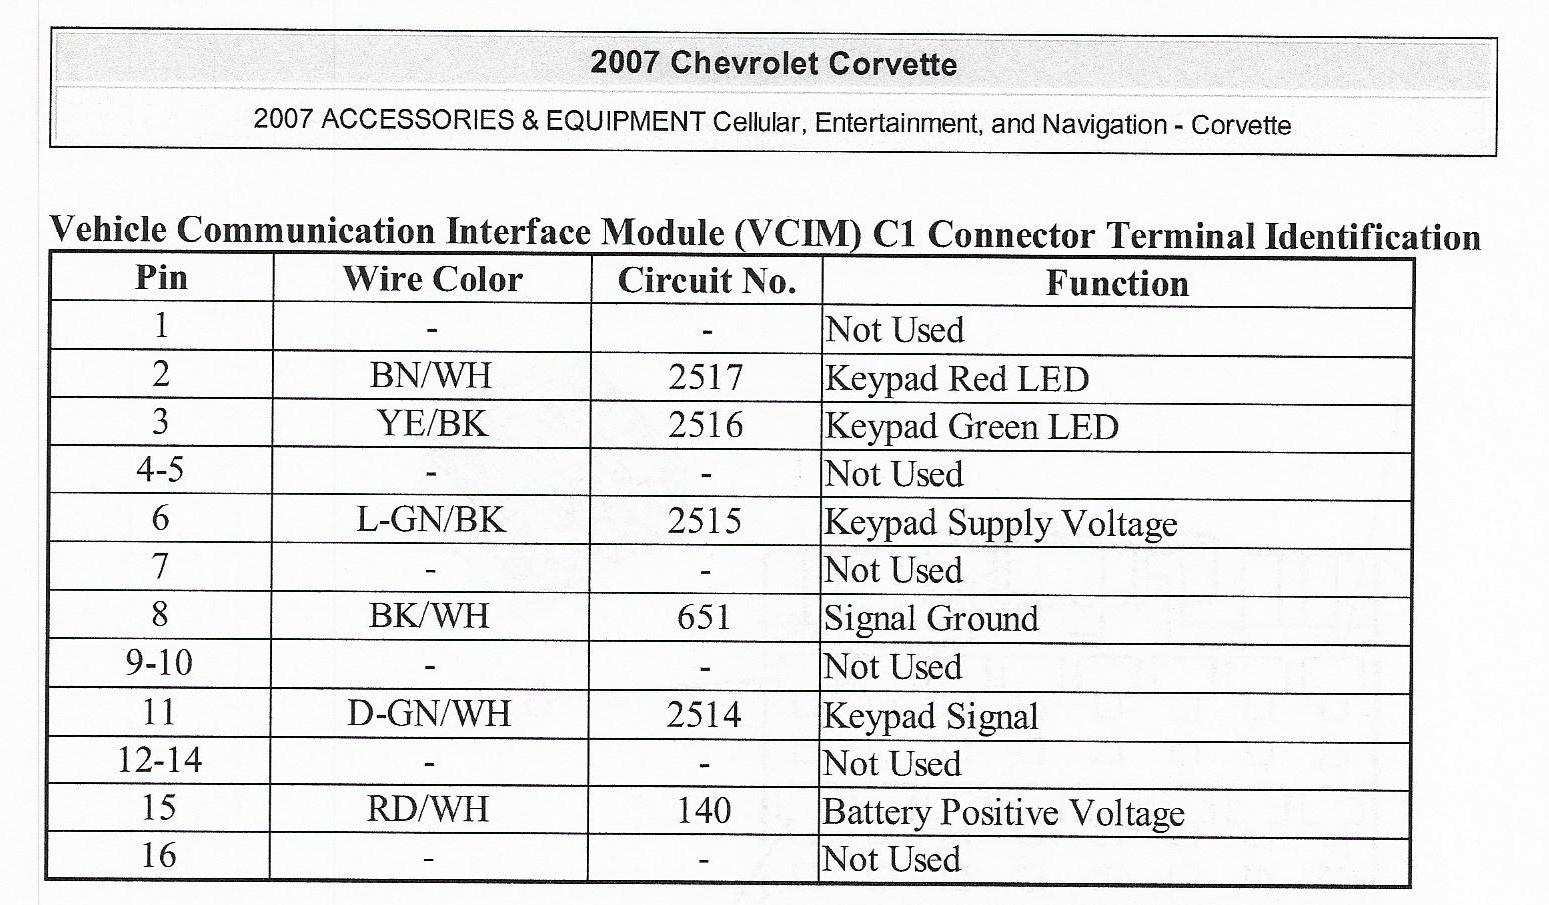
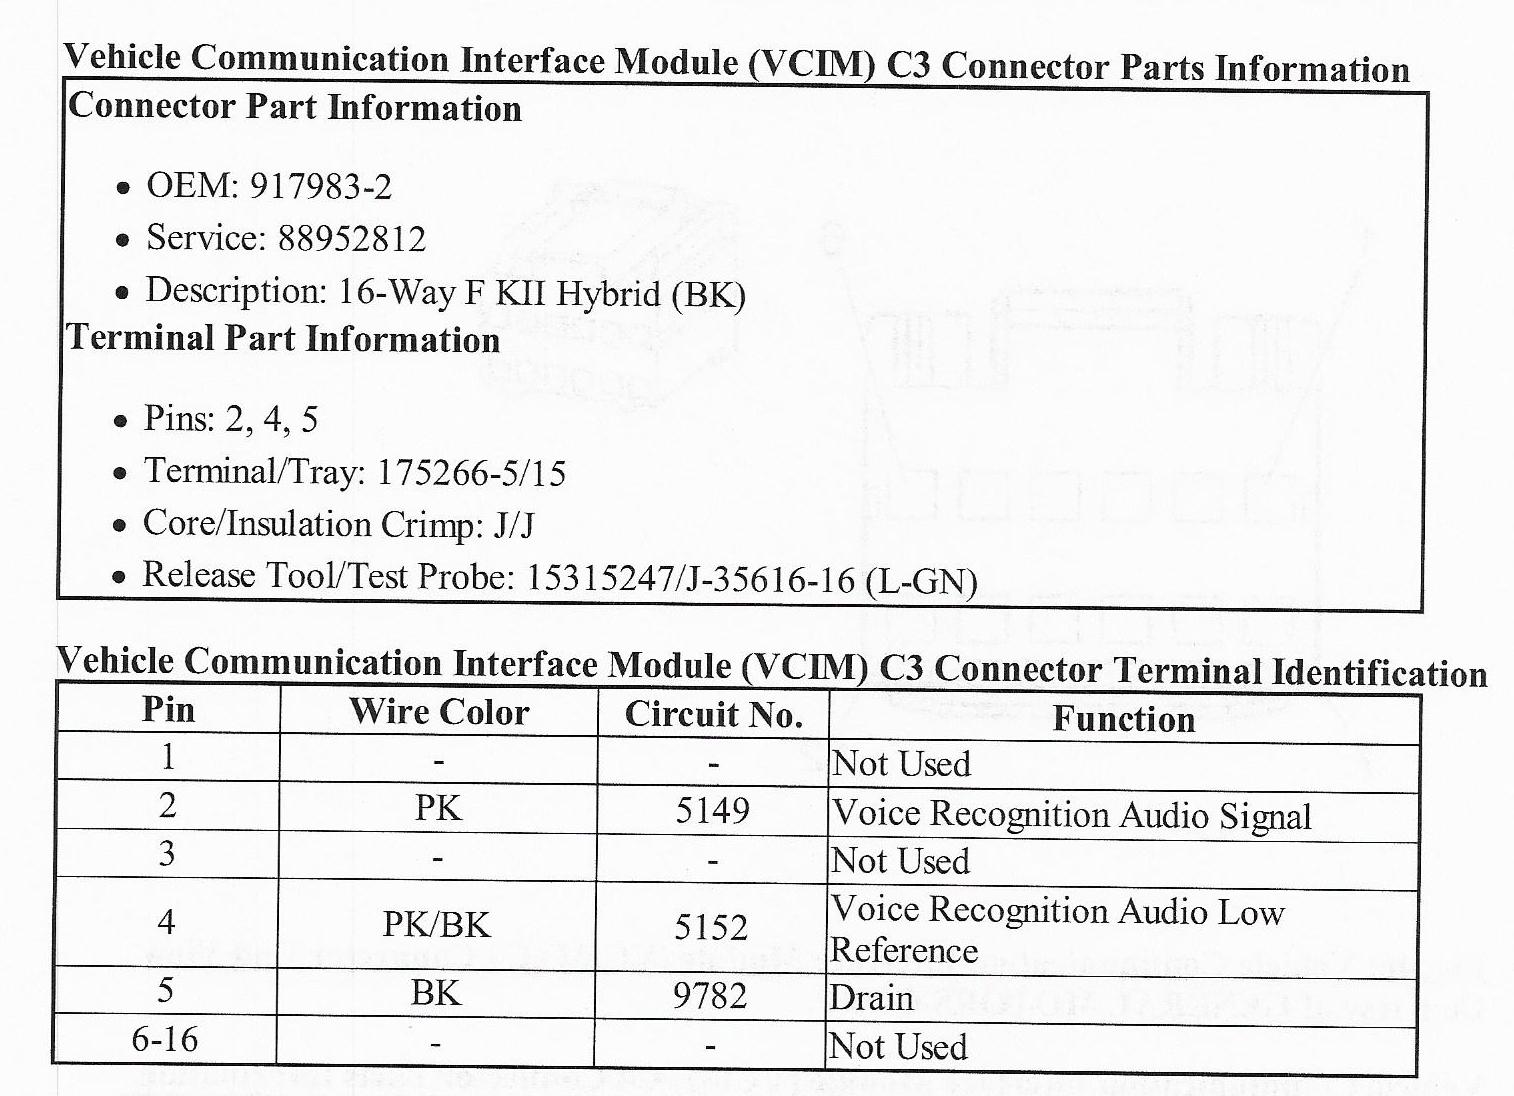
VCIM WIRING
There are four electrical connectors to the VCIM.
Fortunately, the wiring is the same for all C6s, so you can interchange modules
between cars. HOWEVER, each module is uniquely identified by the VIN
number of the original car. So if you call Onstar, the description of the
original car will show up in their system. Keep this in mind as you
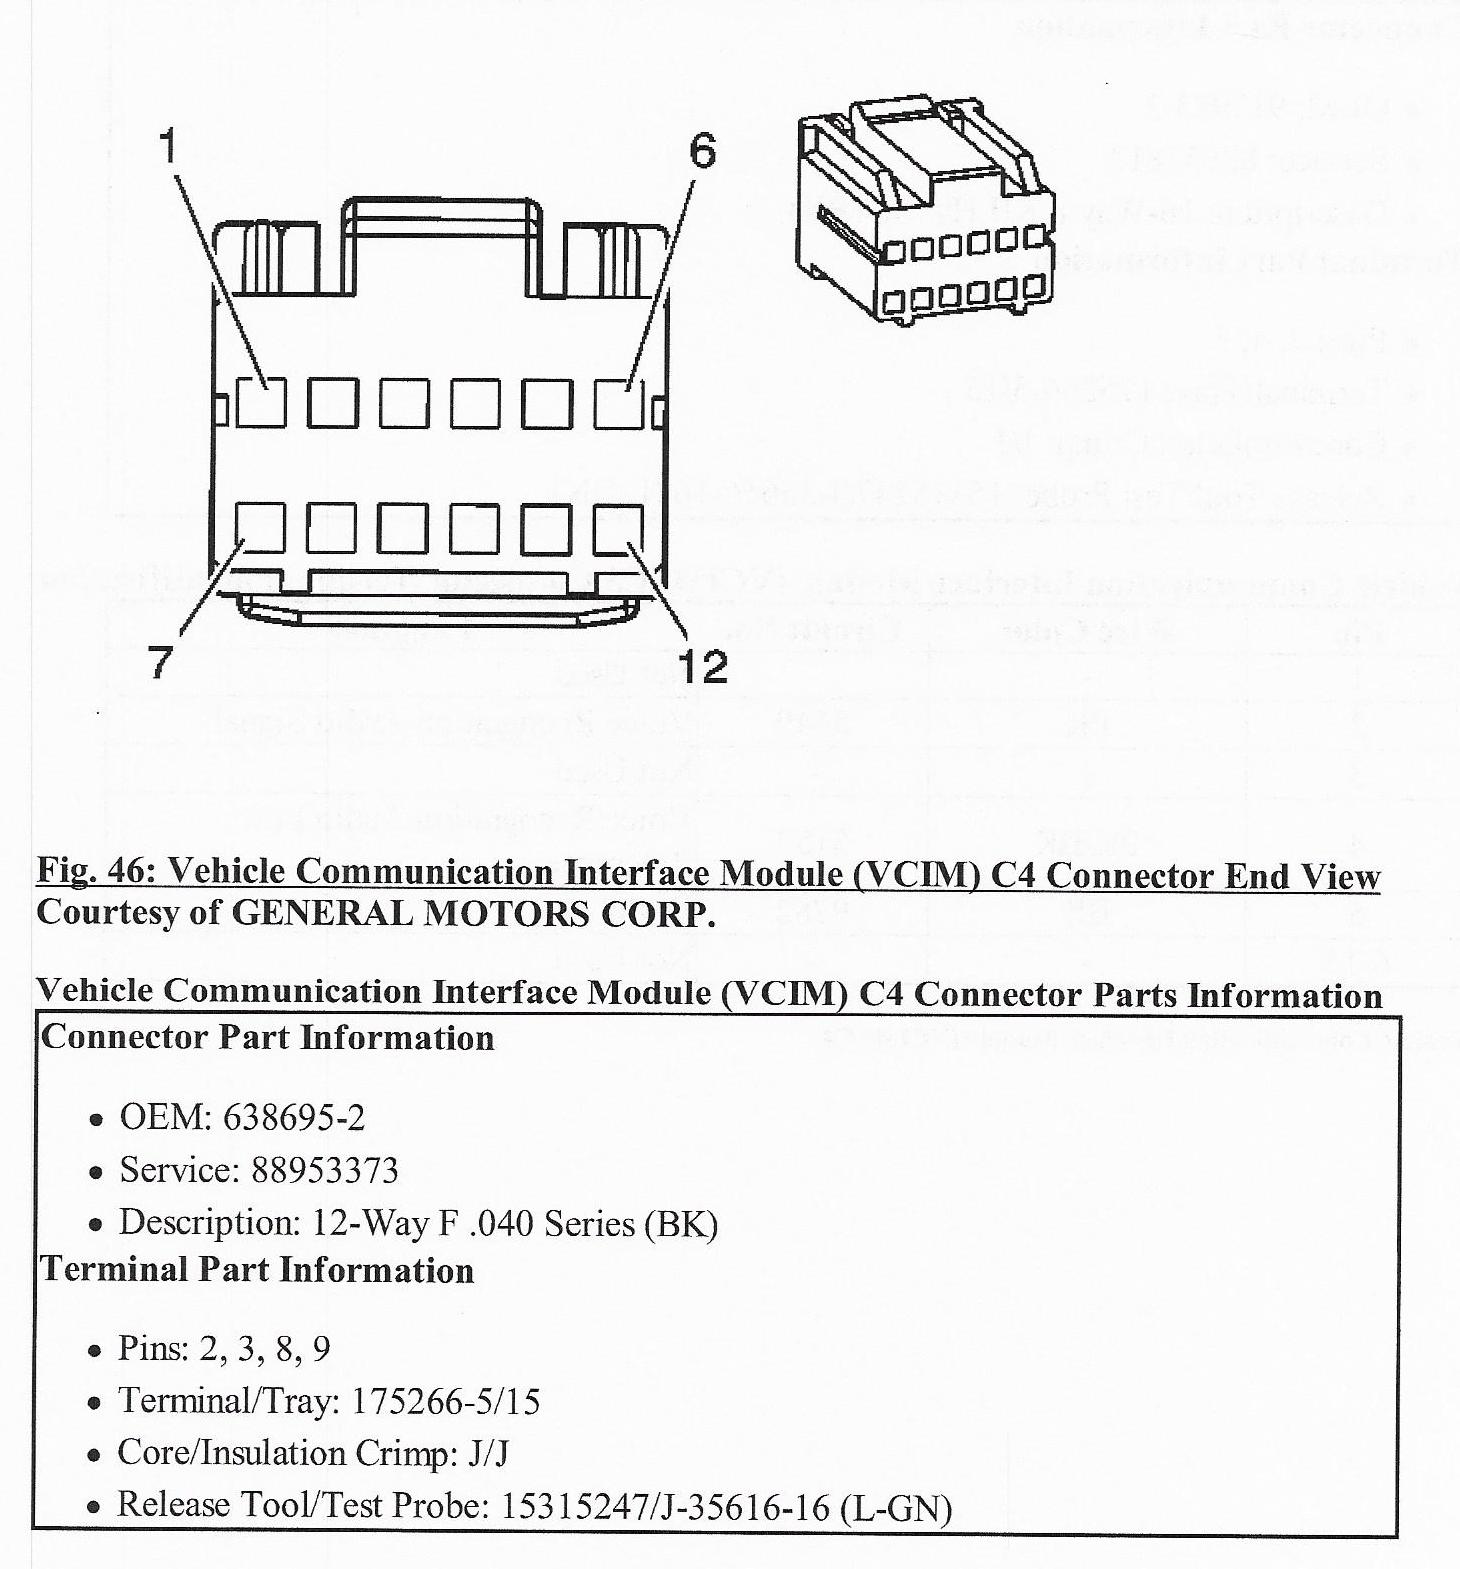
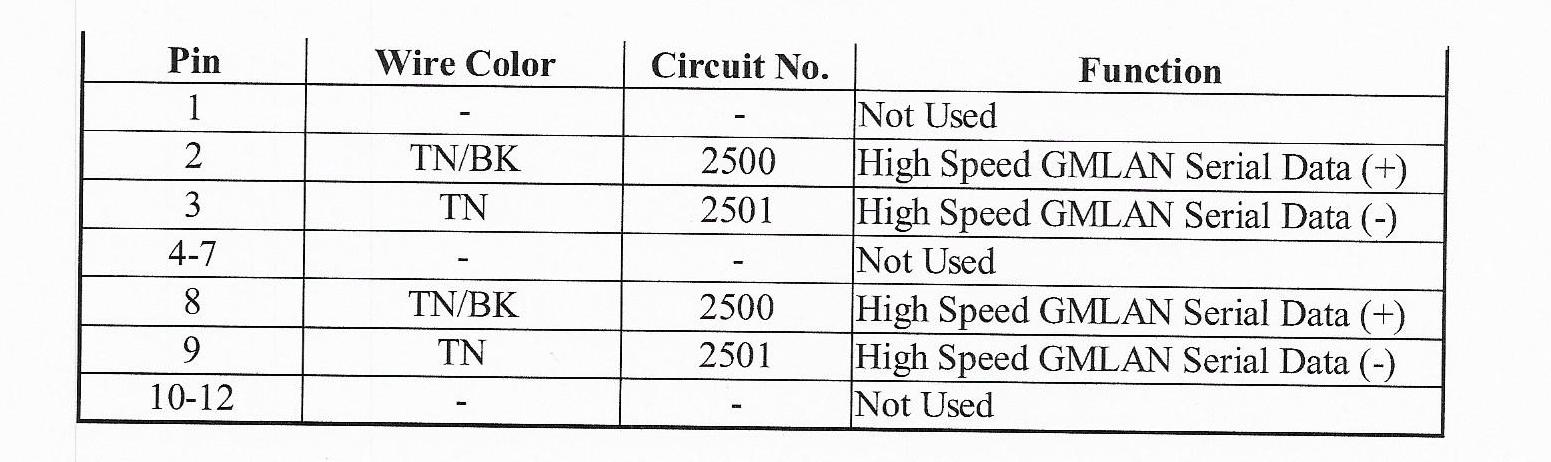
install a used VCIM from another vehicle. ALSO, note that Connector 4
(which plugs into J4 on the module) passes the GMLAN communications signal
through the module. For those of you thinking about removing the Onstar
module for privacy reasons, you CANNOT remove Connector 4 without jumping Pins 2
and 3 and Pins 8 and 9 - the car will not run without Connector 4 in
place. But this website is about Adding Bluetooth, so you MUST have the
VCIM powered up for Bluetooth to operate. There is a VCIM Addendum below to
show the wiring details.
2. The RADIO
For factory Bluetooth to work, you need a
radio that is compatible with the steering wheel voice controls and the
Bluetooth VCIM. This means you will need at least a radio out of a 2009 or
later C6 Corvette. An excellent choice is the factory USB Nav radio from a
2011-13 Corvette. This radio (GM part number 20856087) is not only
compatible with the Bluetooth functions, but it also provides both a USB and an
auxiliary input via a 3.5mm jack in the console, very nice features indeed for
connecting your music device to your audio system. This USB Nav radio can
be installed in any C6 Corvette, whether or not your car is equipped with a
factory Nav or non-Nav radio. Here is the link to the website page for
installing the USB Nav radio:
http://www.kawal.net/USB%20Nav.htm
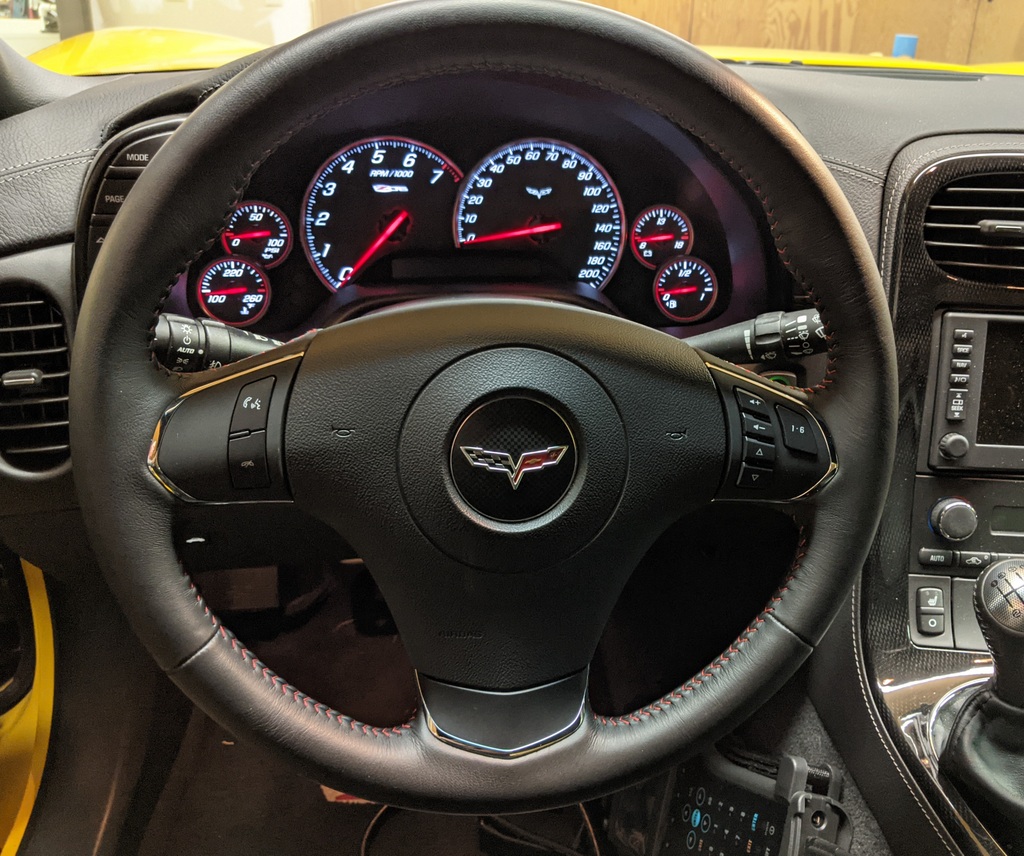
3. The STEERING WHEEL
Since you likely wouldn't be reading this
if you already have factory Bluetooth, I'm guessing your car doesn't have a
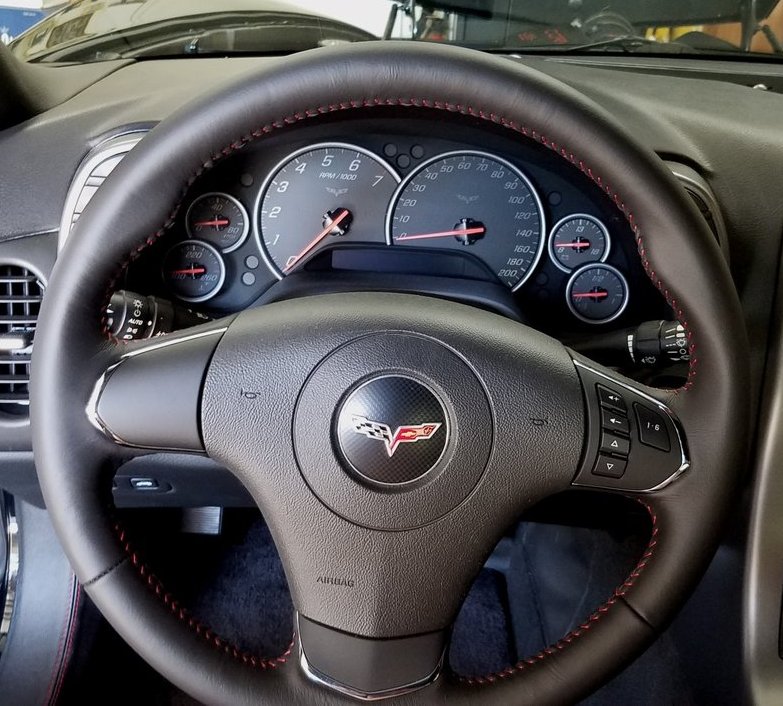
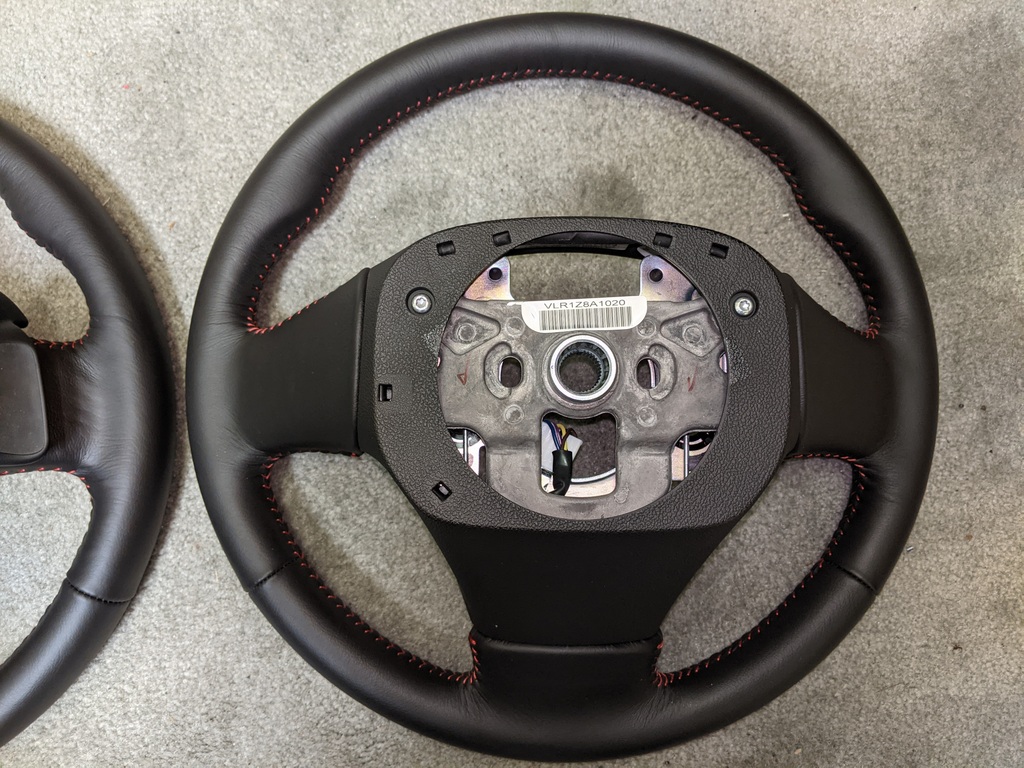
steering wheel with the voice control buttons on the left. Here is a 2012
steering wheel without the voice control buttons:
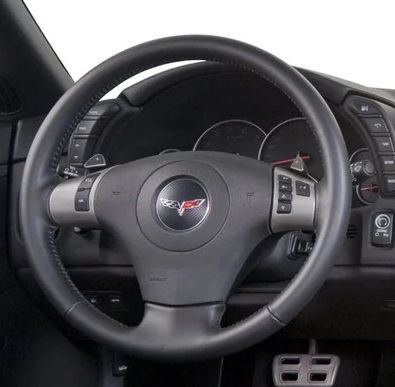
Here is an earlier style steering wheel
without voice controls:
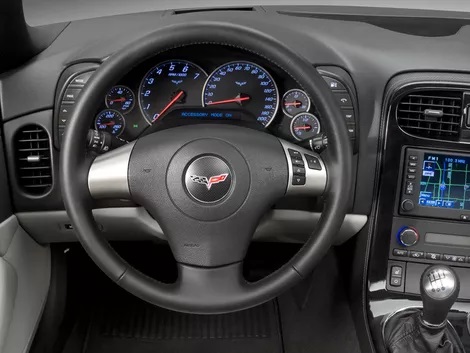
Yours is likely one of the above two
styles.
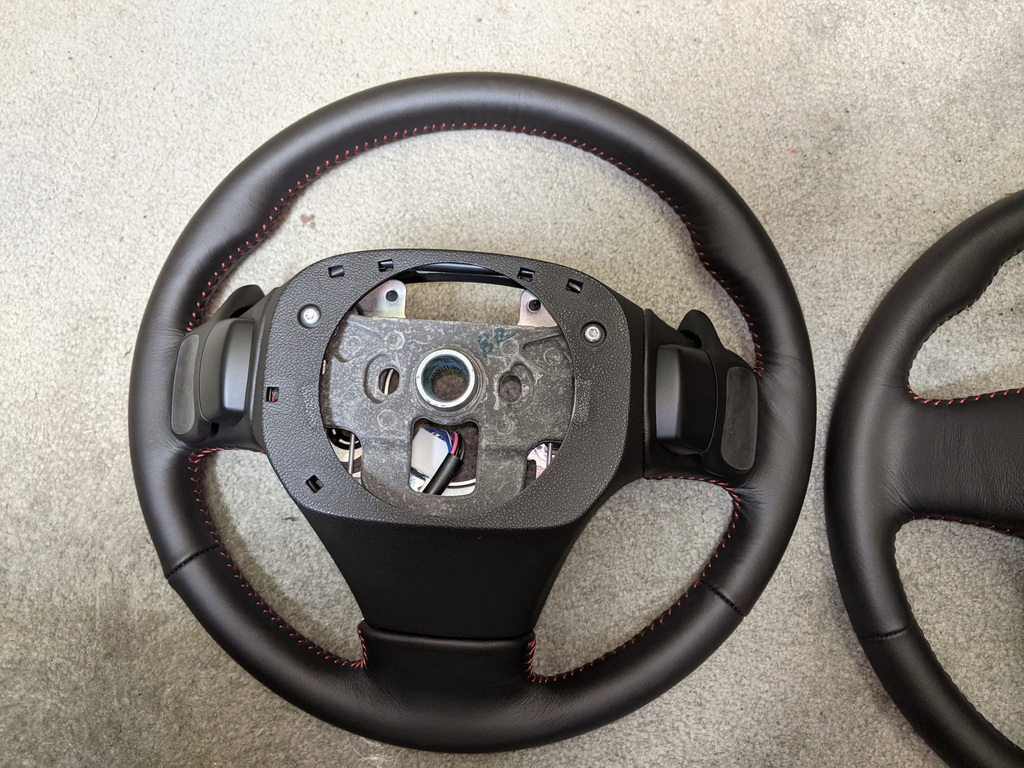
But you need one of these, with voice
controls:
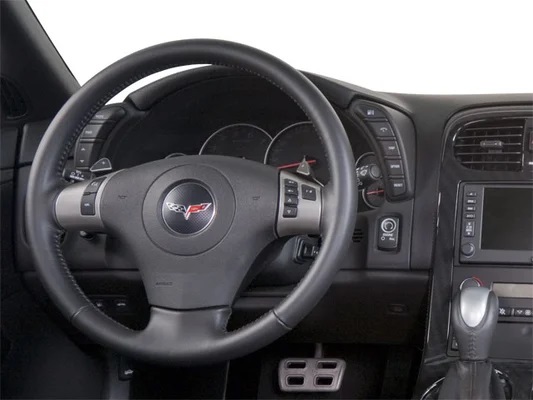
If you have an automatic transmission, with
paddle shifters, you'll need the above version with the paddles.
By far, the simplest way to get the
steering wheel compatible with Bluetooth is just to upgrade your steering wheel
to one with voice controls. Choose one with the features you need (with or
without paddles) and the color and texture of leather you want. Any
steering wheel with voice controls will work.
If you want to keep your original steering
wheel, it's possible to add voice controls. There are clever ways to do
this, because all the voice controls do is add a couple of switches and
resistors to signal the radio to connect to Bluetooth. One savvy owner
even programmed his steering wheel controls to do different functions than
originally intended. And you could add small push buttons on the back of
the steering wheel to control Bluetooth. For most owners, however, you
will at least need the left hand voice control switch assembly (GM part number
25862864). You will then need to either modify your right hand radio
switch or buy a new switch (GM part number 25862865) with the additional pin
connector. Finally the steering wheel harness will have to modified to
connect the left and right switches. These harnesses are unfortunately not
available to purchase from GM, so you need to find a suitable used one or figure
out a solution yourself. The RPO option code for Bluetooth is UPF.
A Steering Wheel Addendum is provided below showing the wiring
schematics for non-Bluetooth steering wheels and Bluetooth steering
wheels. Also shown in the addendum are details for removal and
modification of your steering wheel.

There are lots of used C6 steering wheels
available in the pre-2012 style. Find one you like with voice controls and
you're set. Just be sure it matches your transmission with or without
paddles. Some owners have used a paddle shift steering wheel with a manual
transmission by removing the paddles - that works. And you can rob another
used steering wheel for the controls and wiring harness to modify your own -
that works too. For the late style 2012/13 steering wheels, you will
likely have a problem finding one. They have been discontinued by GM and
unless they bring them back, there are none available in the entire country.
4. The Onstar Microphone
If you have this microphone you're all set:
If not, click HERE
for how to replace it to get much better performance.
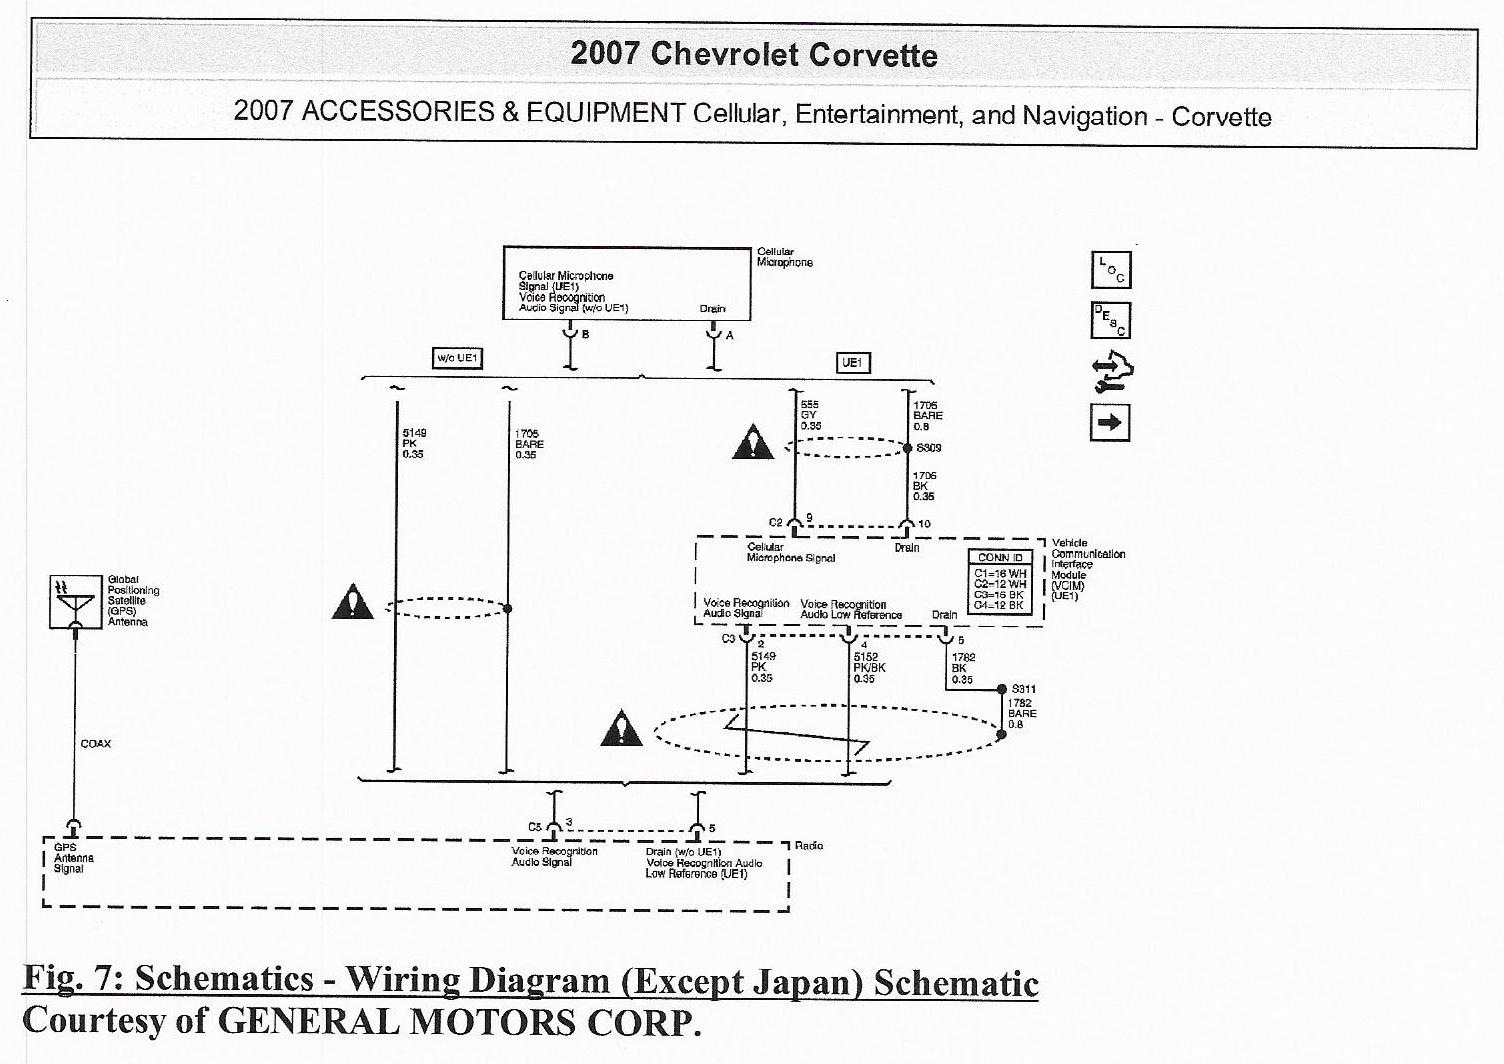
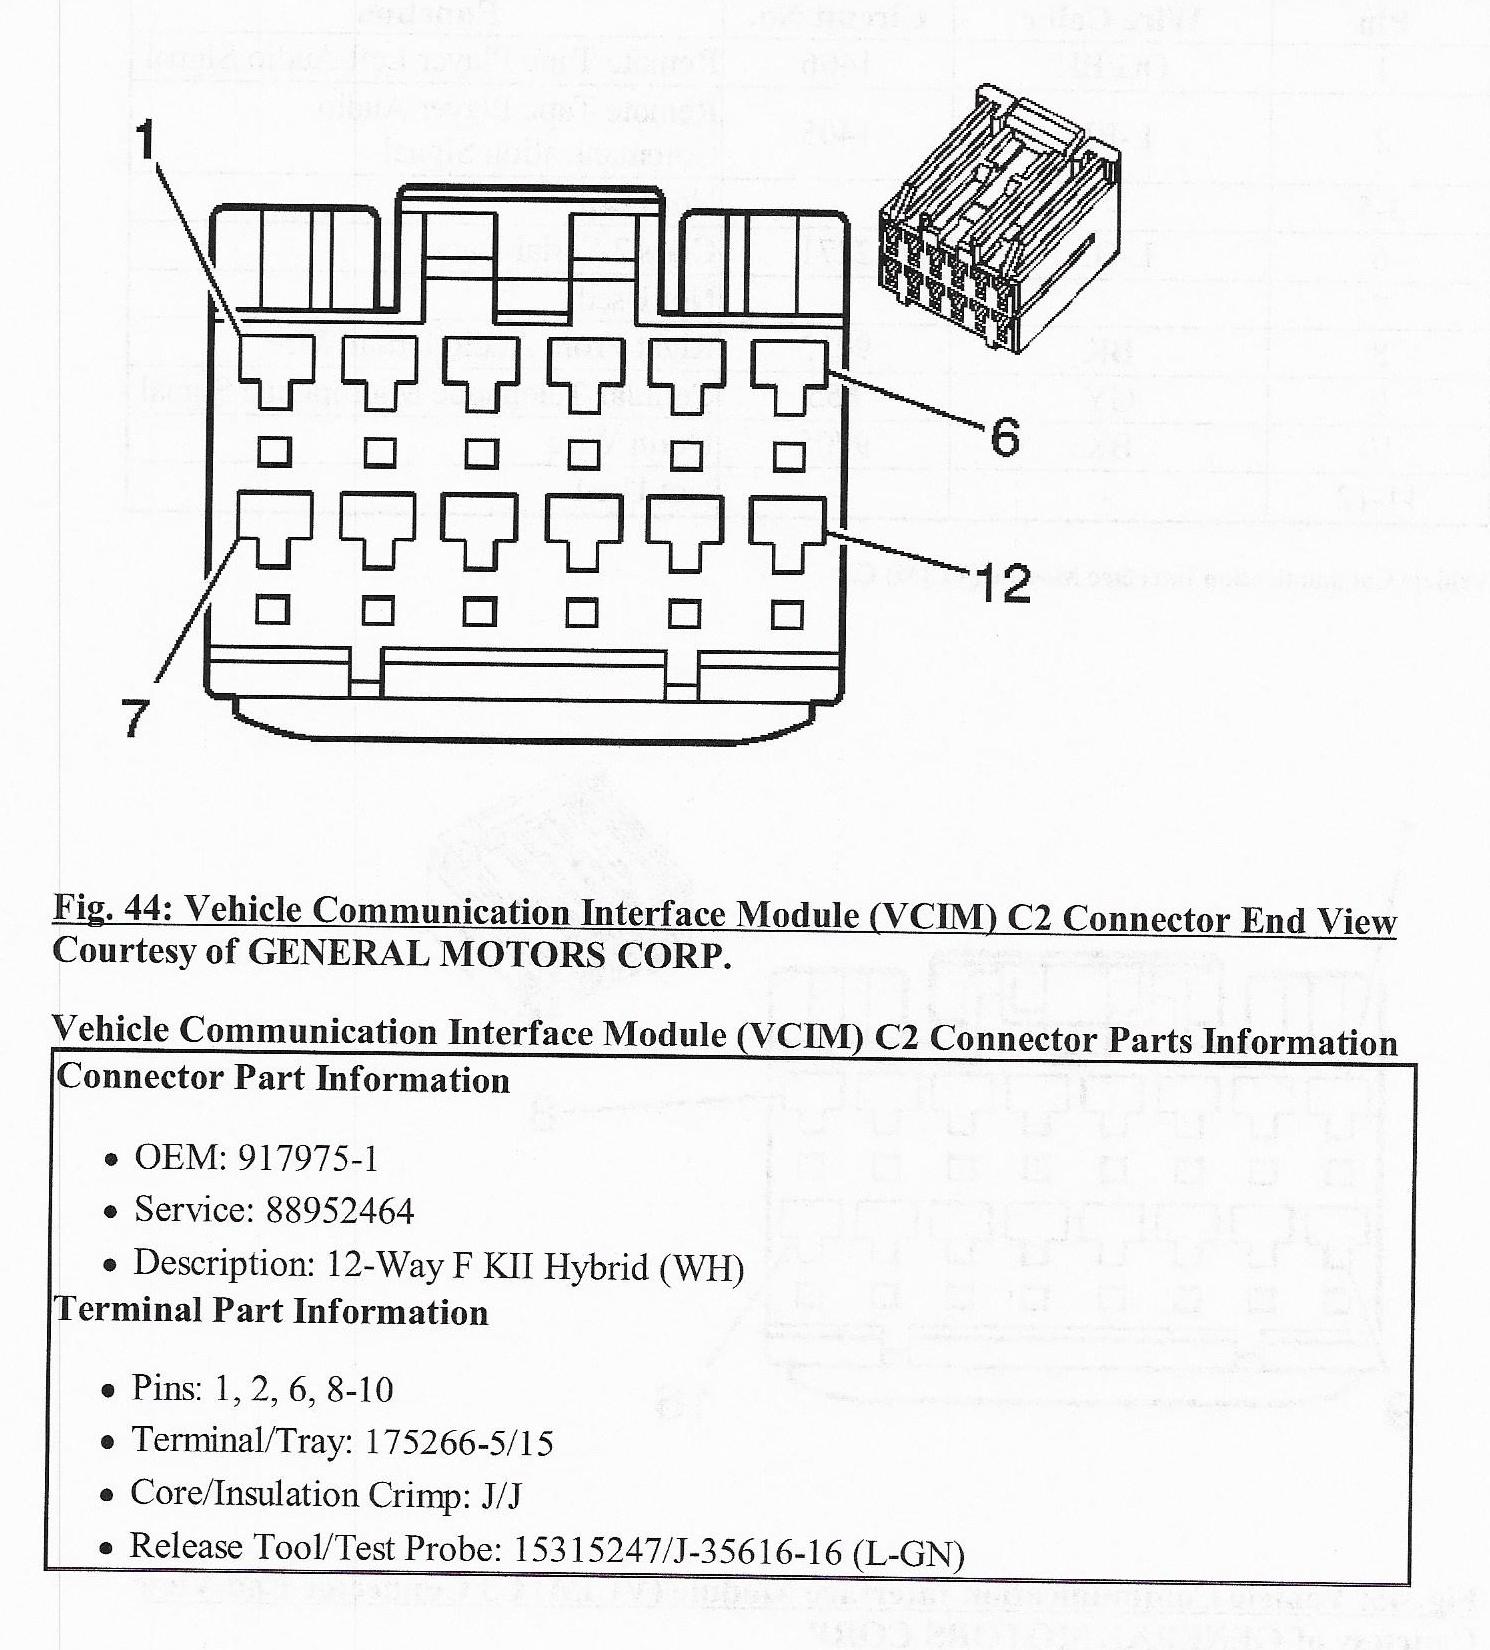
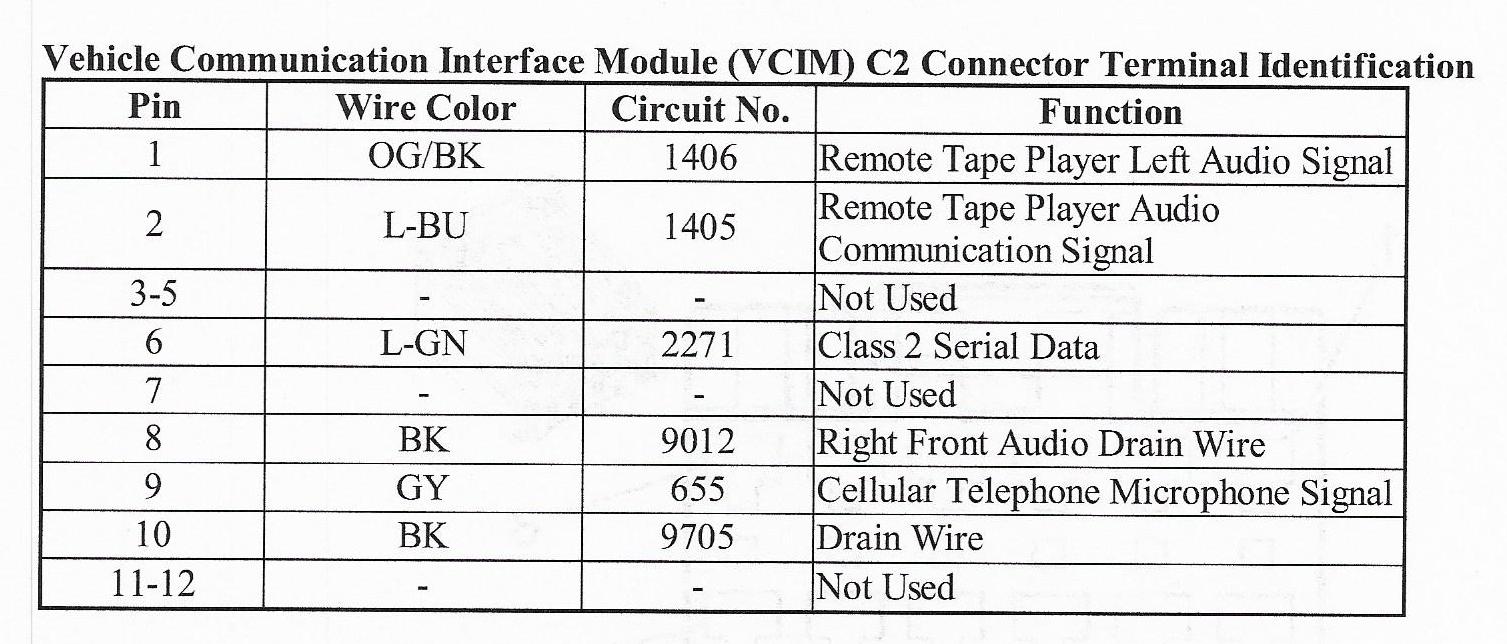
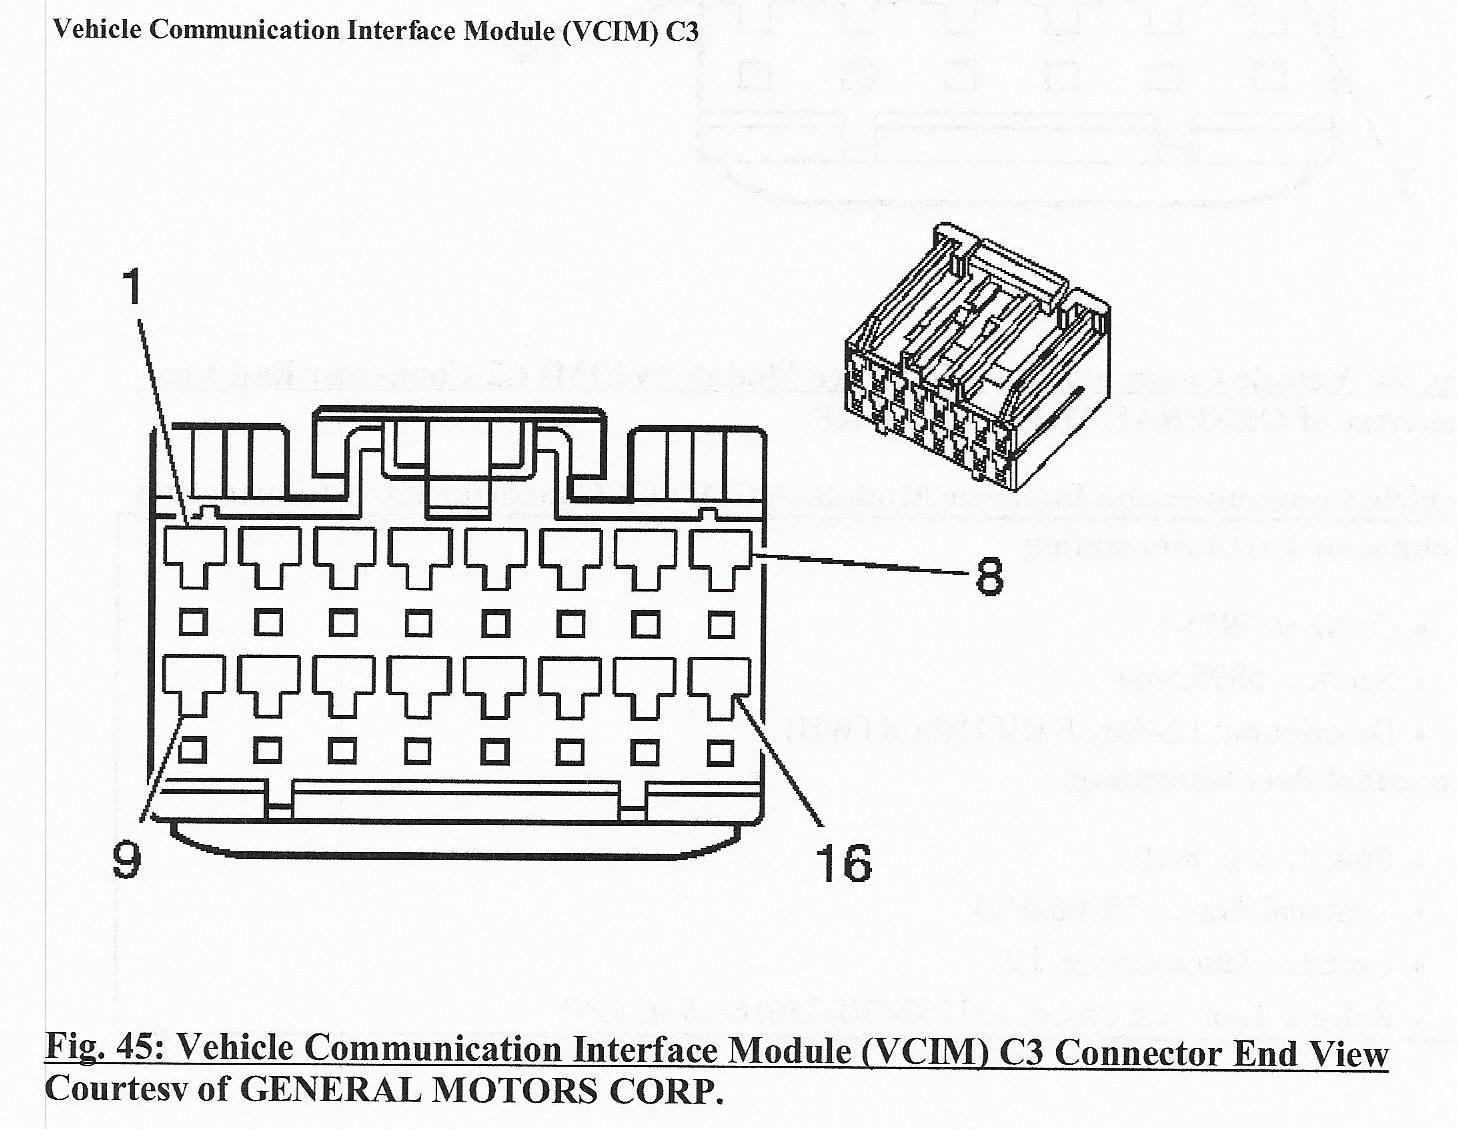
VCIM Addendum
Here are some schematics from the 2007
Service Manual for the VCIM wiring:


And here is the schematic for a 2013
Corvette:
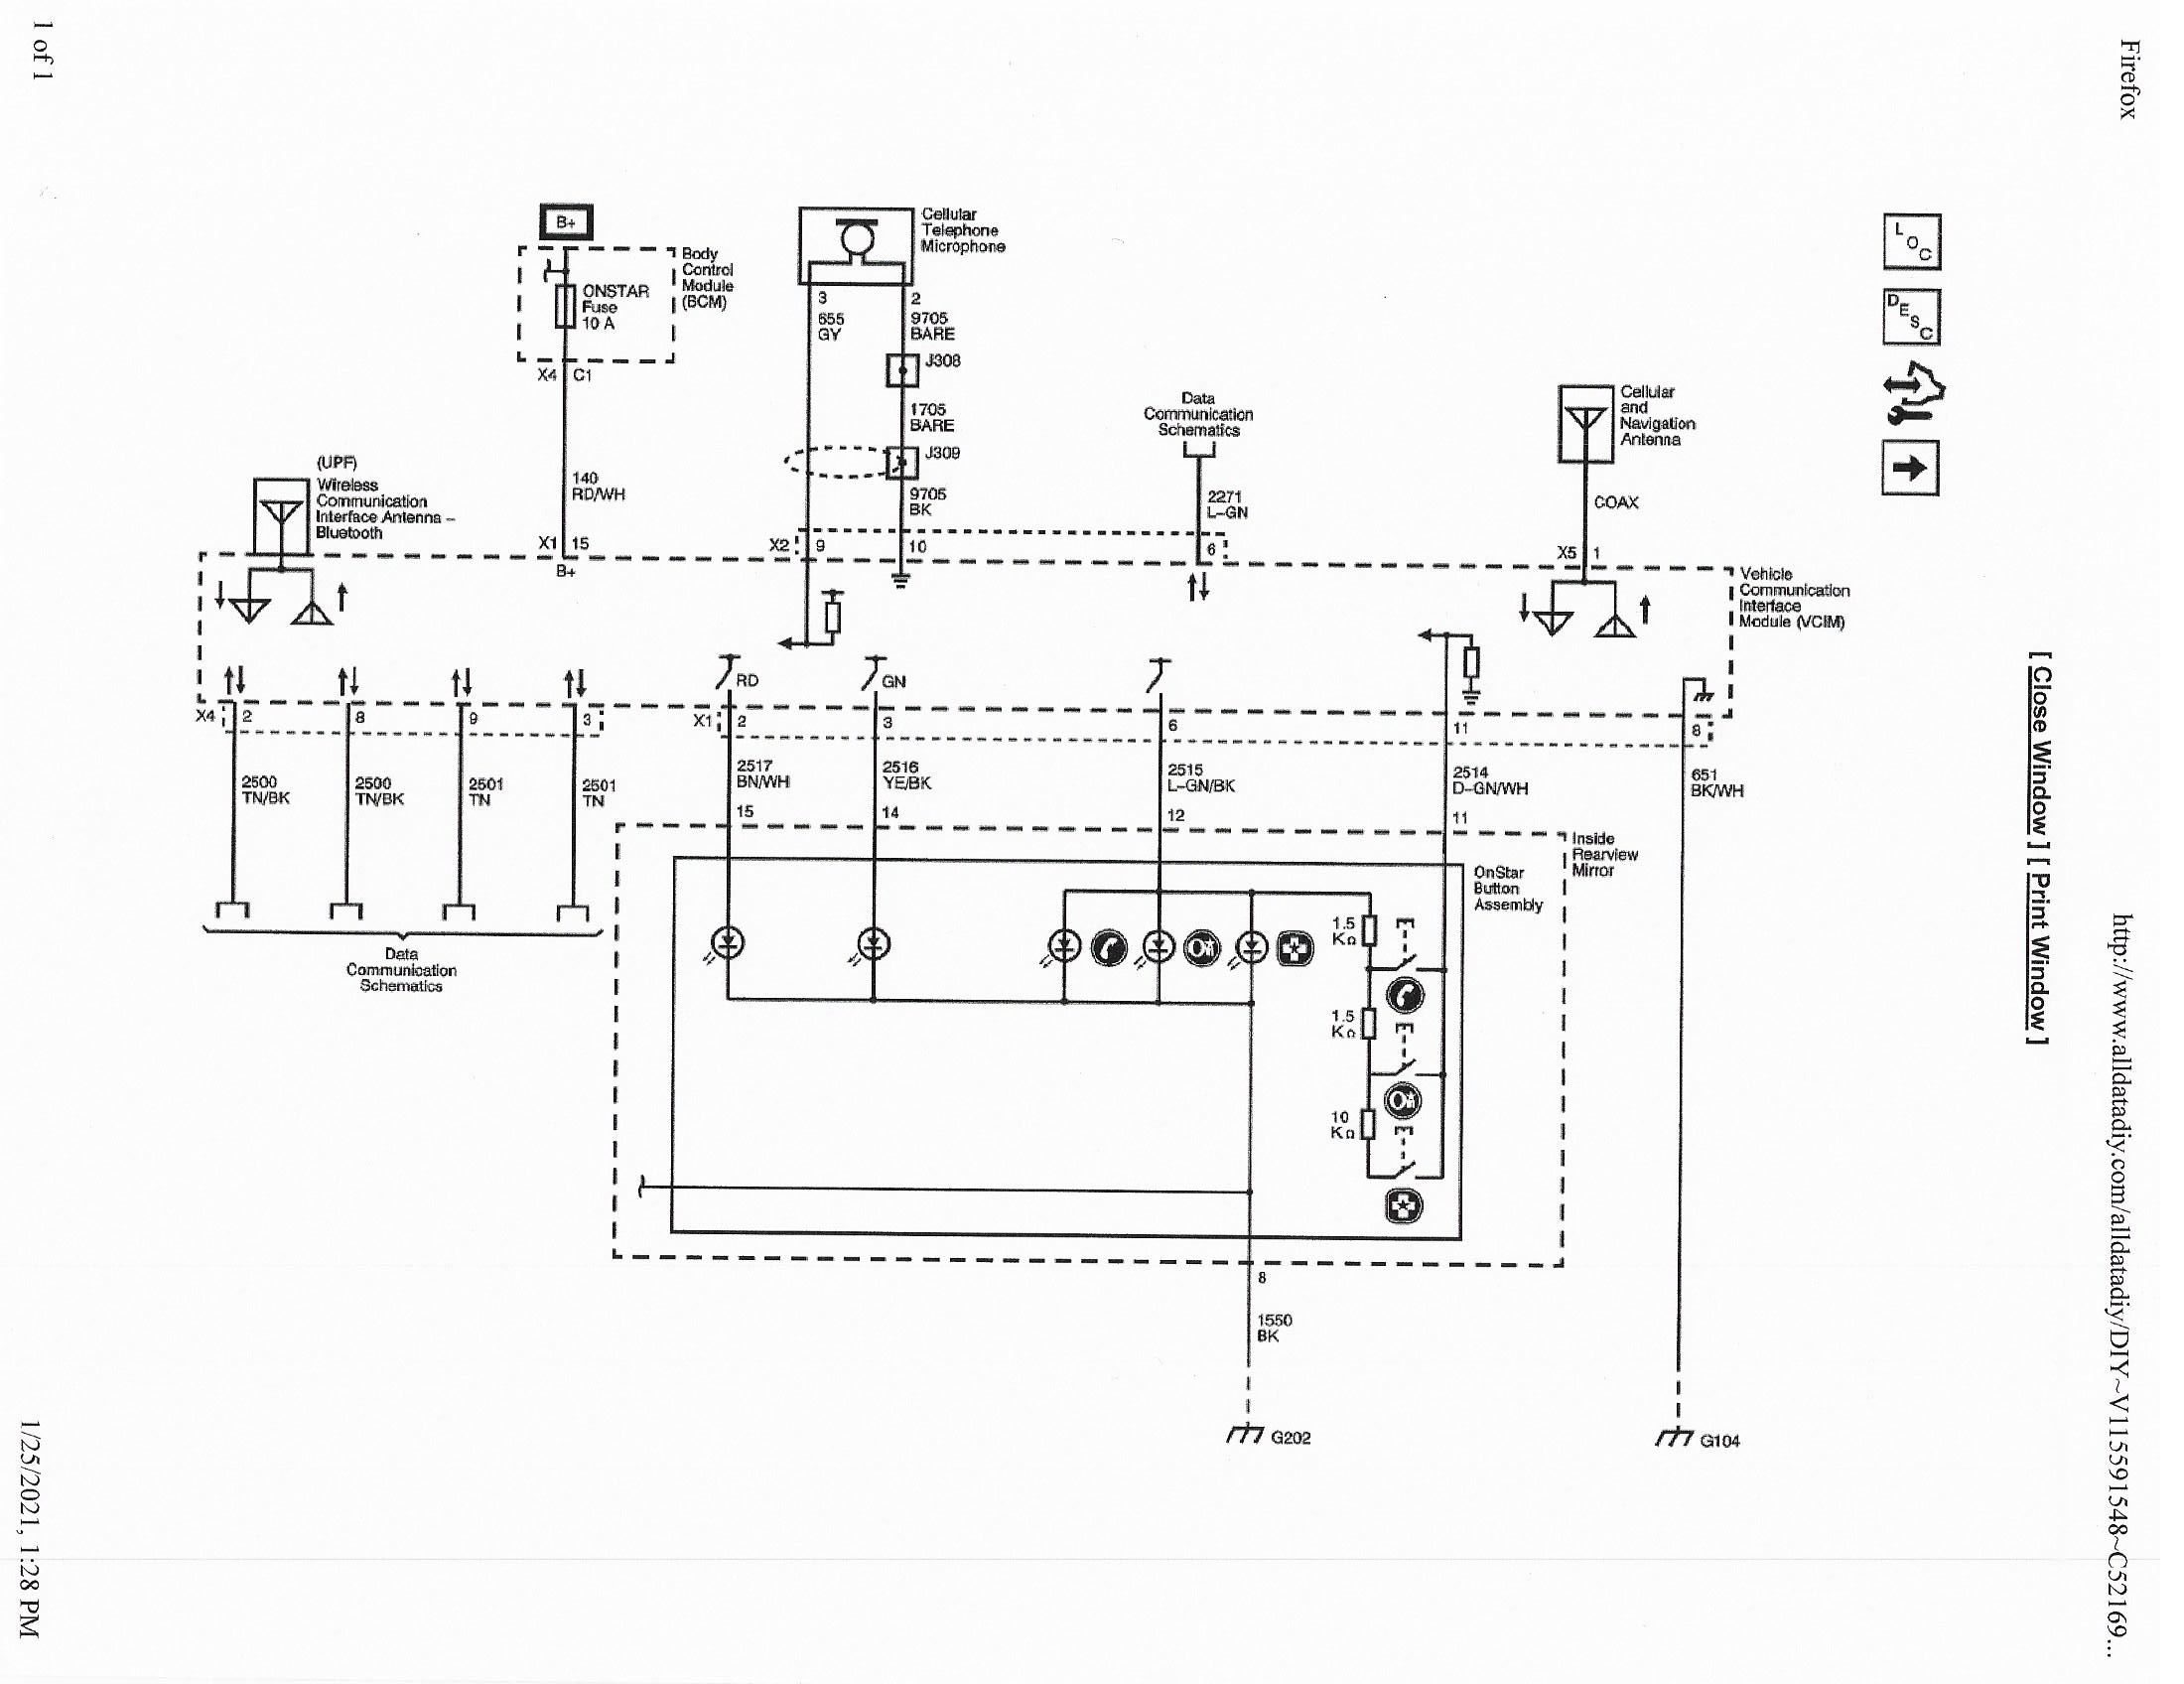
Note that the only difference between the 2007 VCIM and the
2013 VCIM wiring is the single coax cellular/GPS antenna and the addition of the
Bluetooth antenna
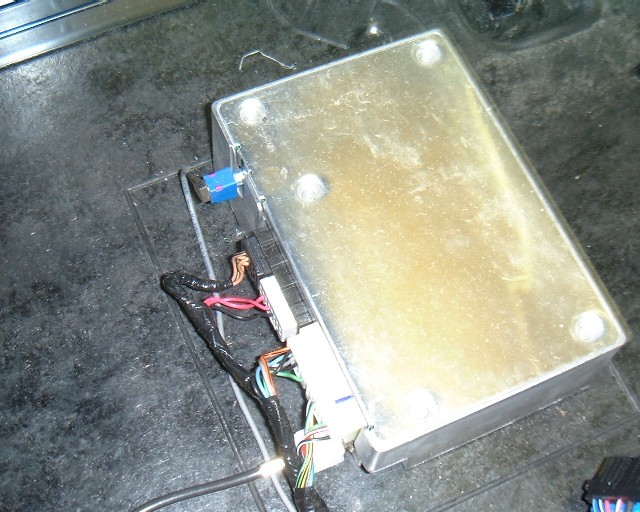
Replacing your Onstar Module
The earlier C6s have their Onstar module near the back of
your car
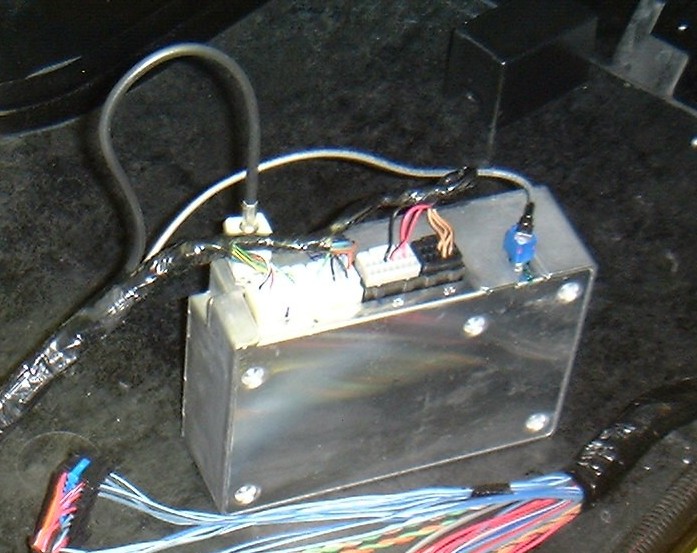
except for the Z06's, which had the VCIM under the
passenger seat. Here's a photo of my module from my Z06:
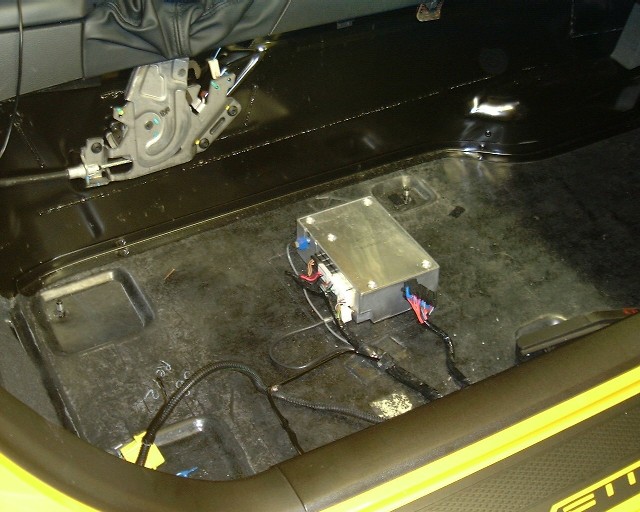
I moved it when I installed power seats to the location of
the Onstar module in the later Corvettes, above the passenger footwell Fuse
Panel:

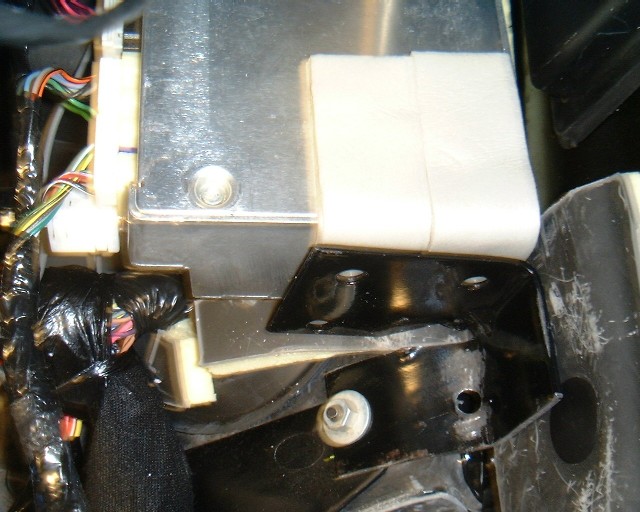
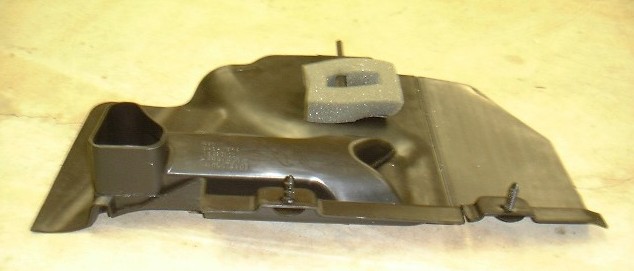
In the later Corvettes, a plastic bracket is used to hold
the VCIM in place:
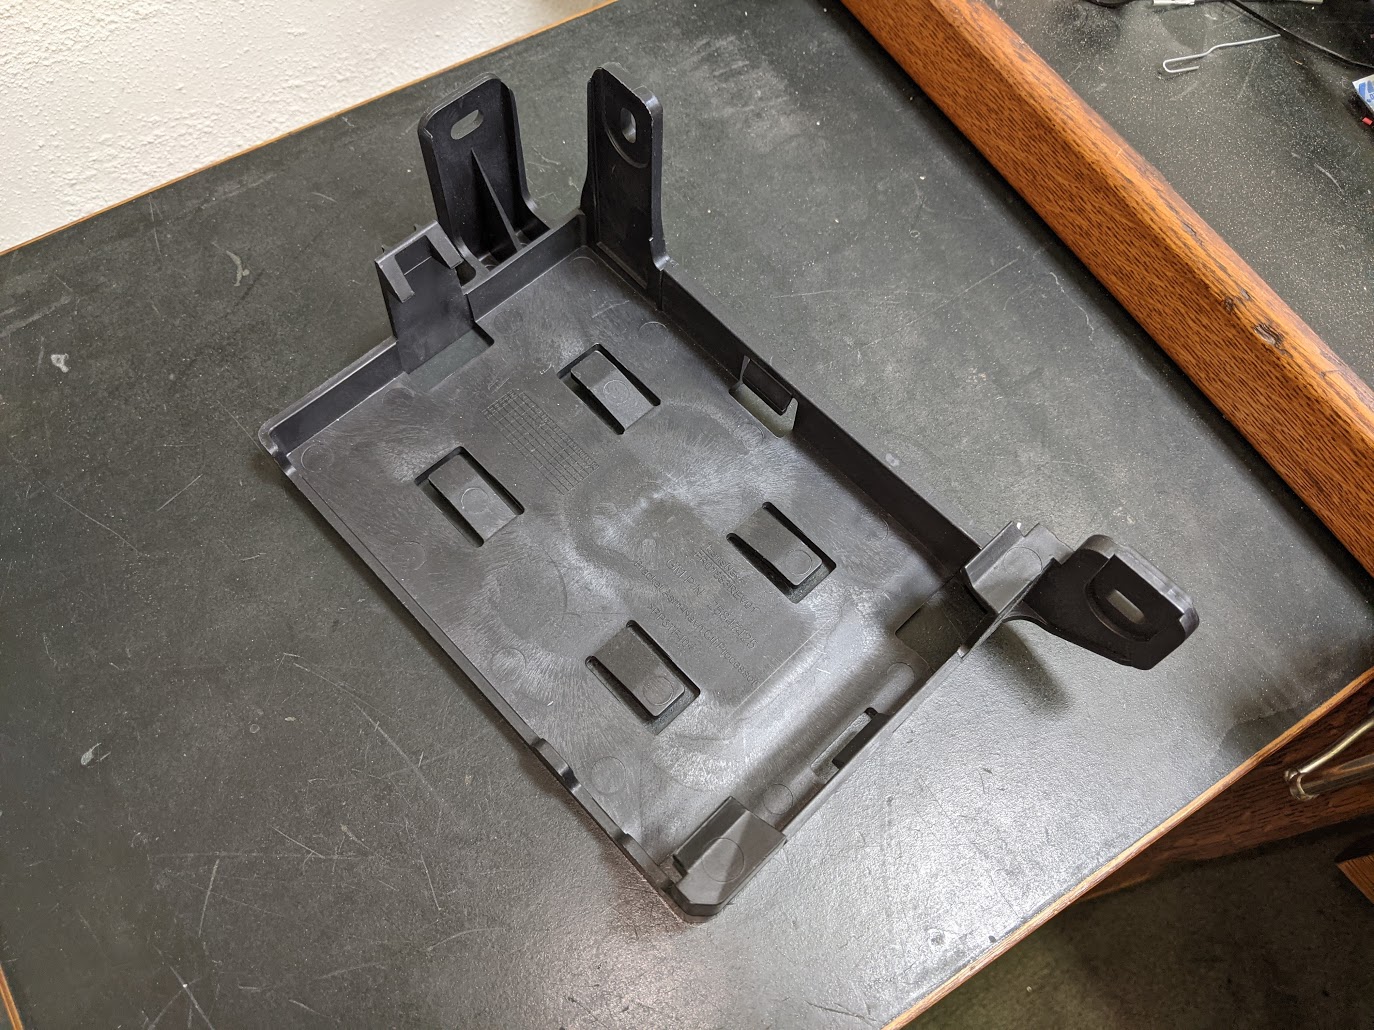
The newer Gen 8 and Gen 9 Onstar modules are thinner than
the old ones, so they will fit in this bracket.
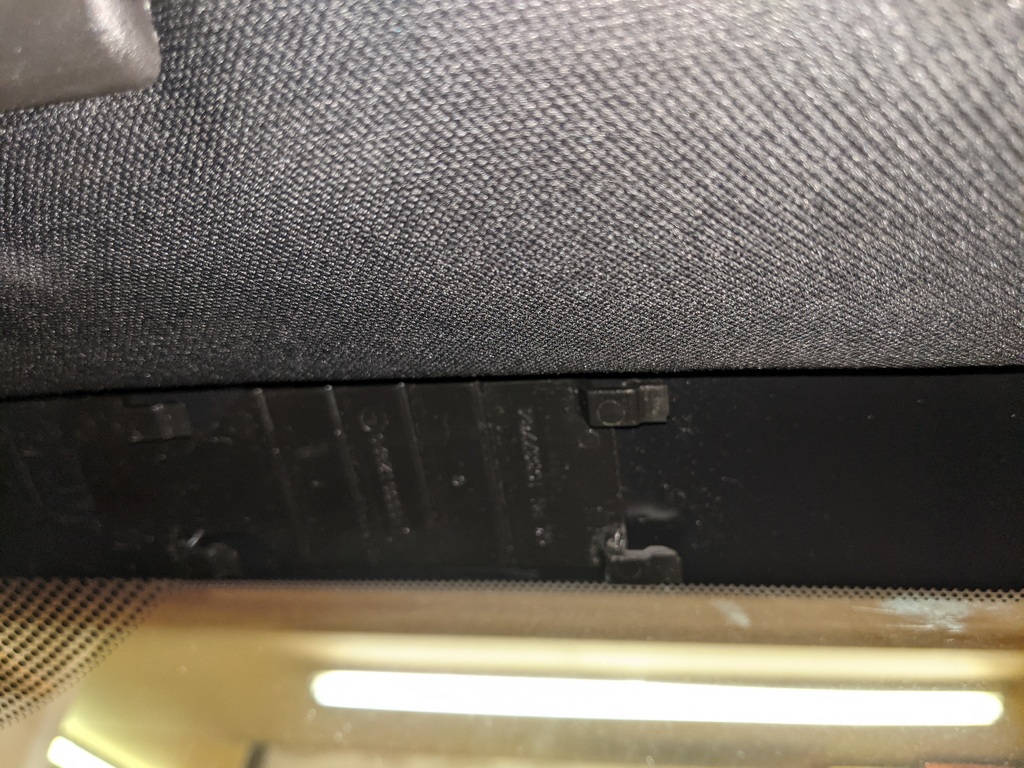
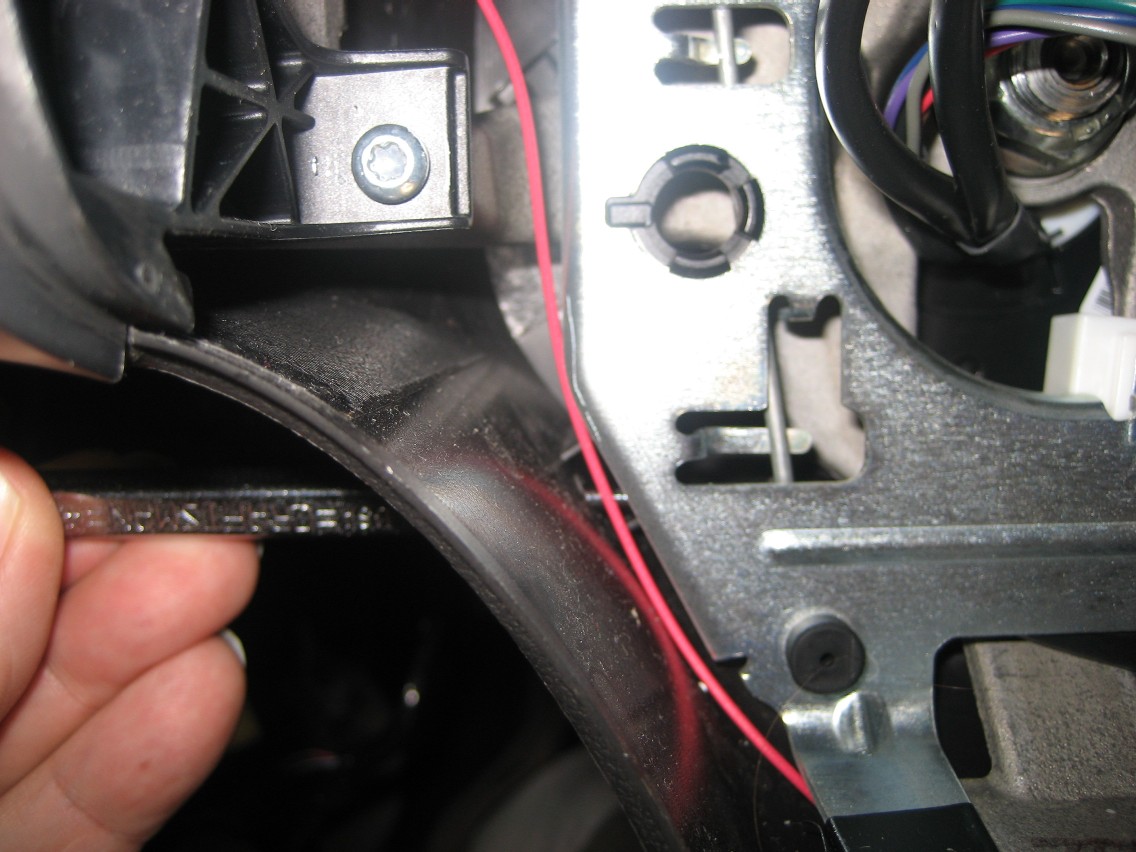
To have access to this area above the fuse panel, you will
need to remove the plastic panel with the light in it. Towards the top of
the photo below you will see a plastic pin. This locates the panel on the
firewall above the fuse panel. To remove the panel, use a flat tool to pry
down the two plastic fasteners shown near the bottom of the photo. That
will release the panel and let it fall. Disconnect the light from the
panel and remove the panel. You should now be able to see the Onstar
module area.
Wherever you find your module, unplug the four connectors,
then the two antennas.
A small screwdriver will help you separate the white
plastic connector cover on the cellular antenna.
The GPS antenna has a small latch.
Plug the four connectors into the new module with Bluetooth.
They cannot be inserted in the wrong place.
Connect the antenna wires to the appropriate location on
the new module.
If you have a Gen 9 module, connect only the GPS antenna
and you'll need to replace the windshield antenna with the newer single coax
antenna.
Note that these antenna connections are only necessary if
you plan to communicate with Onstar and perhaps subscribe to their services.
Steering Wheel Addendum
Here is the steering wheel controls
schematic for a 2007 steering wheel without voice controls:
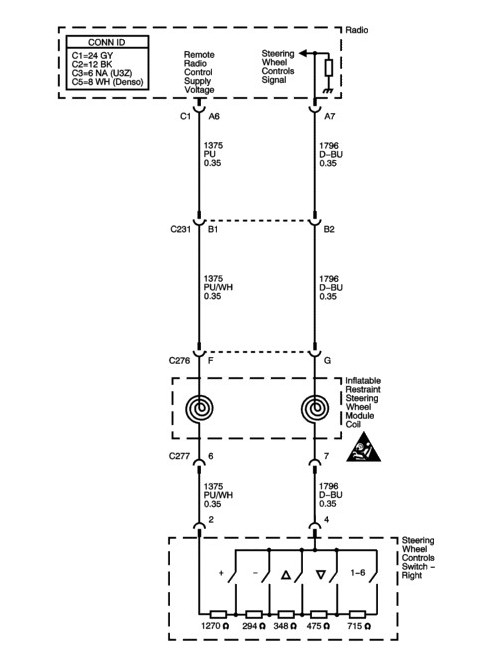
The wiring shown above was used in all 2007
and later C6 Corvettes without the UPF Bluetooth option. The right control
switch is GM part number 15942358.
In 2009, the UPF Bluetooth option was
added. For those Corvettes, the schematic below is used:
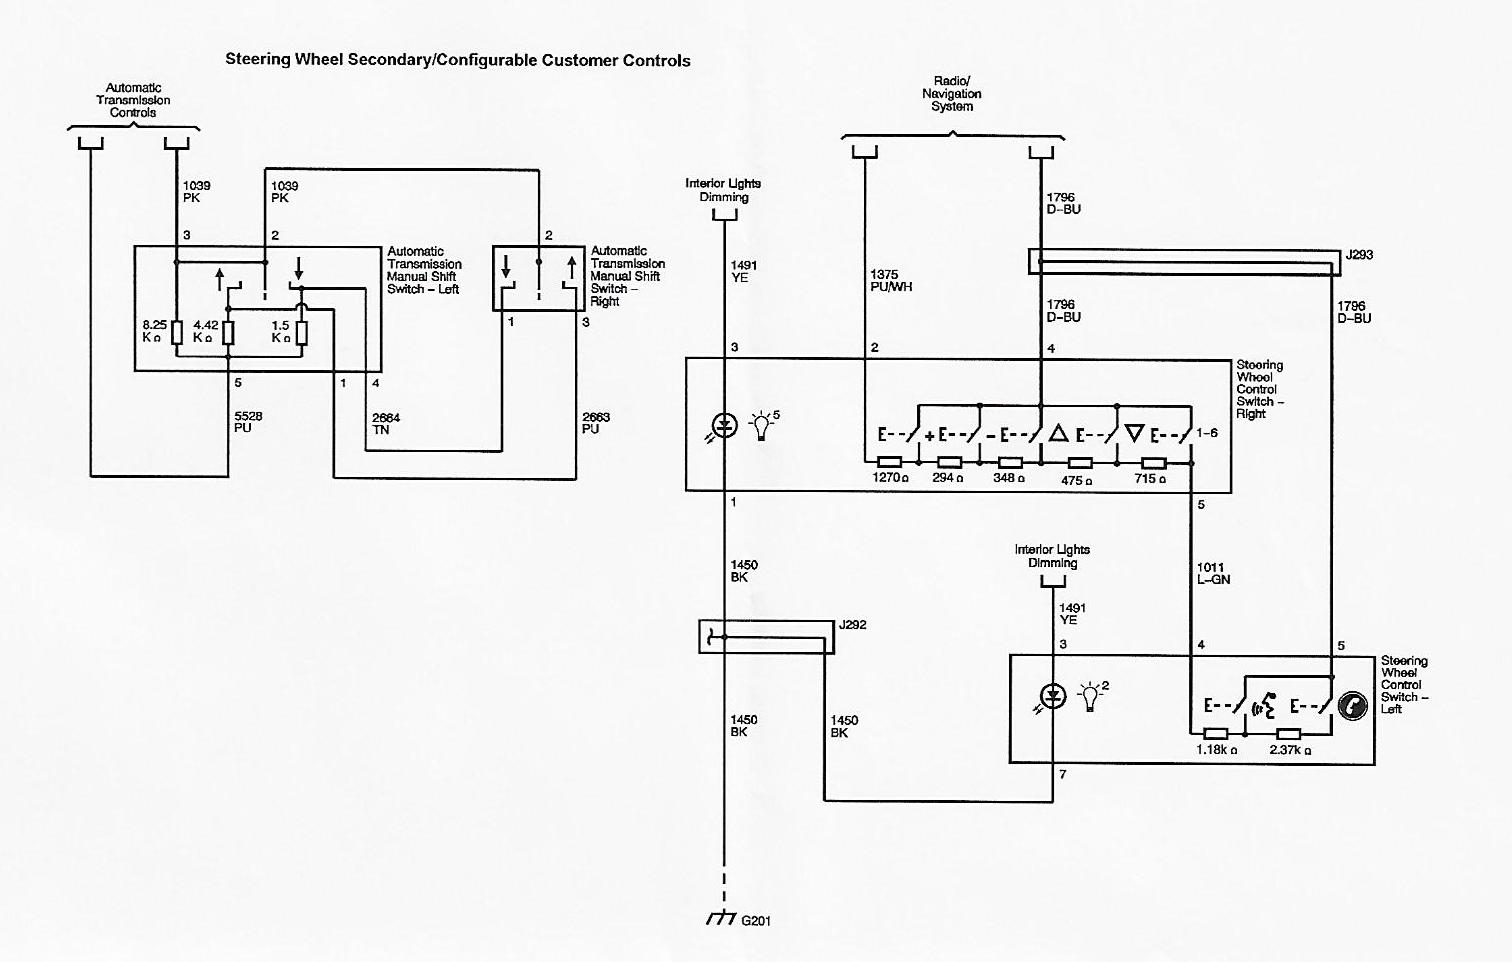
Note that in the non-Bluetooth steering
wheels (shown in the top schematic), the right (radio) control switch has a four pin
connector. But the
Bluetooth (Voice Control) steering wheels (bottom schematic) have a fifth circuit (5 pin connector)
necessary to tap into the resistor series. This allowed adding the second
(left) switch for voice controls by adding two more resistors to the
series. The 2009 radios were also upgraded to allow the reading of the
additional signals for the additional commands.
STEERING WHEEL REMOVAL
To replace or modify your steering wheel, here are a few
suggestions that the Service Manuals omit.
First you must remove the steering wheel airbag module,
so to be safe, remove the negative terminal on the battery or at least pull the
airbag fuse:
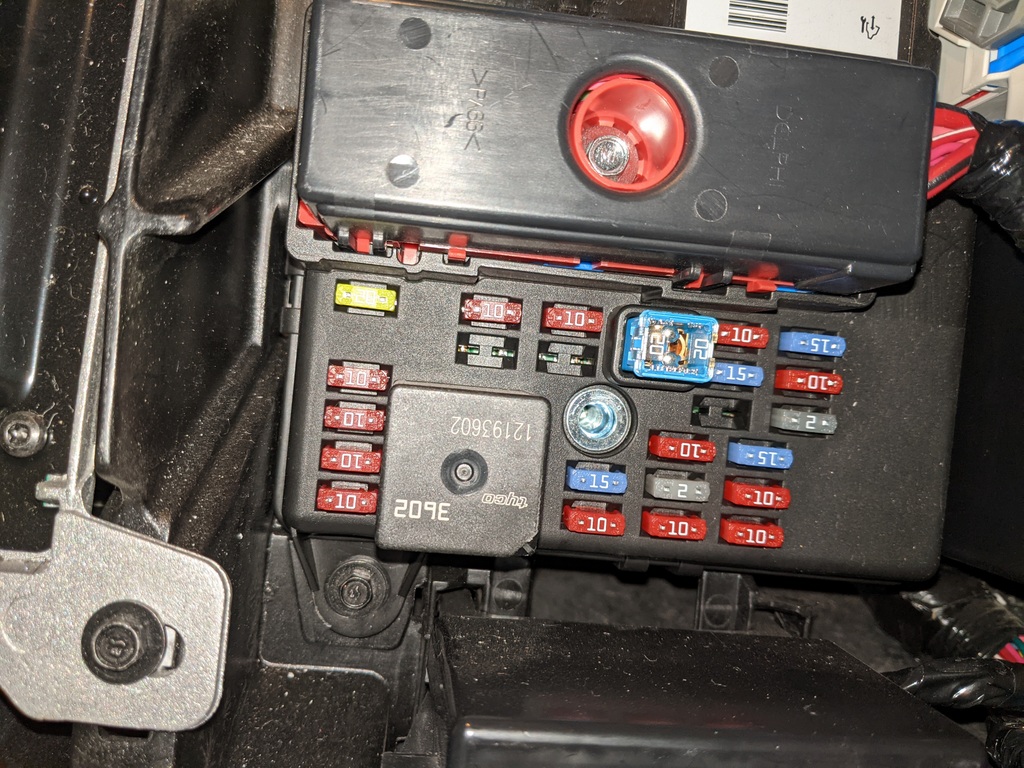
See the missing fuse towards the right, just below the blue
15 amp fuse - that's the Airbag fuse location.
Removing the airbag module is about a 30 second job, IF
you know how to do it - and the Service Manual isn't too clear.
First, point the steering wheel straight ahead and
you'll see some small holes on either side behind the steering wheel. The
manual says turn the wheel so one is at the top, but it's easier to keep it
pointed straight ahead.
You'll need a 5/32" or 1/8" punch or something
similar with a blunt end. Push the punch straight into the hole with it
level to the ground, but first here are some photos to show how the airbag
module is attached:
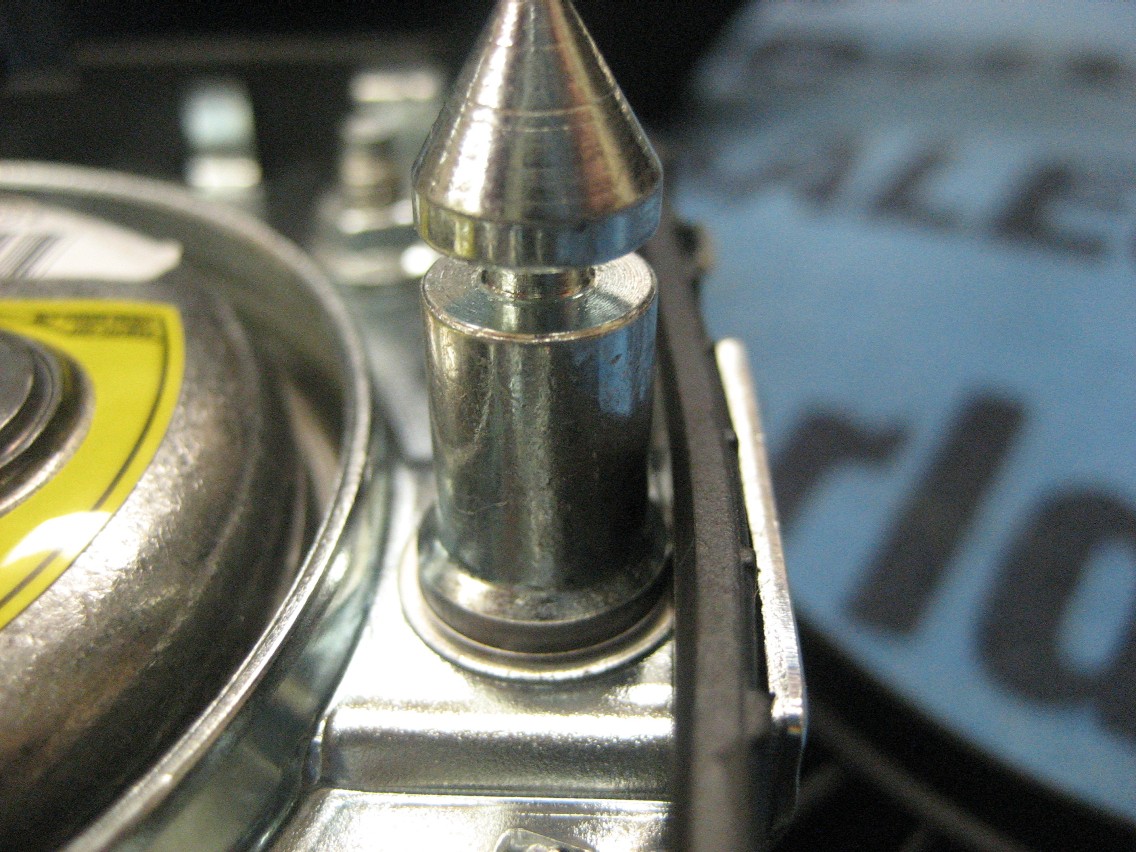
There are two of these locking pins on the airbag
module, one on either side.
As you push the airbag module onto the steering wheel, a
wire spring pops into the groove in the pin.
Here's the wire spring in the hole for the pin:
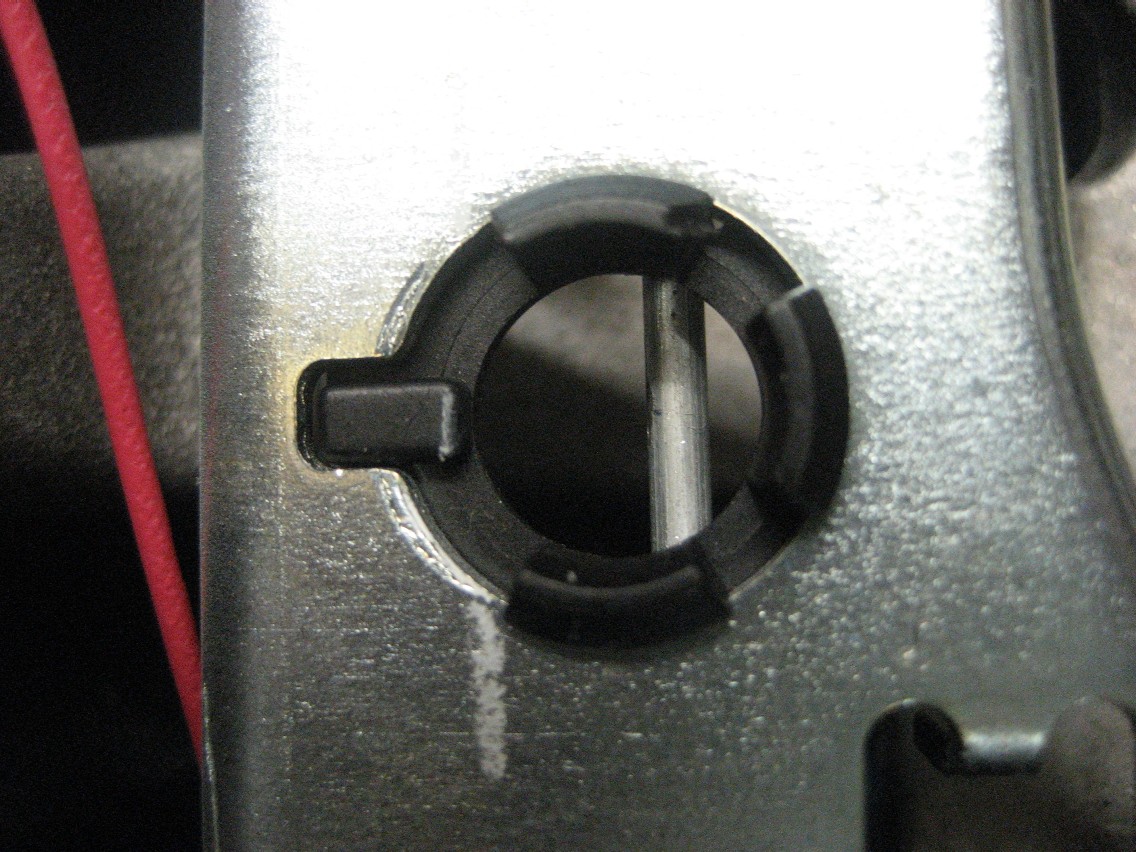
A view from further out:
To release the airbag, you must push the wire spring
towards the center of the wheel.
See the wire spring below the round hole? It's
been pushed to the right with the punch shown below..
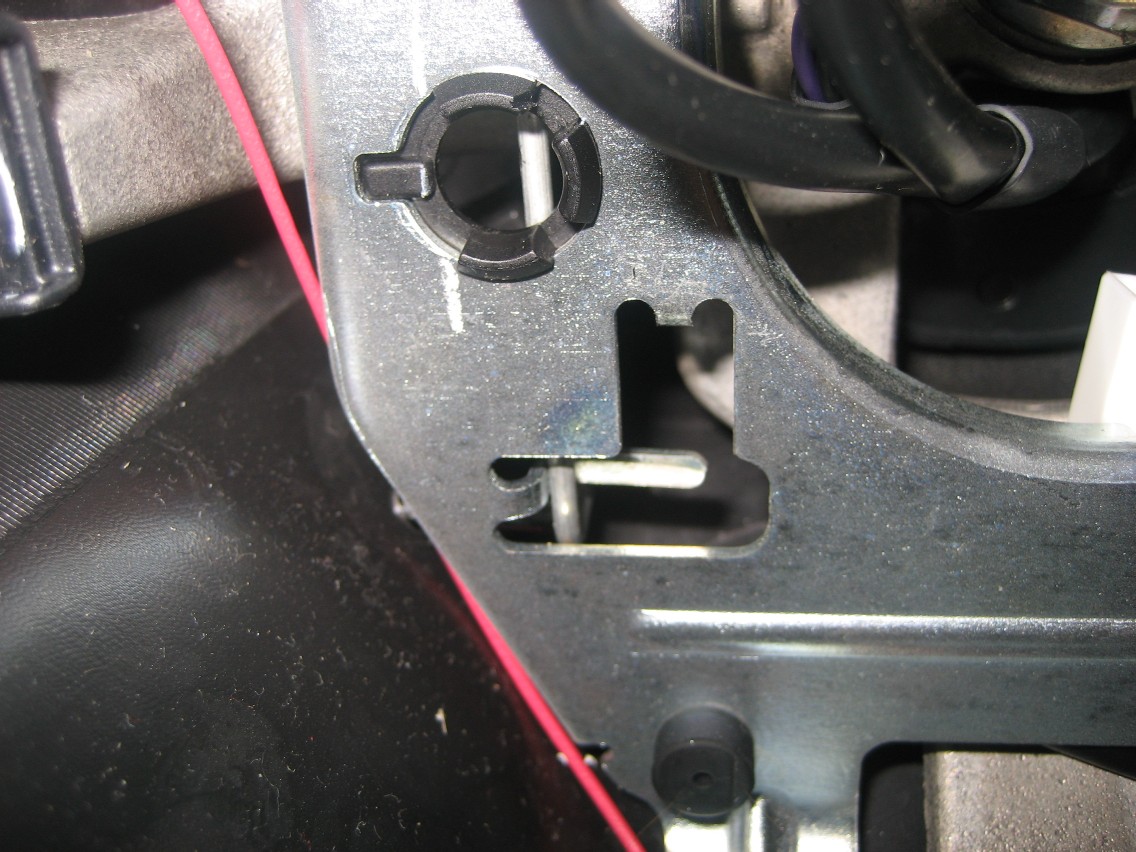
Here's a photo of the spring pushed, so the airbag can
be released:
Keep the punch horizontal, straight toward the center,
and you will push the spring to unlock the airbag module.
You'll have to feel around a bit with the punch until
you feel the spring.
Pull gently on the module on the side you release, then simply
do the other side the same way.
When you release the module, lay it face down in front of
you:
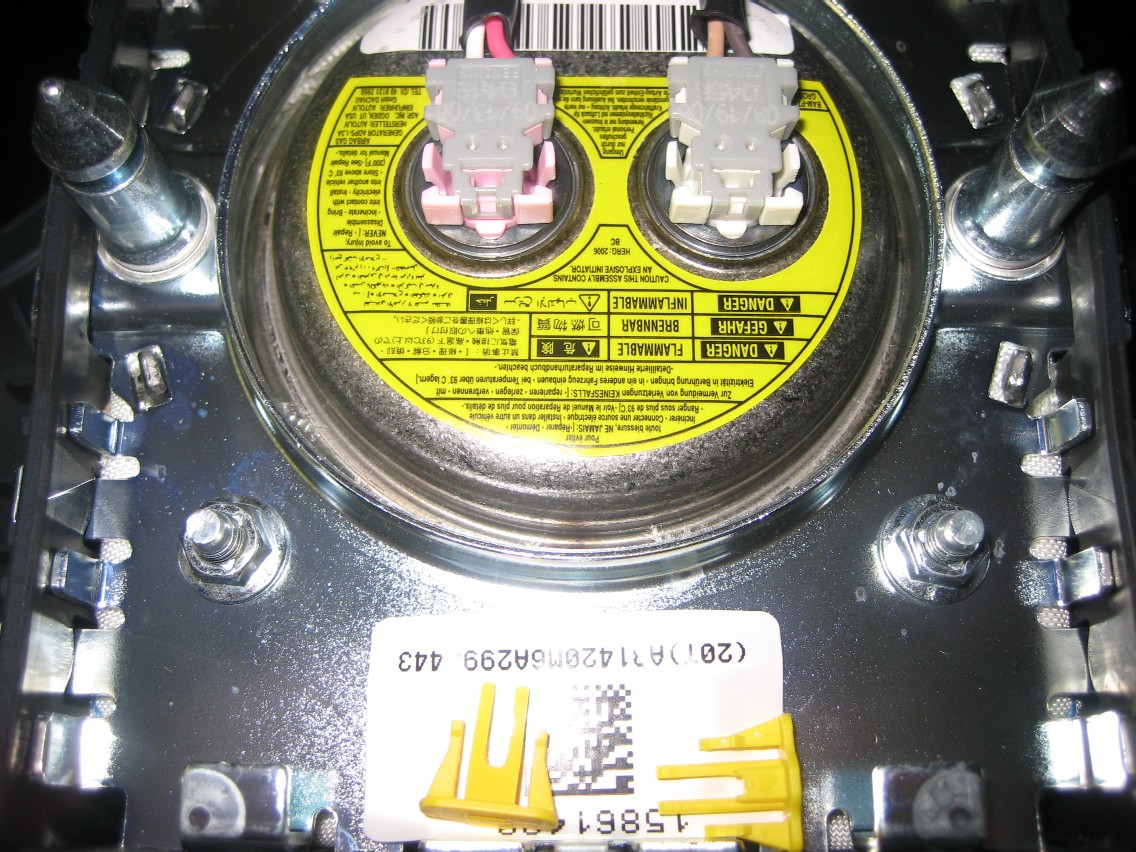
In the photo above, the yellow locks have been pried up
from the two connectors.
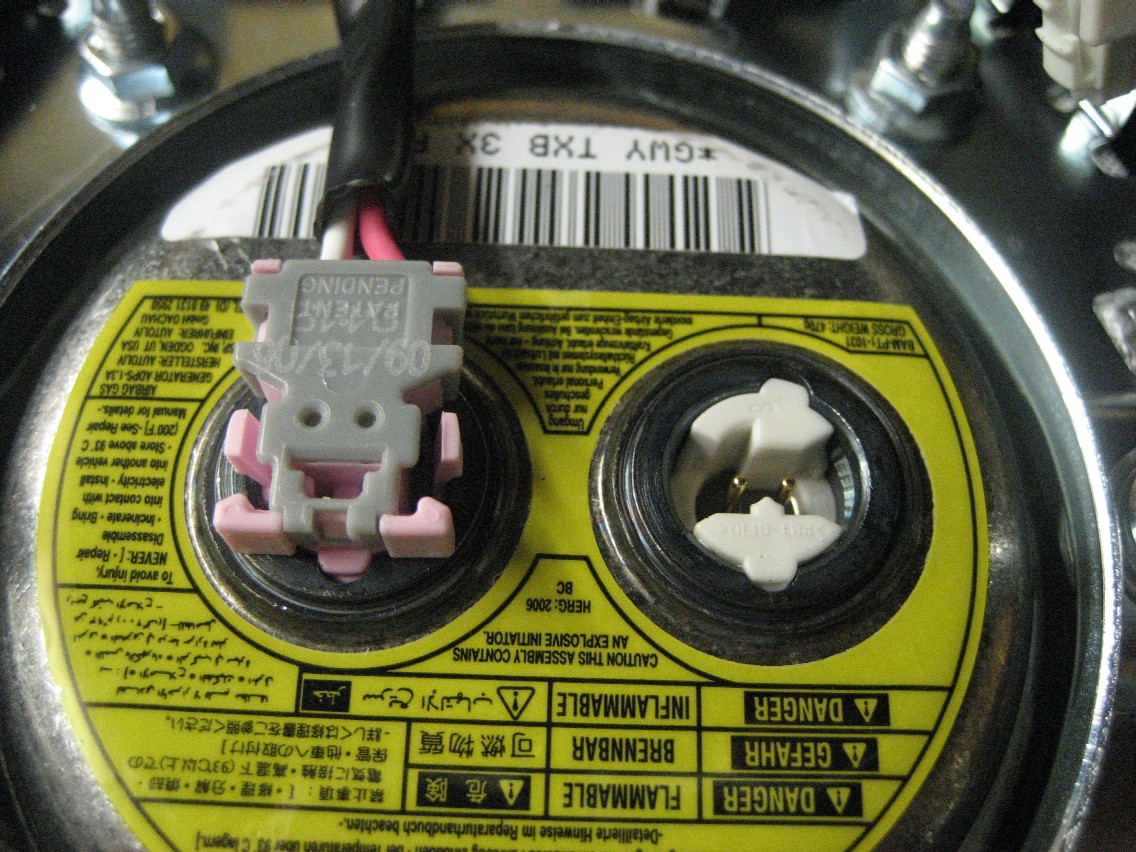
To release the connectors, squeeze the tabs inward.
Here's one connector removed:
Set the airbag module in a safe place and your steering
wheel will look like this:
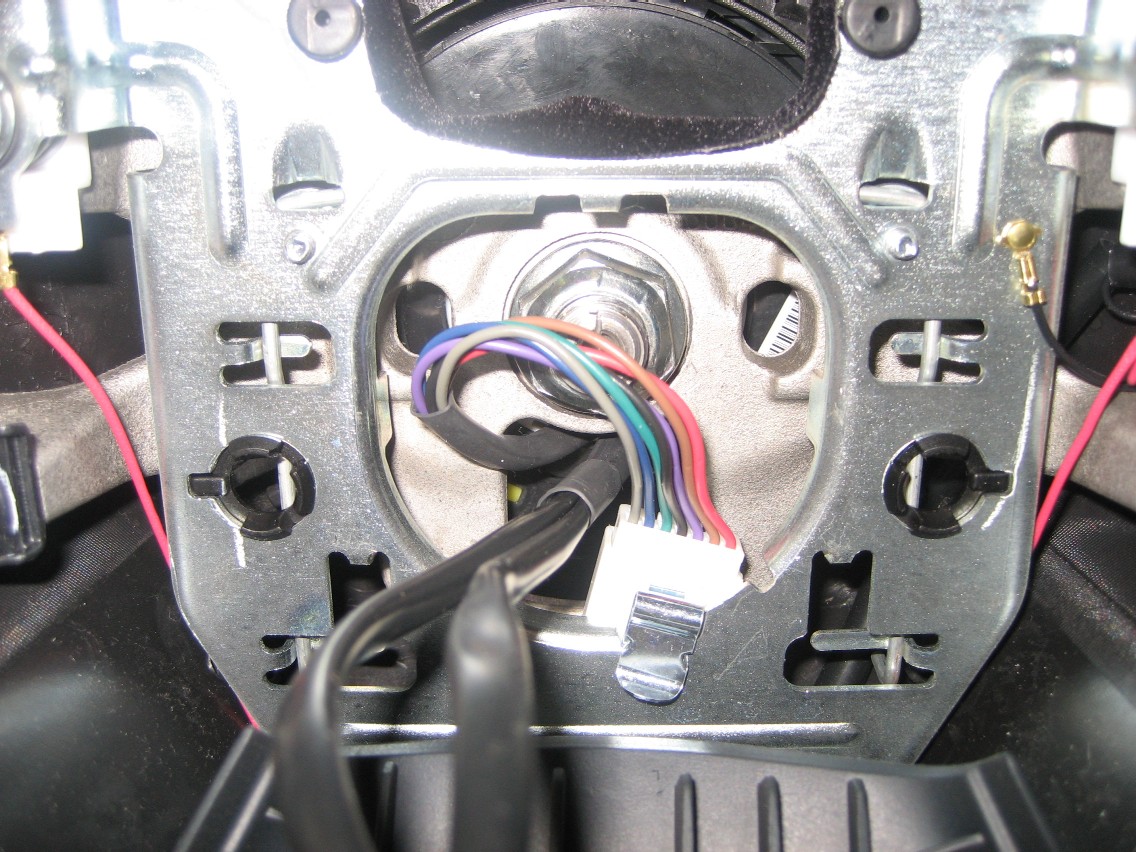
Unplug the white connector and move the wires away from
the nut holding the wheel in place.
You'll need a 21mm socket to remove the nut, but here's
a trick I learned many years ago for removing a steering wheel.
(Instead of a puller, this works most of the time.)
Loosen the nut quite a few turns, but DON'T remove it.
Now pull hard on the wheel, first left, then right.
Do that a few times and it will usually pop off against
the loosened nut.
Then simply remove the nut and the wheel.
STEERING WHEEL WIRING
Depending on which steering wheel you
have, the wiring is quite different between models. A manual
transmission steering wheel is much simpler than one with paddle
controls. And one without voice controls is much simpler than the
voice control model.
Here's a wiring harness for a manual
transmission wheel without voice controls:
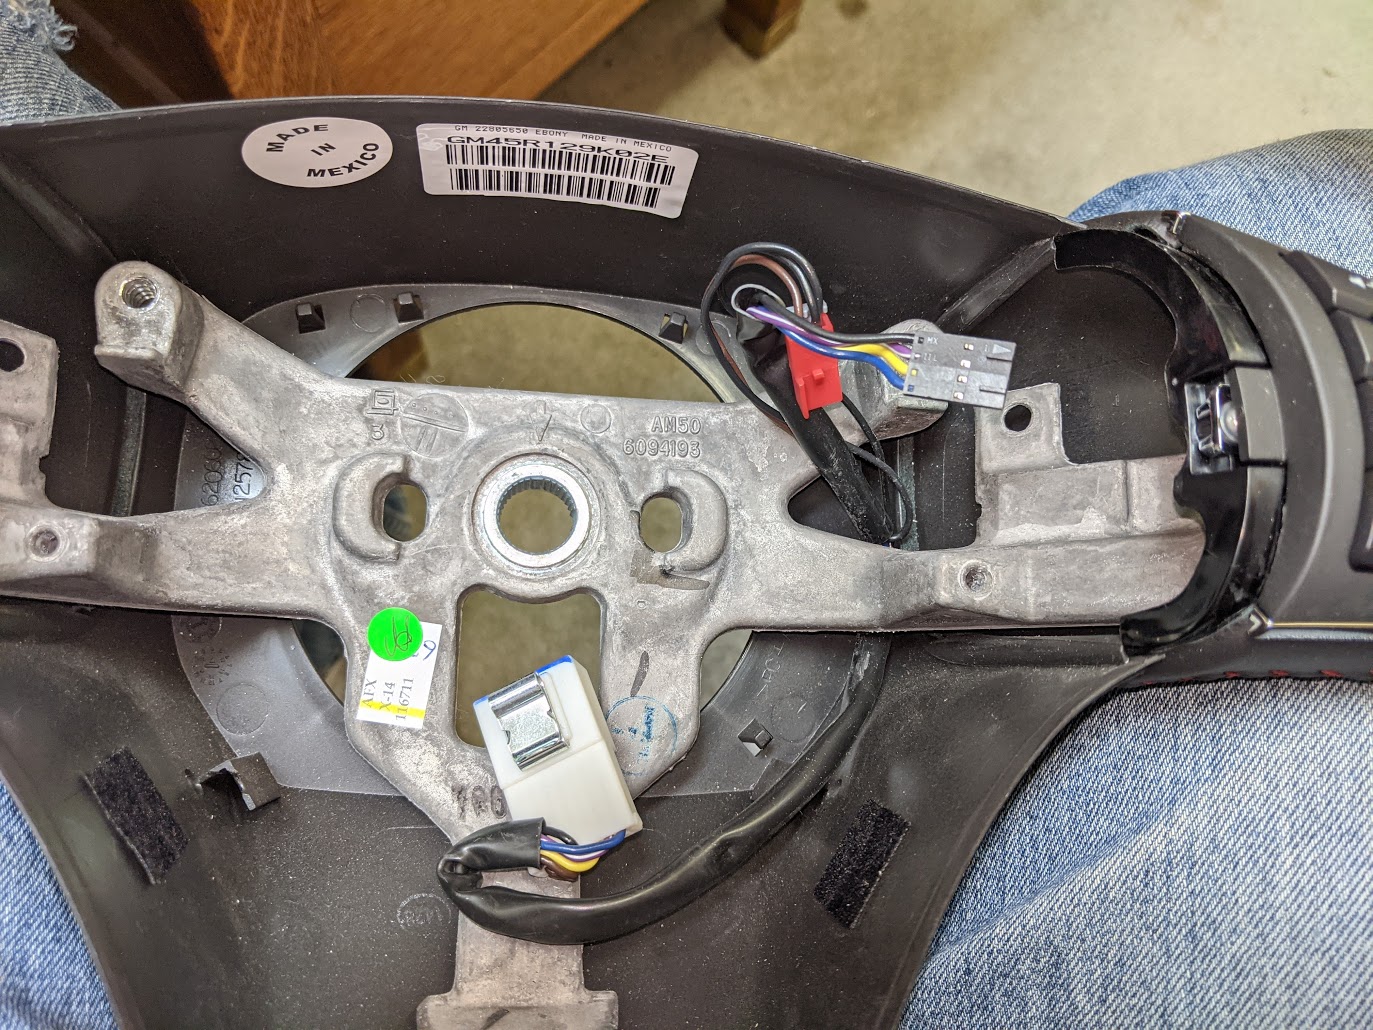
The red connector is for the horn and the 4 pin black
connector is for the right switch.
Now compare that simple harness to one for an automatic
transmission with voice controls:
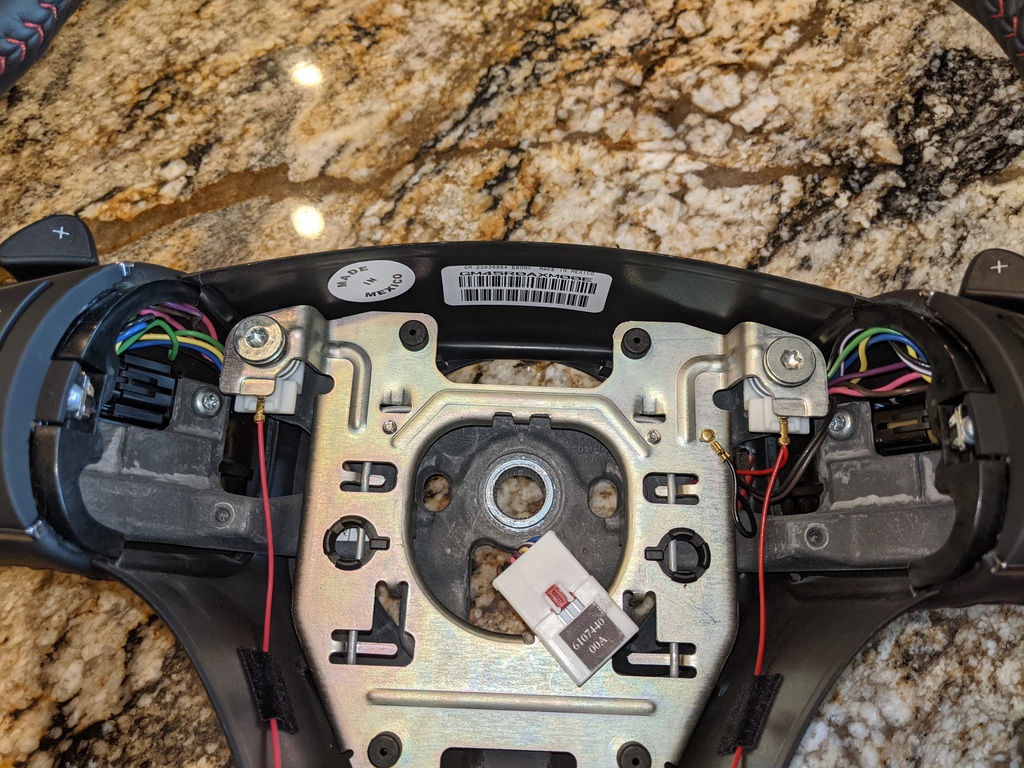
In the photo above, the horn assembly is still in
place, but look at all of the wiring on both sides of the wheel.
Here's the wiring for the right side:
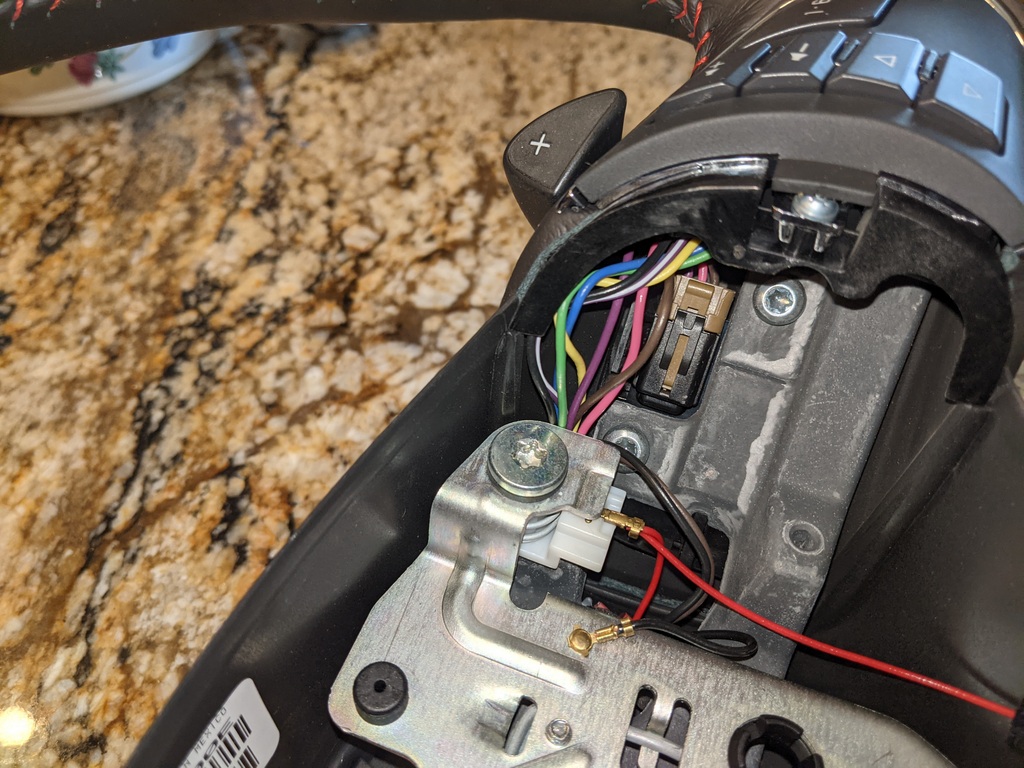
The brown connector is for the right paddle switch and the
black connector (hard to see) is for the right radio switch.
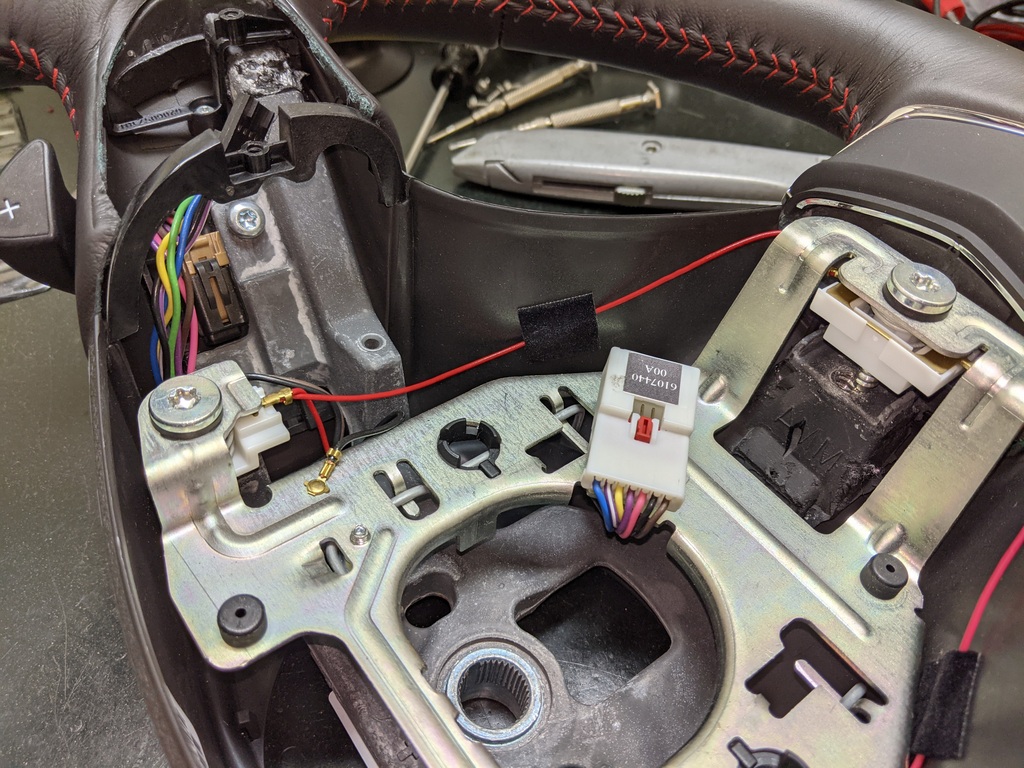
Here's the wiring for the left side:
Although I don't recommend this unless you're really good
with wiring harnesses and connectors, the following information provides details
for the steering wheel components in case you want to modify your steering
wheel.
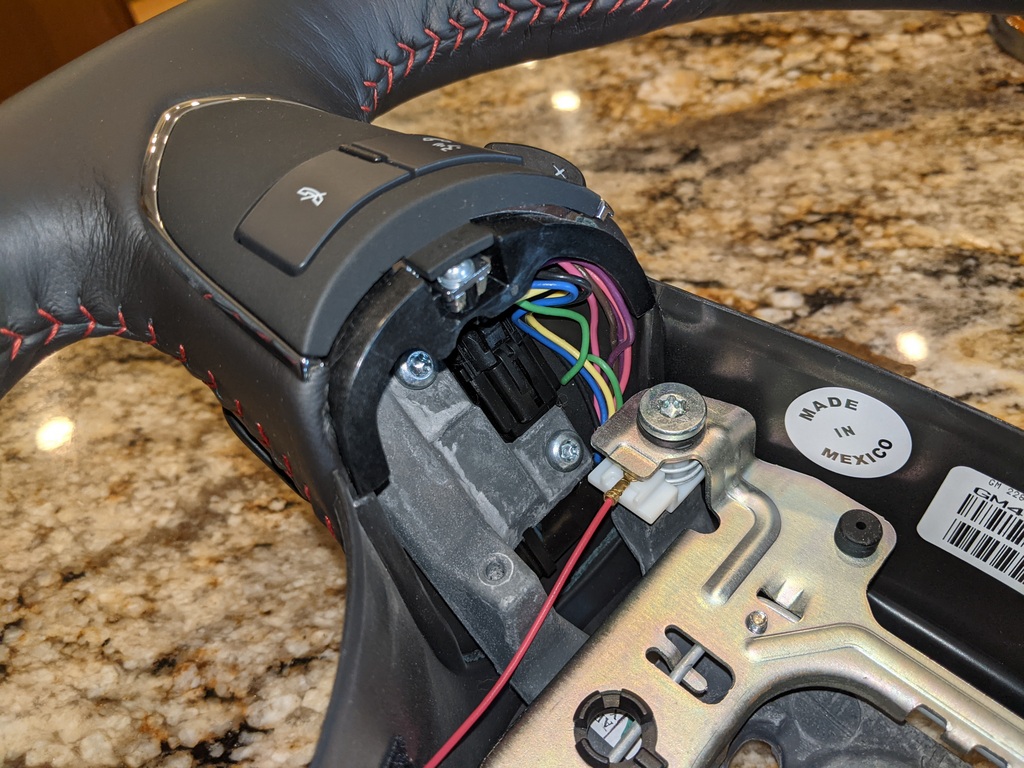
For the new 2012/13 steering wheels, you first need to
remove the left and right bezels:
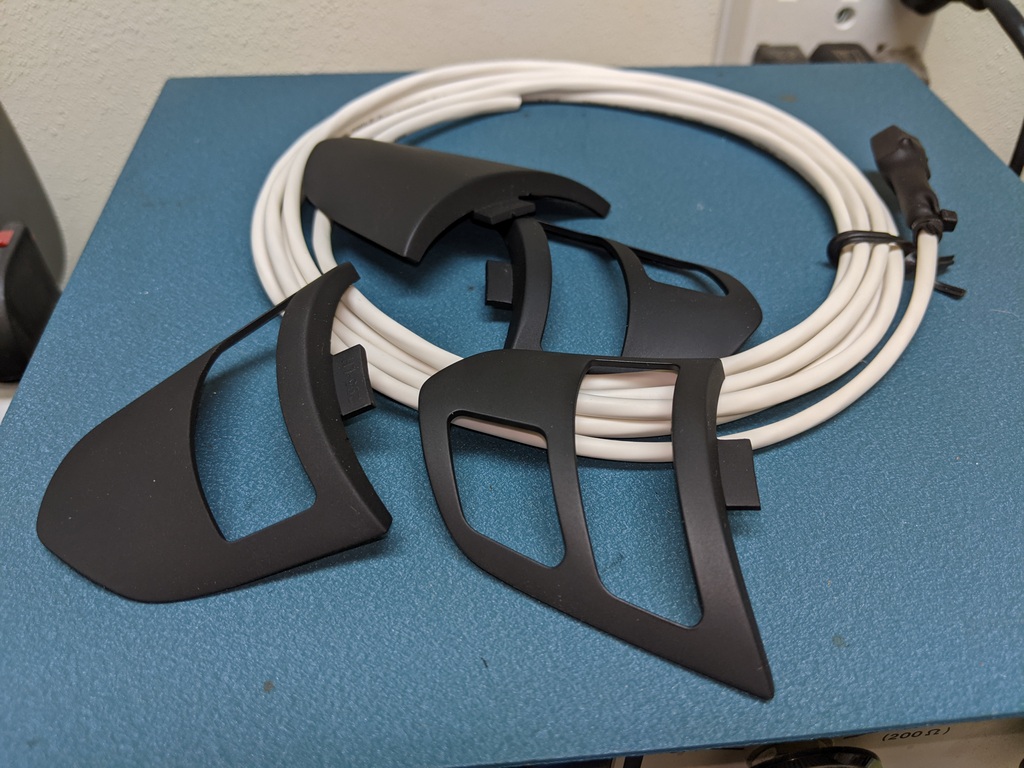
They are plastic, but you can pry them off carefully.
They are NOT individually replaceable, so do NOT break them!
Here is the left switch being removed:
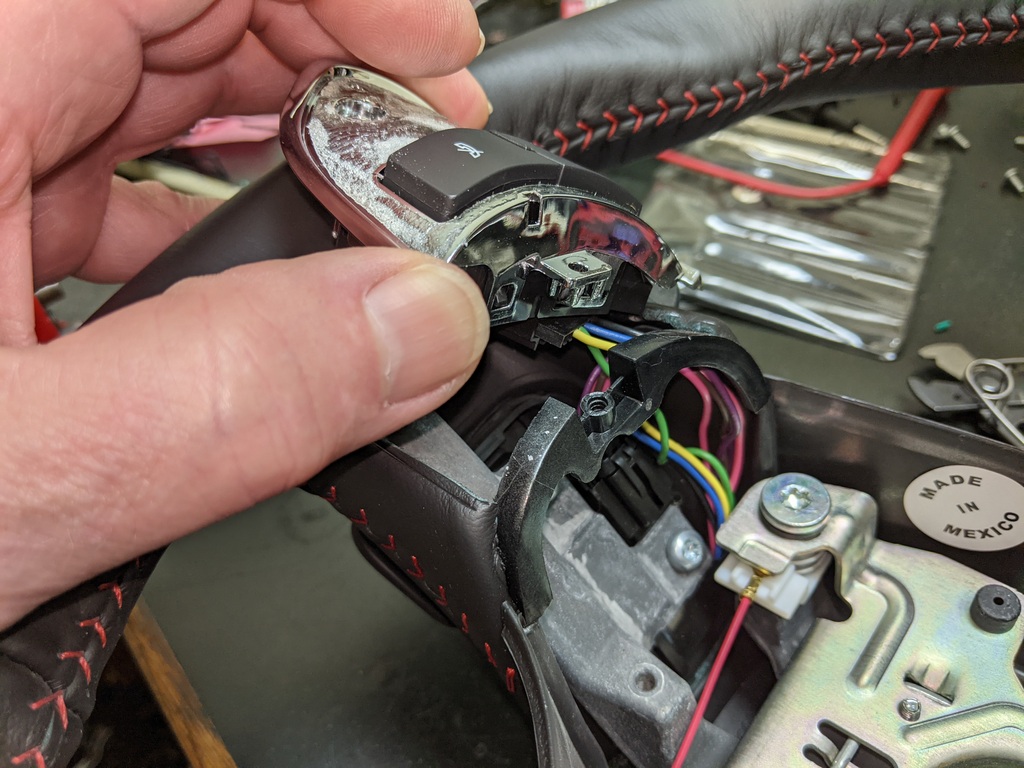
and the right switch:
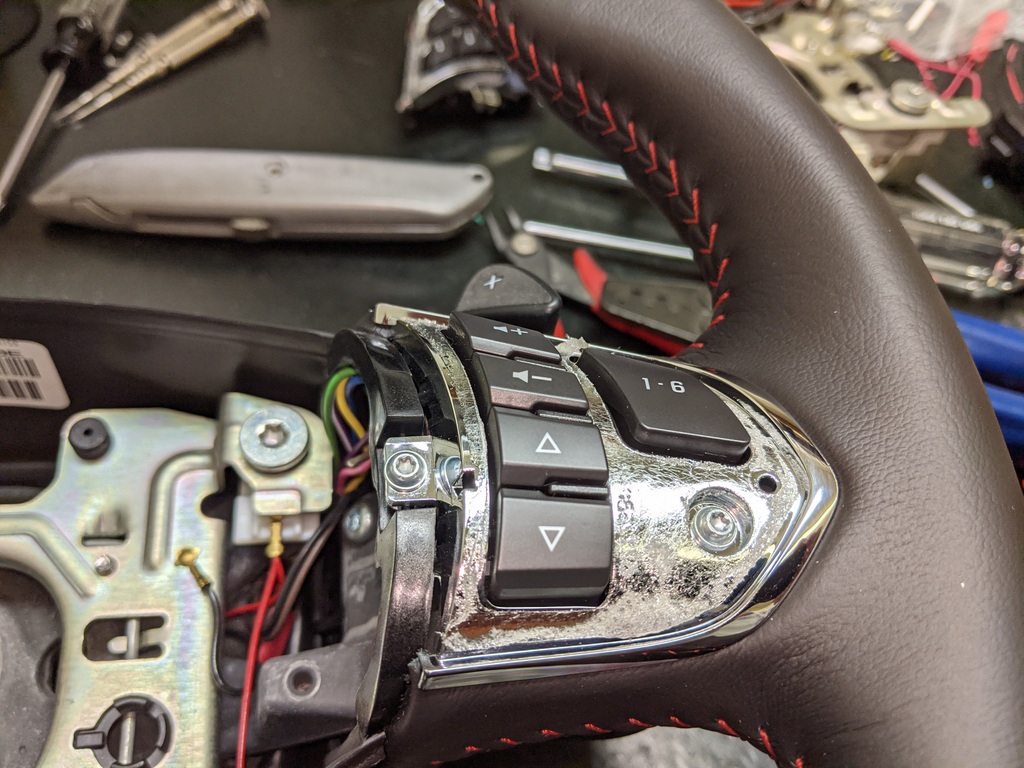
Two Torx screws hold each switch in place. Older
style steering wheels don't have the plastic bezels.
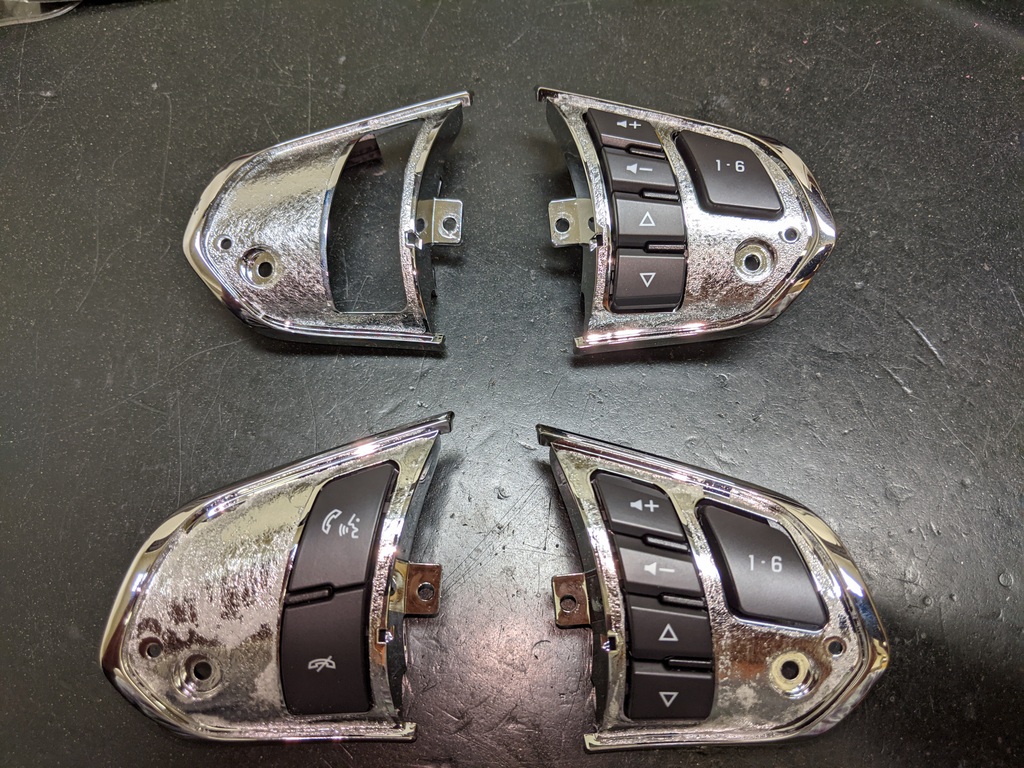
Here are the left and right switches from a non-voice
control steering wheel (top) and a voice control steering wheel:
and the backs of them:
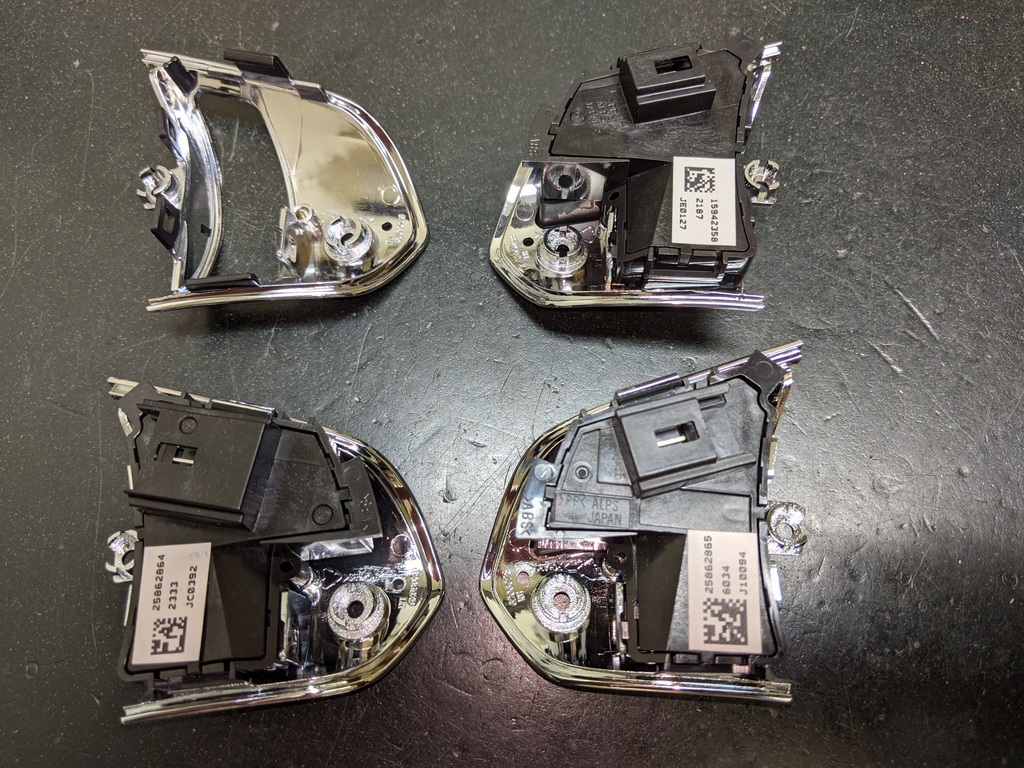
The right switches are NOT the same for a voice control
wheel and a non-voice control wheel. The right VC switch has 5 pins and
the non VC switch has only 4 pins.
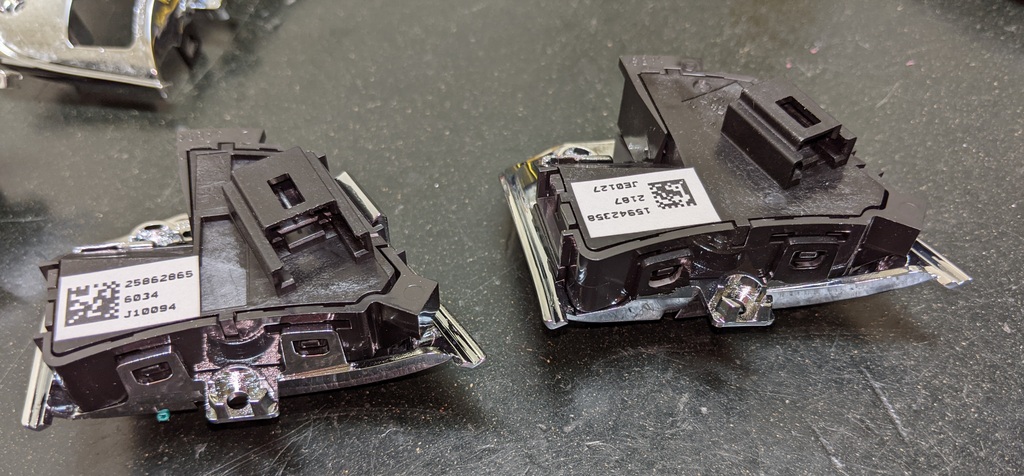
Here is the connector for the right VC switch:
The extra green wire connects to the left VC
switch.
(See the schematics near the beginning of
the steering wheel addendum section.)
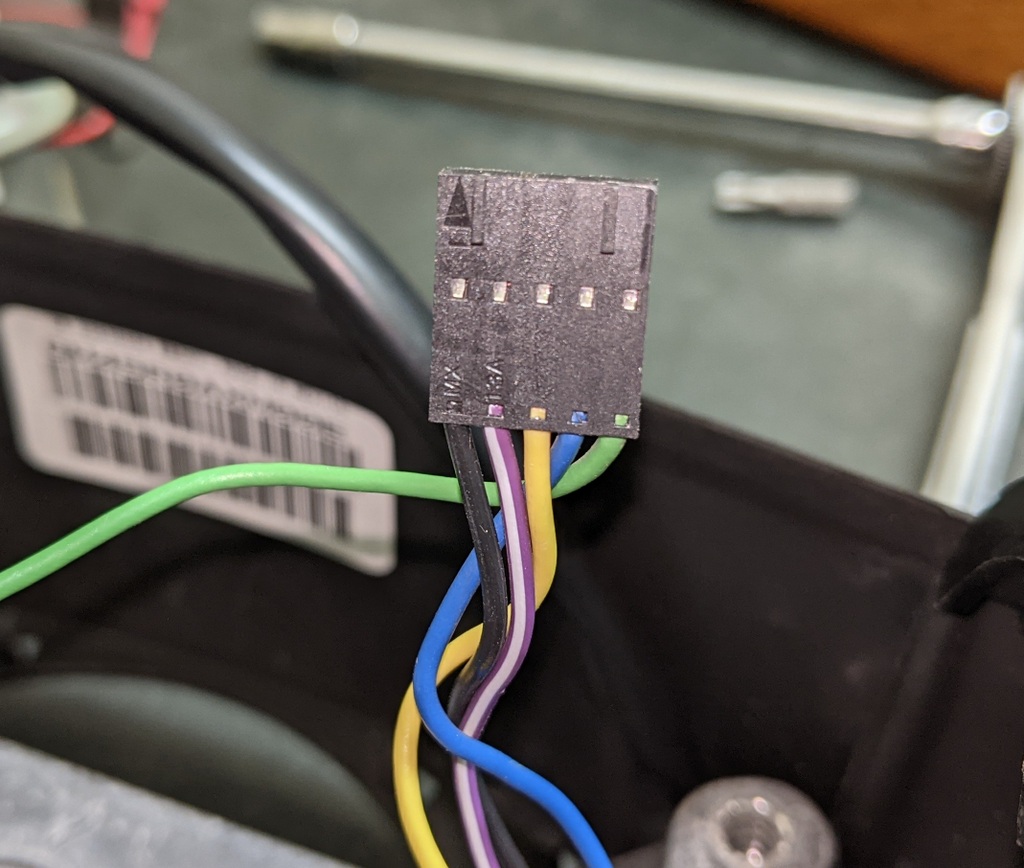
Here are photos of the left VC switch connector:
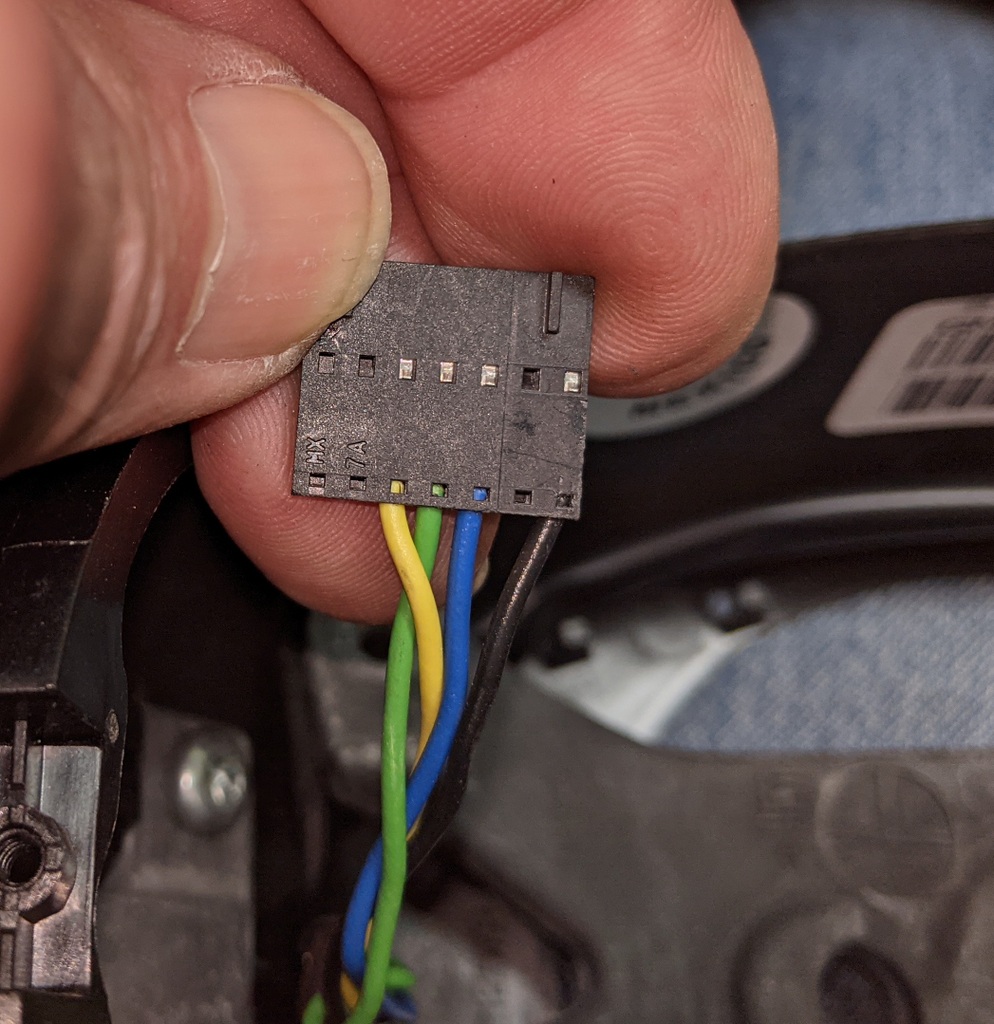

Note this is a 7 pin connector but only four wires.
Not only is the wiring different, but manual transmission
wheels are different from those with paddle switches:
For my own '07 Z06 I have a 2013 manual transmission
steering wheel and I needed to add voice controls. The only 2013 wheel I
could find was for an automatic, so it had the paddles. That required me
to swap the switches between the two wheels, but I also needed to modify my
wiring harness to accommodate the new VC switches. It was a LOT of
work! I would highly recommend you find the correct voice control wheel
for your car, since it's a simple job to remove the wheel and reinstall a new
one.
Here's one last photo of my car with the steering wheel
off:
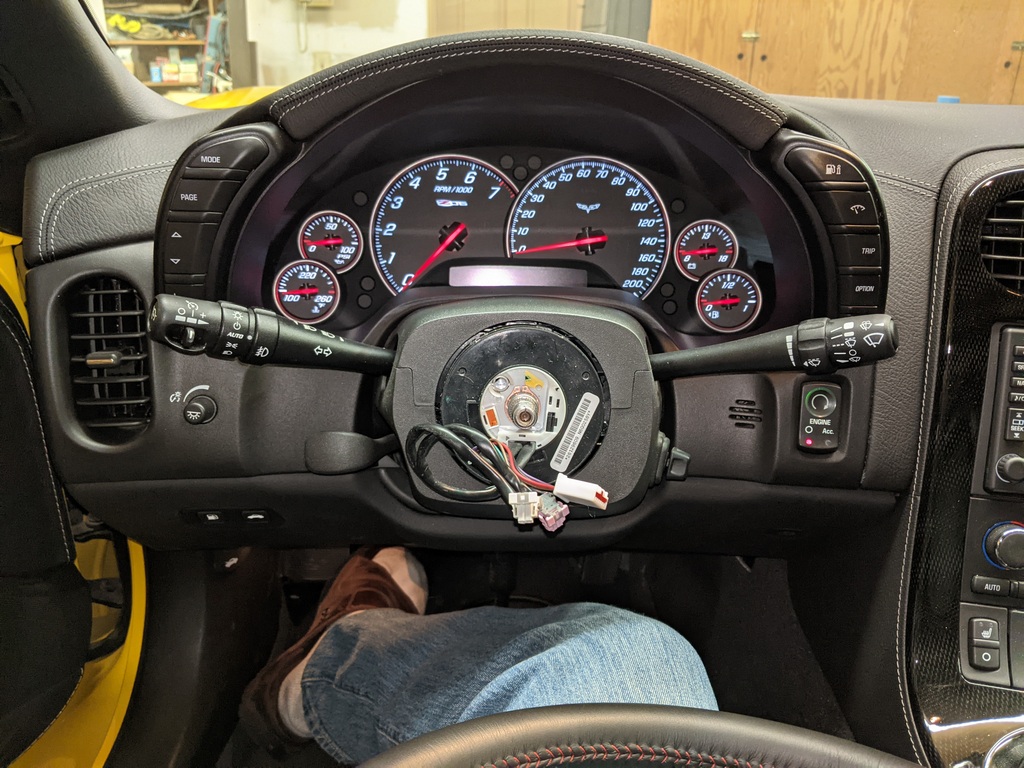
All you do is remove the air bag, unplug the connectors,
and remove the 21mm nut, as described above.
Stick the new wheel on and you're done.
Helpful GM Part Numbers
| Description |
GM part number |
| 2012/13 Steering wheel - manual -
black stitching |
22805644 |
| 2012/13 Steering wheel - manual - red
stitching |
22805652 |
| 2012/13 Steering wheel - manual -
yellow stitching |
22805639 |
| 2012/13 Steering wheel - manual - blue
stitching |
22805648 |
| 2012/13 Steering wheel - auto - blue
stitching |
22838980 |
| 2012/13 Steering wheel - auto - red
stitching |
22838984 |
| 2012/13 Steering wheel - auto - black
stitching |
22838978 |
| 2012/13 Steering wheel - auto - yellow
stitching |
22838982 |
| 2012/13 Steering wheel w/o V.C. -
manual - red stitching |
22805650 |
| 2012/13 Steering wheel w/o V.C. - auto
- red stitching |
22838983 |
| 2012/13 Steering wheel w/o V.C. - auto
- black stitching |
22838977 |
|
|
| 2012/13 left switch (voice control) w
UPF Bluetooth |
25862864 |
| 2012/13 right switch (radio) with UPF
Bluetooth |
25862865 |
| 2007+
right switch (radio) w/o UPF Bluetooth |
15942358 |
|
|
| 2007 VCIM Gen 7 Onstar module |
15934199 |
| 2007 VCIM Gen 7 Onstar module |
25909997 |
| 2009/10 VCIM Gen 8 Onstar module w
Bluetooth |
20794960 |
| 2011/13 VCIM Gen 9 Onstar module w
Bluetooth |
22898987 |
|
|
| 2005-2010 Cellular/GPS windshield
antenna |
10333600 |
| above, alternate part number |
20781950 |
| 2011/13 Cellular/GPS windshield
antenna |
20815619 |
| above, replaced by |
22830110 |
| above, interchange part number |
22964580 |
| windshield antenna bracket, glued to
windshield |
10337786 |
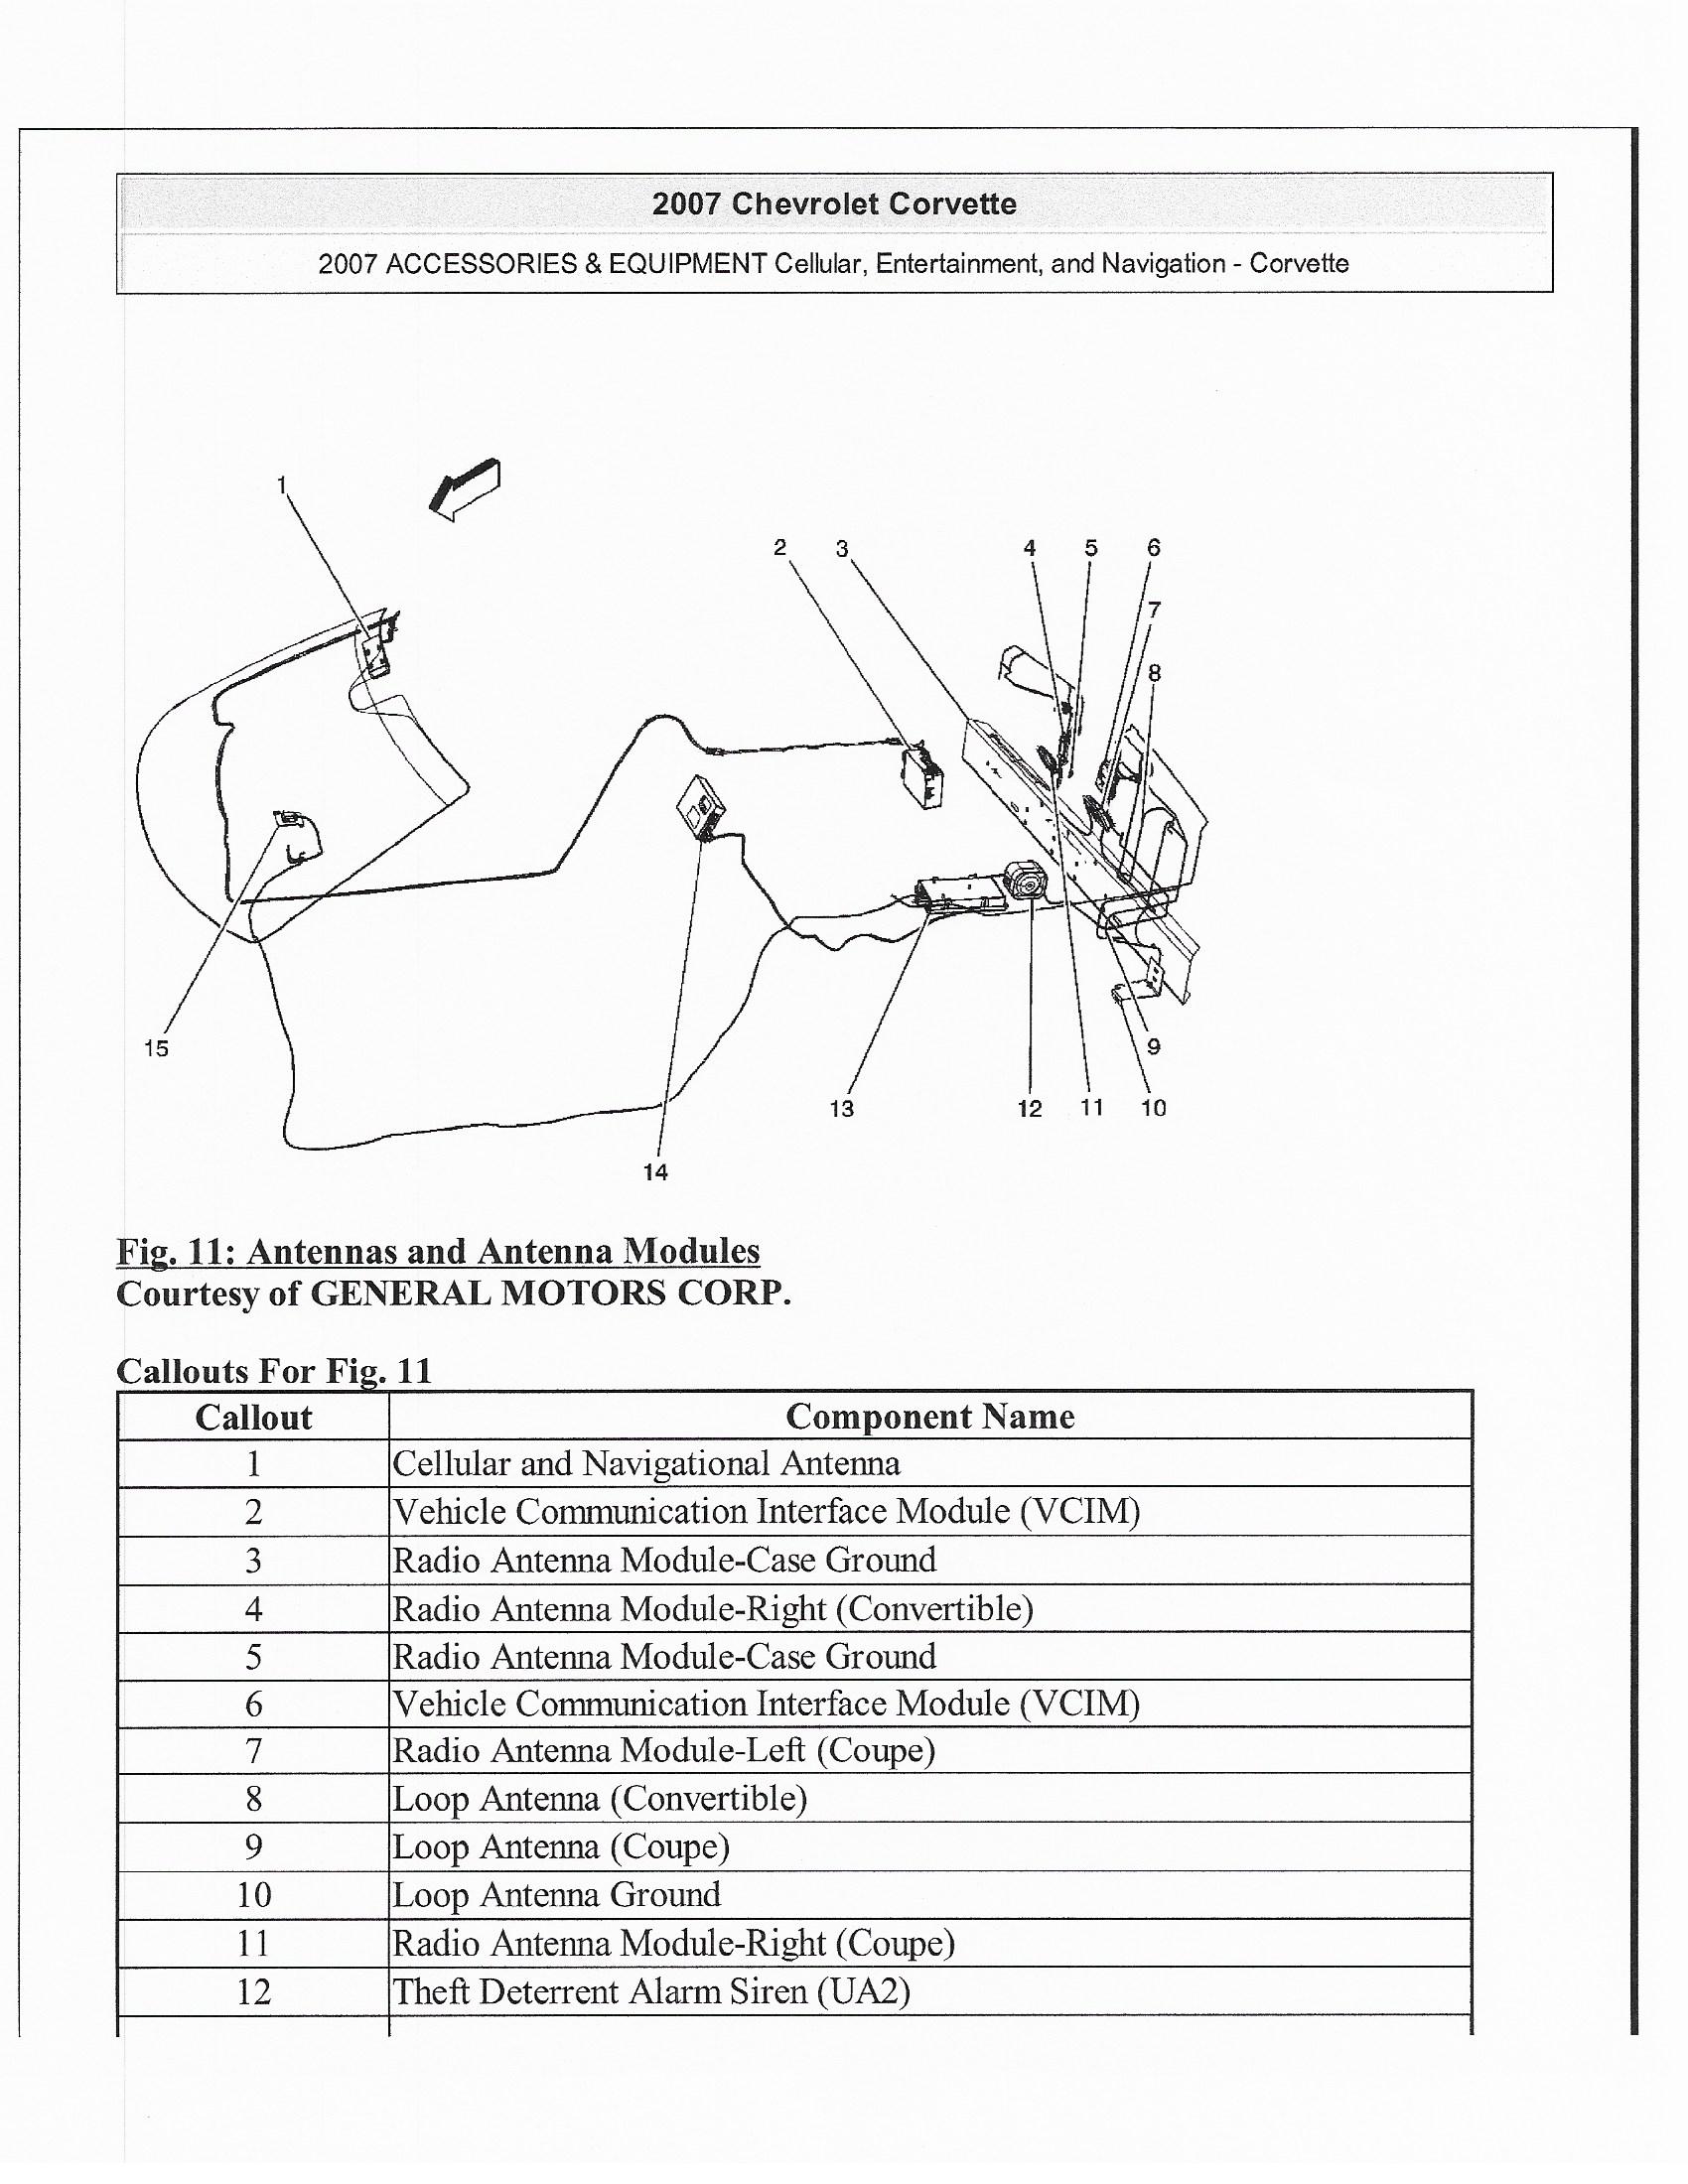
Click HERE
for a 12 page description of the Onstar System from the Service Manual in .pdf
format
Antenna Addendum
For those of you who want to connect to Onstar and use the
Generation 9 VCIM, there is some additional work you have to do. The
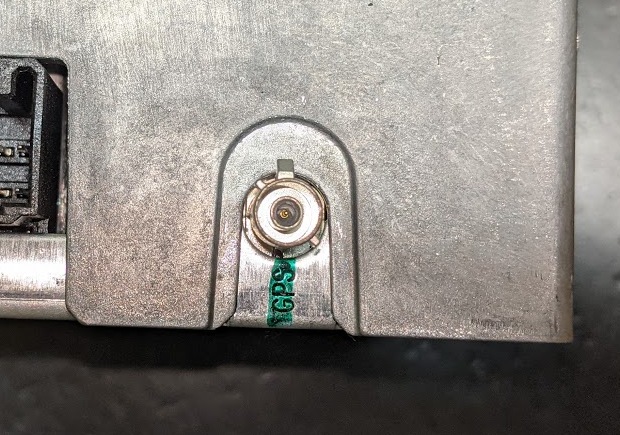
original Gen 7 and Gen 8 modules have two antenna connections:
The one on the left is the GPS antenna and the right one is
for cellular communication. Notice the two connector indexes on opposite sides of
the GPS connector:
Two coax cables connect to the module and then to
the original windshield antenna:
The Gen 9 modules have only one connector:
Notice the connector indexes at right angles to one another. A
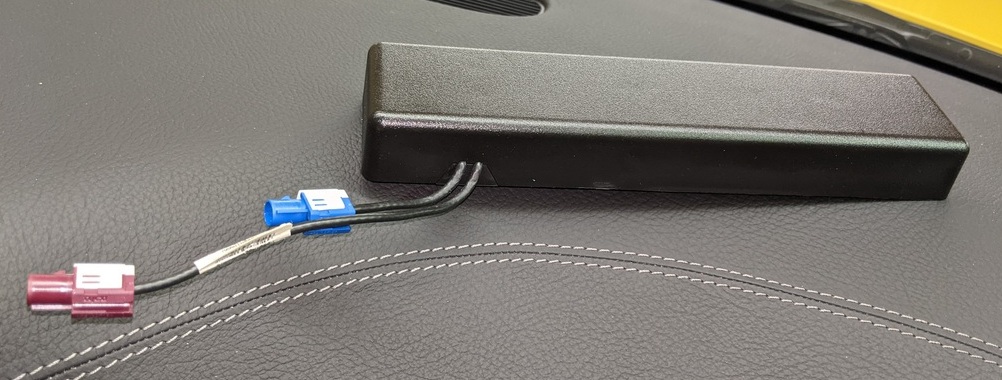
new dual purpose antenna using a single coax is used:
You have two coax cables connecting the module to the
antenna, so you think well, just use one of them.
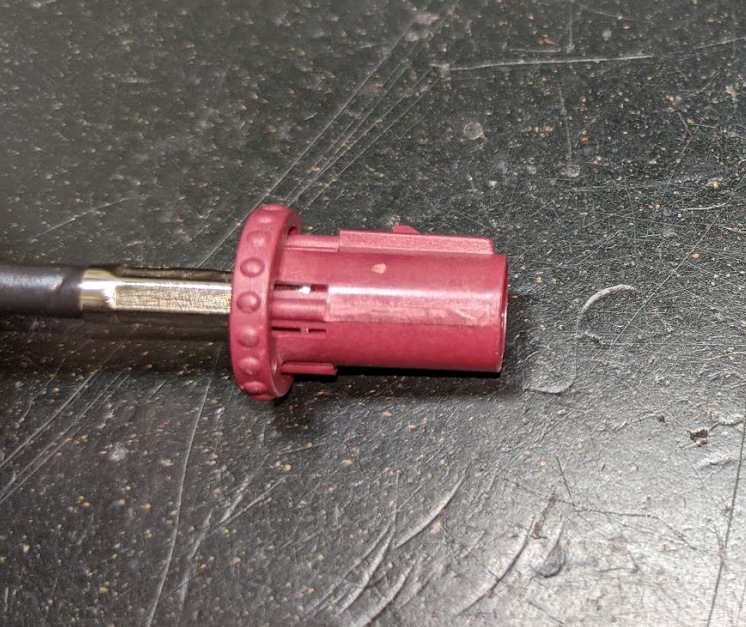
It's unfortunately not
quite so easy as that, because of the connectors on the two coax cables.
The cellular coax has a push on type connector for the module end and a red
connector at the windshield:
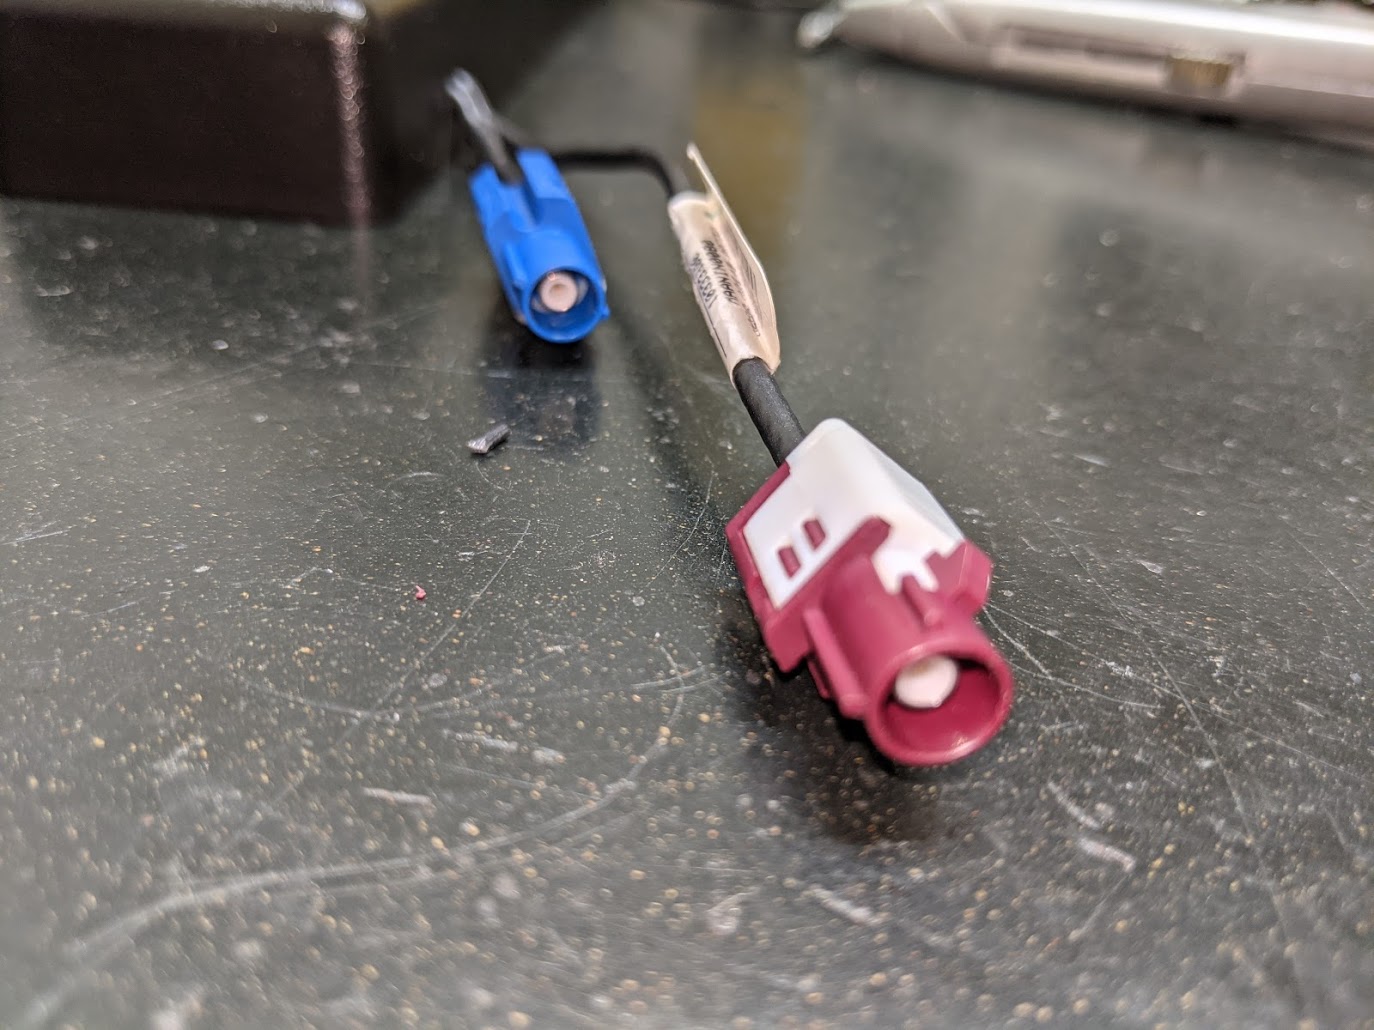
So that cellular coax won't fit either end - at the new
module or at the new antenna. That cable can't be used.
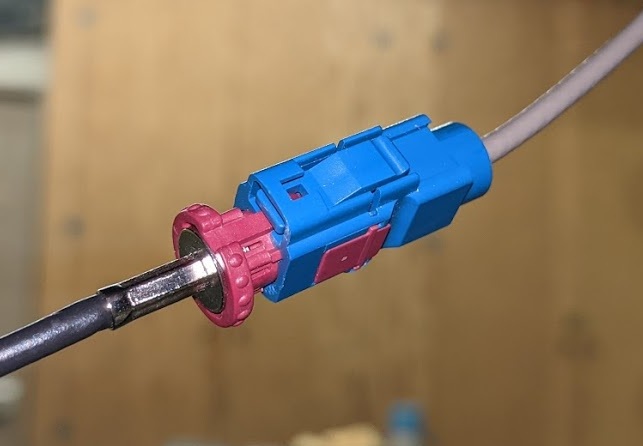
So you think just use the other (GPS) coax with the blue
connectors at either end. Not so easy either because the red and blue
connectors are indexed differently. It's hard to see in the photos, but
the red connectors have their indexes at right angles to each other, while the
blue connectors have the indexes opposite each other. Both the new module
and the new antenna have connectors with indexes at right angles, so the coax
with the blue connectors won't fit on either end - both the module connector and
the new antenna connectors have to be modified.
Fortunately, it's easy to modify them. On the new
antenna, use a utility knife to cut away the plastic index as shown:
On the Gen 9 VCIM, use a file to grind off the aluminum
index so the original GPS coax will fit.
Once you modify those connectors, the GPS coax will fit on
both ends - here's the connection at the windshield:
Once you get the new antenna connected you can push the
Onstar button and call them up. They will ask your name, assuming you are
the owner of the Corvette the VCIM is from. While they can easily change
owners, they can't change the VIN number of the car in their system. In my
case, they see "my car" as a blue 2013 Z06. I explained that my
car is actually a yellow 2007 Z06 with a different VIN number, but their system
has to remain with the same vehicle identification. I still have the
option of subscribing to Onstar with whatever benefits offered for my 2007
Corvette.
Click
here for main website