C6 USB Nav Radio Installation
(updated 11/19/21)
Introduction
The factory Navigation radios for the C6 Corvette had no provisions for connecting an iPod or any other music device to the Corvette sound system from when it was introduced in 2005 through the 2010 model year. That's pretty amazing considering that the Corvette is GM's premium sports car.
In 2009, the GM Personal Audio Link (PAL) was introduced and offered as an accessory that Corvette owners could install themselves or have their dealer install it. The PAL is a very nice accessory, and with my Version 2 upgrades, it is not only easy to install but versatile for handling your music library from an iPod or iPhone. You can do extensive music searches, and music information is displayed on the Nav screen as well as the HUD. But it's becoming hard to find the PALs and they are getting more expensive to purchase as well.
In 2011, Corvette finally supplied a brand new Nav radio with a new USB port and auxiliary input port in the center console. This allows owners to connect any iPod, Iphone, or even a USB flash drive with a music library to the USB port and control it with the new Nav radio. And with the auxiliary input port, other music devices and Android phones can be connected, although control of the music must be done on the device itself, rather than on the Nav radio screen. The new radios are very nice, and they operate identically to the older Nav radios, but there is a new menu on the radio and additional sub menus that allow you to search your music library and display the music information on the Nav screen.
Although the PAL can be used with the new radio, it is designed as a factory built-in alternative to the PAL so no additional accessory is needed.
This website provides the details for how to install the new USB Nav radio in pre-2011 C6 Corvettes. It also provides technical details on how it is wired and how it operates.
Update: Near the bottom of this site is an addendum for installing this new USB Nav radio in C6 Corvettes with a factory non-Nav radio.
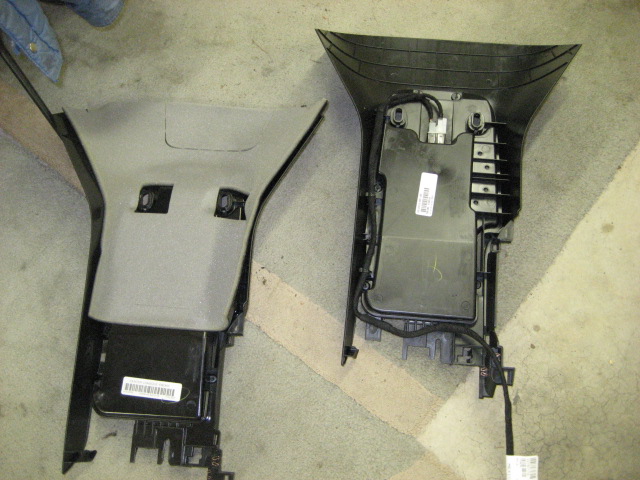
The radio on the left is the original Nav radio from my '07 Z06. The one on the right is the new USB Nav radio.
They look identical:
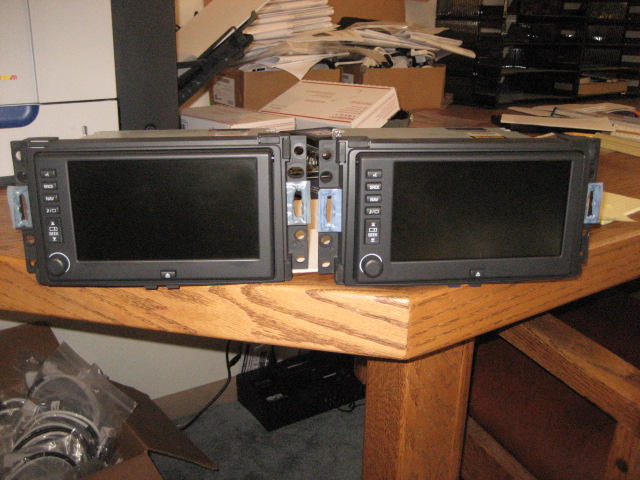
So what's different?
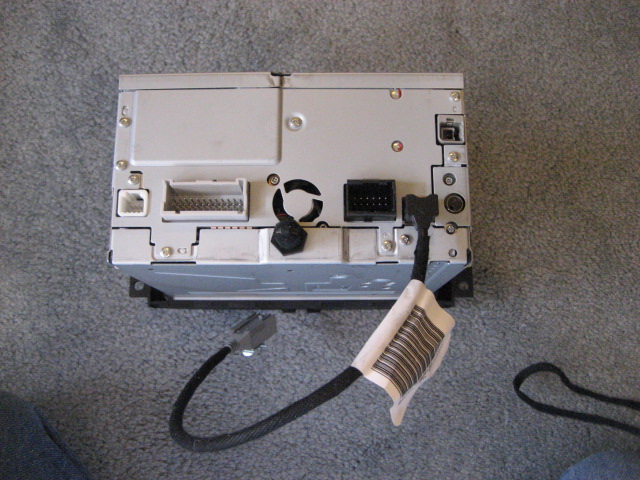
Look on the backs and you'll see:
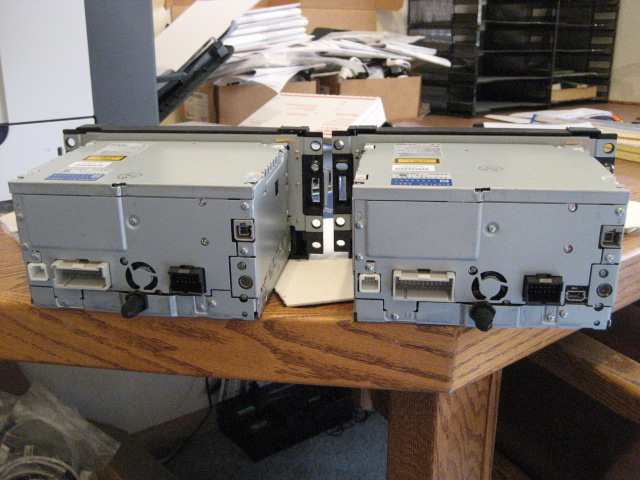
In addition to internal wiring modification and new firmware, there is a new USB port on the right:
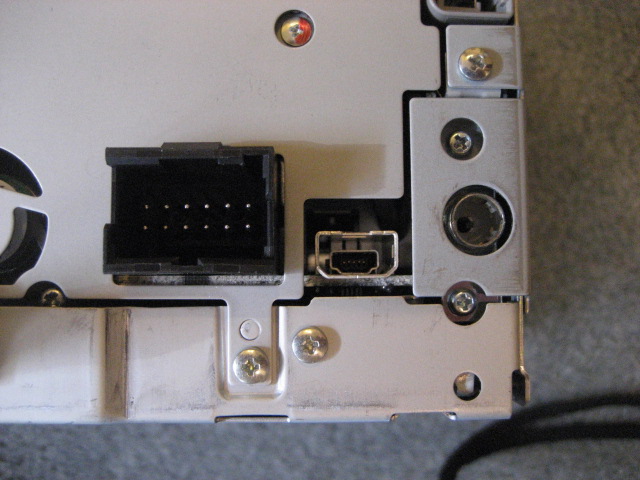
All other connectors to the radio are identical, which makes it simple to retrofit the new radio in the older Vettes.
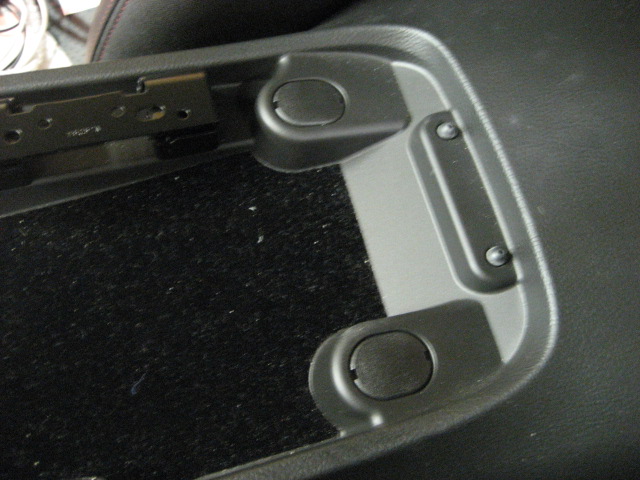
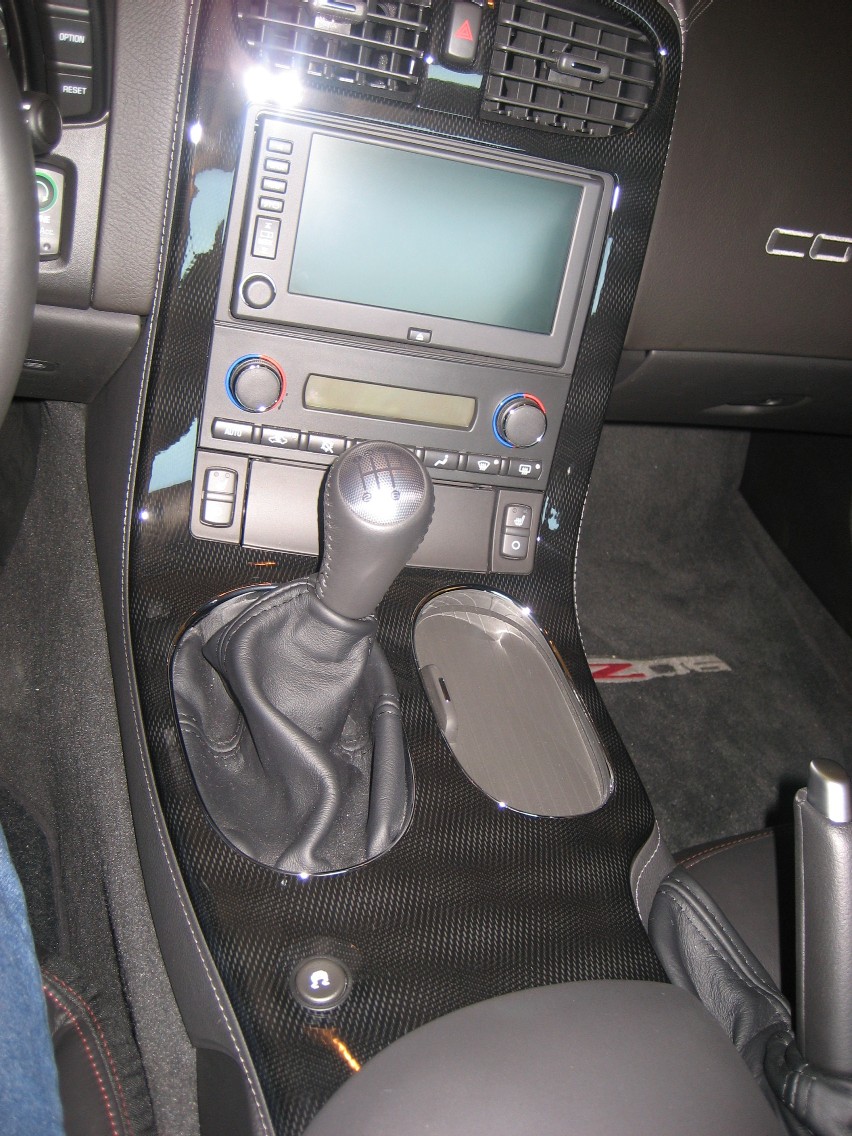
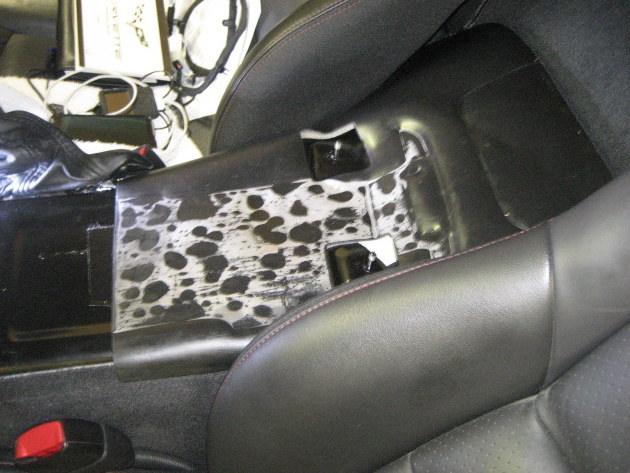
Here's the other difference in appearance - the original center console:
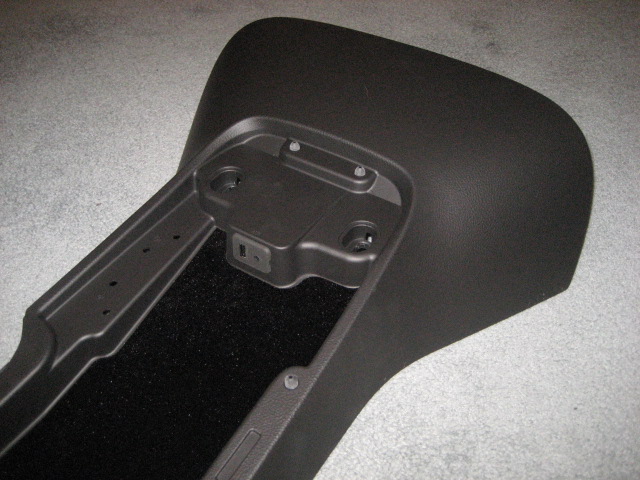
and the new console:
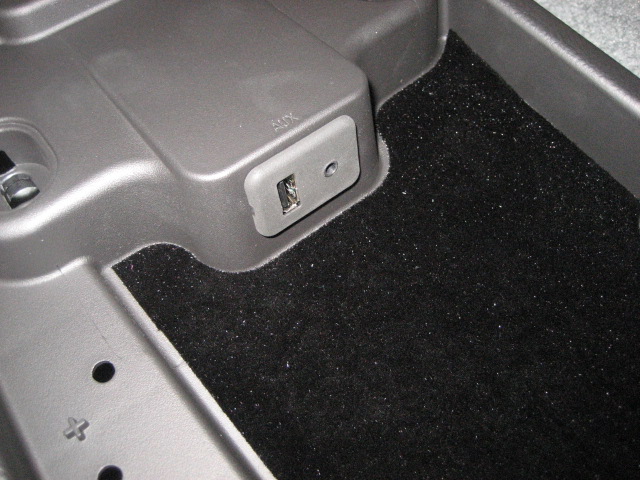
Here's a closeup of the new USB and Auxiliary Input Receptacle:
How about the new Nav display?
Here's the old Nav:
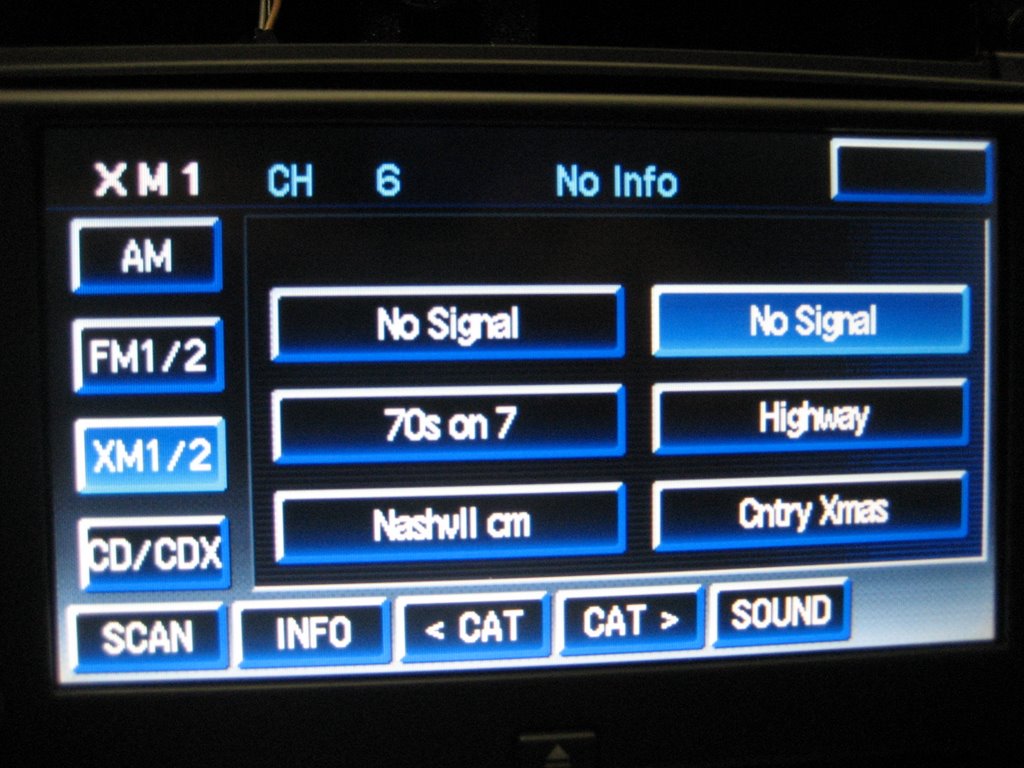
And the new USB Nav:

The above photo shows the radio playing in iPod mode, but notice that the four soft buttons on the left now have a down arrow allowing you to choose a second screen:

iPod and AUX mode have been added to the original four buttons, and they are automatically detected when something is plugged into the console receptacle.
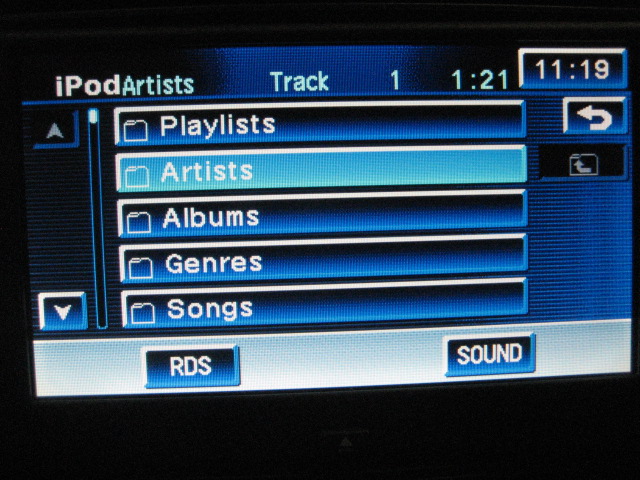
To search your music library, press the Track Select button on the lower right and you'll get this submenu:
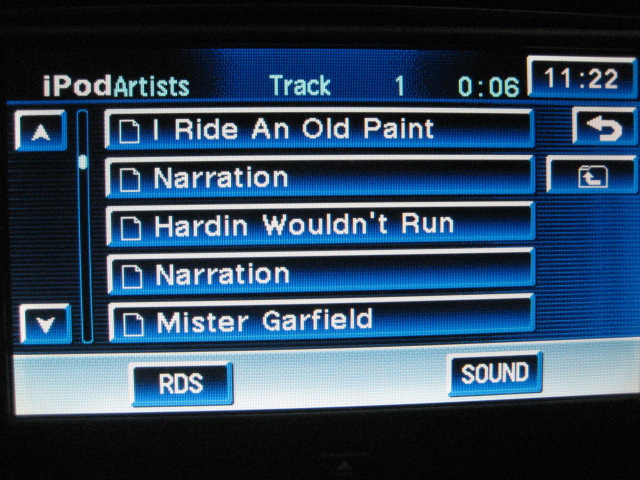
I selected Artists and up pops the following from my iPod:
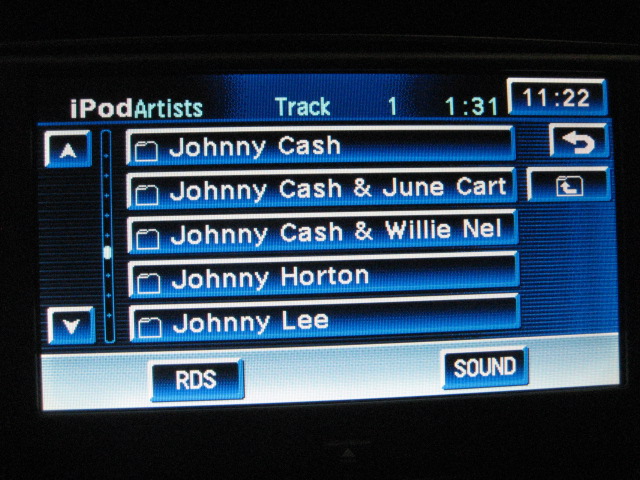
In the above photo, I've scrolled down the artists using the arrow buttons on the left.
Choosing "Johnny Cash", the list of albums is displayed:
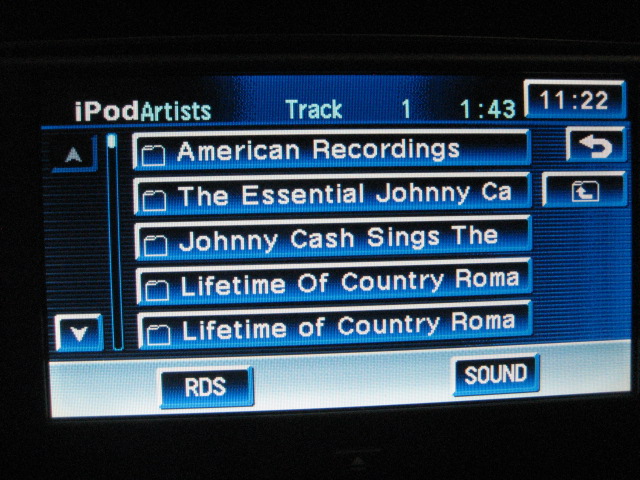
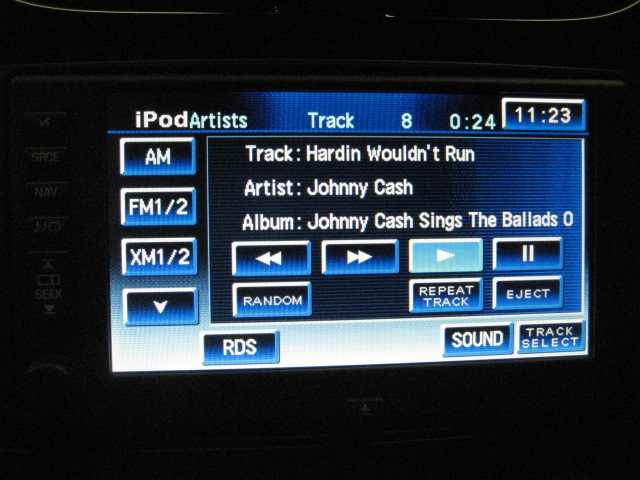
Choosing "Johnny Cash Sings The Ballads of the Old West", the track list is shown:
Choosing "Hardin Wouldn't Run", here is the display:
The new interface is easy to use and works well. If you have a very large music library, it might take a bit of time to find your Playlist, Artist, or Album, since you start at "A" and progress downward. The PAL has a bit of an advantage for music searches because it allows you to delve farther down into your listing with an "ABC" search, then an individual letter search, but otherwise this new USB interface is very nice. The display is nice too, providing a lot of music information on the screen.
Also, with a USB interface, rather than a 30 pin iPod connection, most any iPod or iPhone can be connected and charged. Even flash drives can be accommodated in the new USB port.
Everything else about the new Nav radio is the same as the original Nav radio.
Getting the Parts You Need
So if this setup interests you, this is what you will need to get:
Here's the original Nav radio:
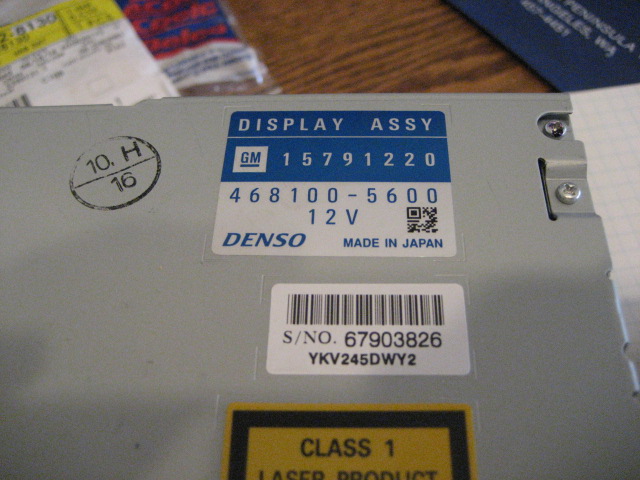
but you need this one:
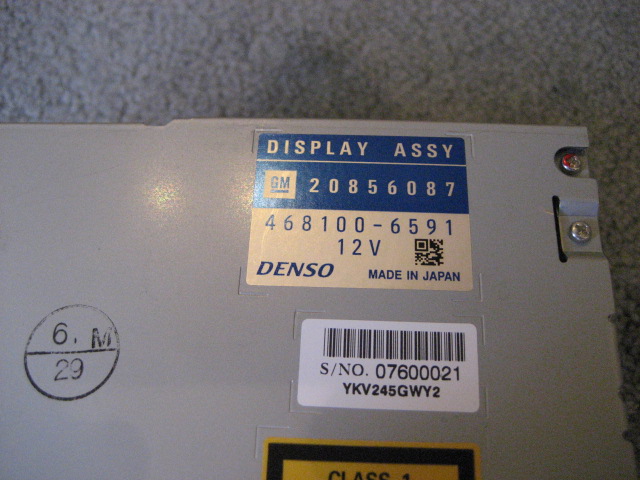
This is the biggie, since GM part number 20856087 originally listed for over $3300! But the going price is around $1700 for a new radio, and used radios are going for much less. Corvette owners often elect to replace the factory radios with aftermarket sound systems and because of this, you can often find a used radio in perfect condition for far less. One recently sold on eBay for around $500, and I recently saw another one on eBay for $850. Prices are all over the place, so keep your eyes peeled for a bargain. Do a search for "20856087".
Next, you'll need the center console with the USB receptacle:
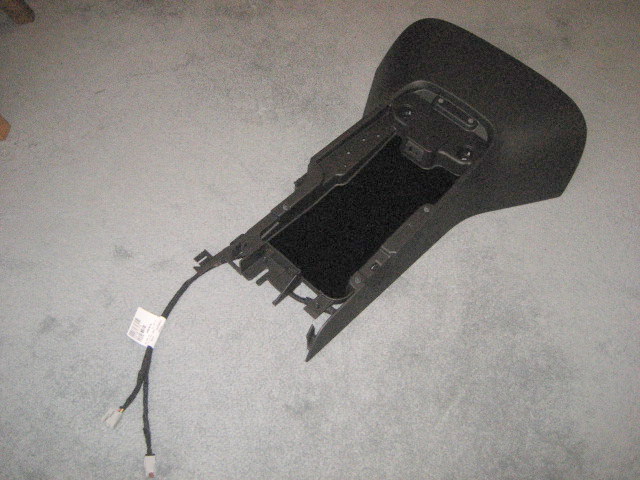
My part number is 20957060 because the color is Ebony, but the 2011-13 consoles are available in other colors to match your interior. Tell your Parts Man that you want the 2011 console with the U3U (Navigation) radio option. These consoles are a real bargain, because for around $150 that also includes the console wiring harness and the color matched USB receptacle. (The tan consoles are more expensive for some reason.) The wiring harness (P.N. 22787173) and receptacle (P.N. 20870101 in white and 25832462 in black) are available separately, but they cost about $100 just for them alone. So for an extra $50 bucks you get a brand new console with the harness and receptacle already installed.
![]() 10/15/20 Update Note:
10/15/20 Update Note:
For quite a while the USB consoles were sold out in colors other than ebony. Now Vette owners are writing me that even the 20957060 ebony consoles are impossible to find, as well as the 22787173 wiring harness.
Click HERE if you find yourself in this position.
Next you'll need the radio USB cable:
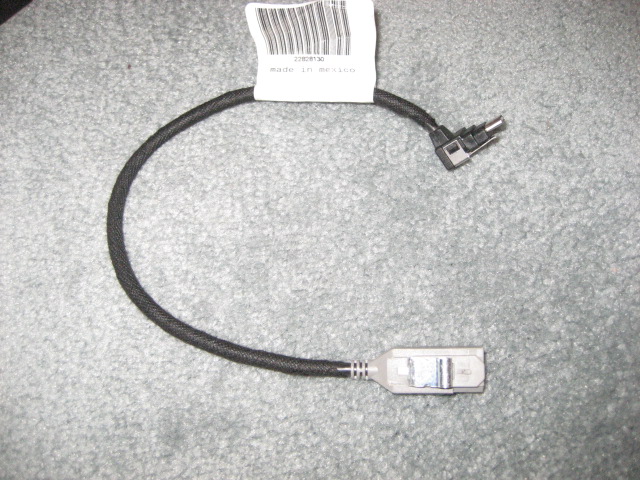
This is GM part number 22828130, and it costs about $45. You need it because the USB connector on the radio is a proprietary connector and this cable is specifically designed for the USB radio. The USB connector is called a "mini-A", which is available in other places, but a regular "mini-A" won't snap into the radio housing without modification. Get the 22828130 and you'll be very happy you did.
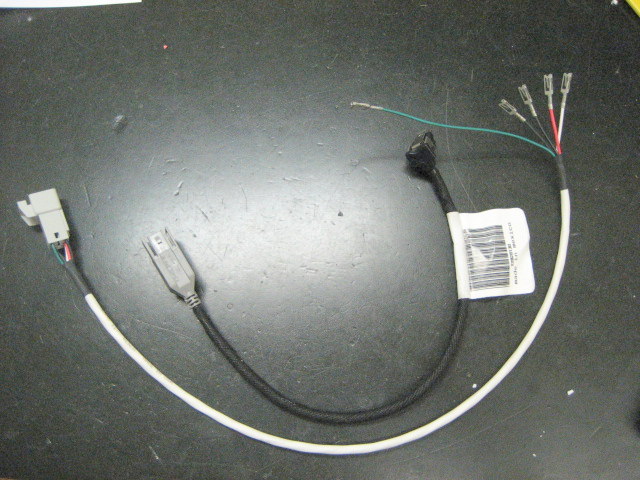
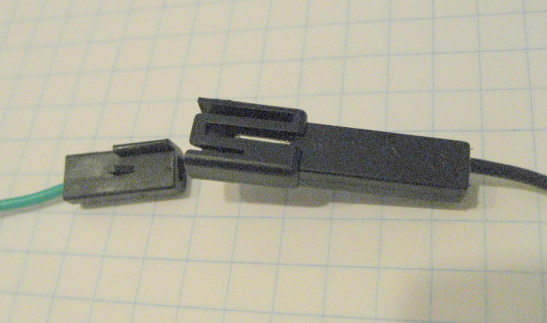
Finally, you'll need an adapter harness to connect the console harness to the two radio connectors in back of the radio. GM makes a service part to accomplish this task, but I didn't like it because it wasn't designed specifically for the Corvette. So I build a better quality harness using Delphi terminals and connectors that will connect directly to the console harness and the Delphi radio connectors. Here's a photo of it next to the GM USB cable:
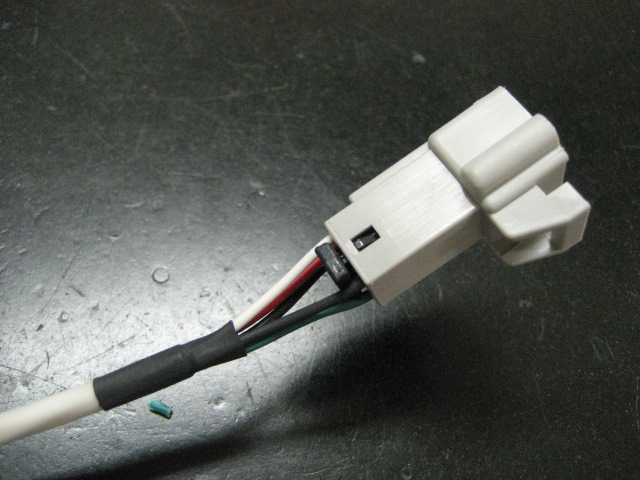
Here's a closeup of the console end of the cable using a Delphi Metri-Pack 150 connector that mates with the console harness:
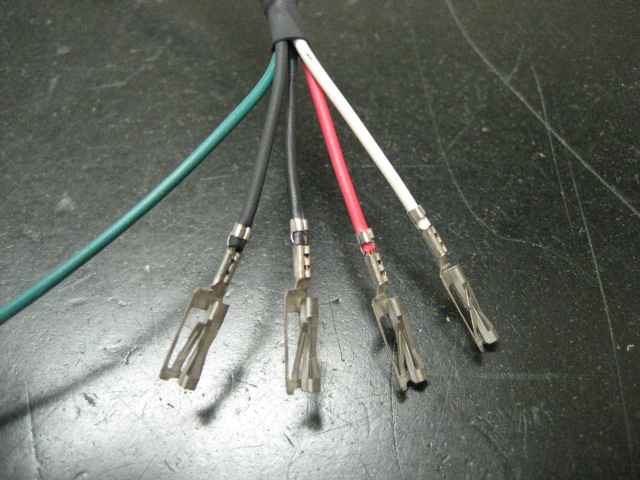
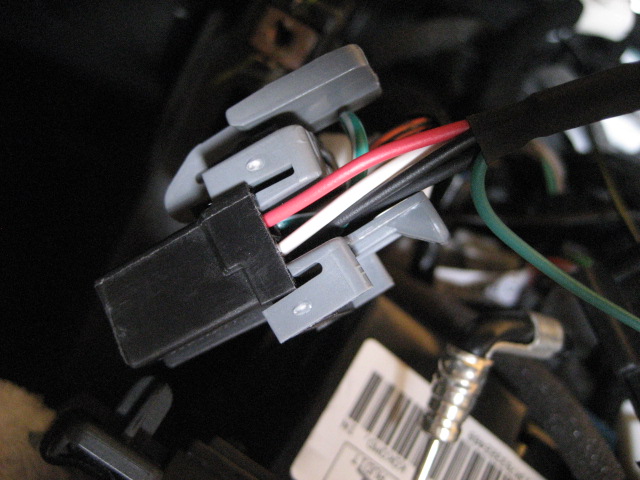
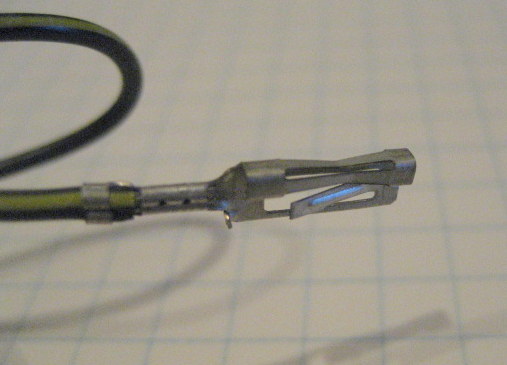
And here is a closeup of the radio connector end of the harness:

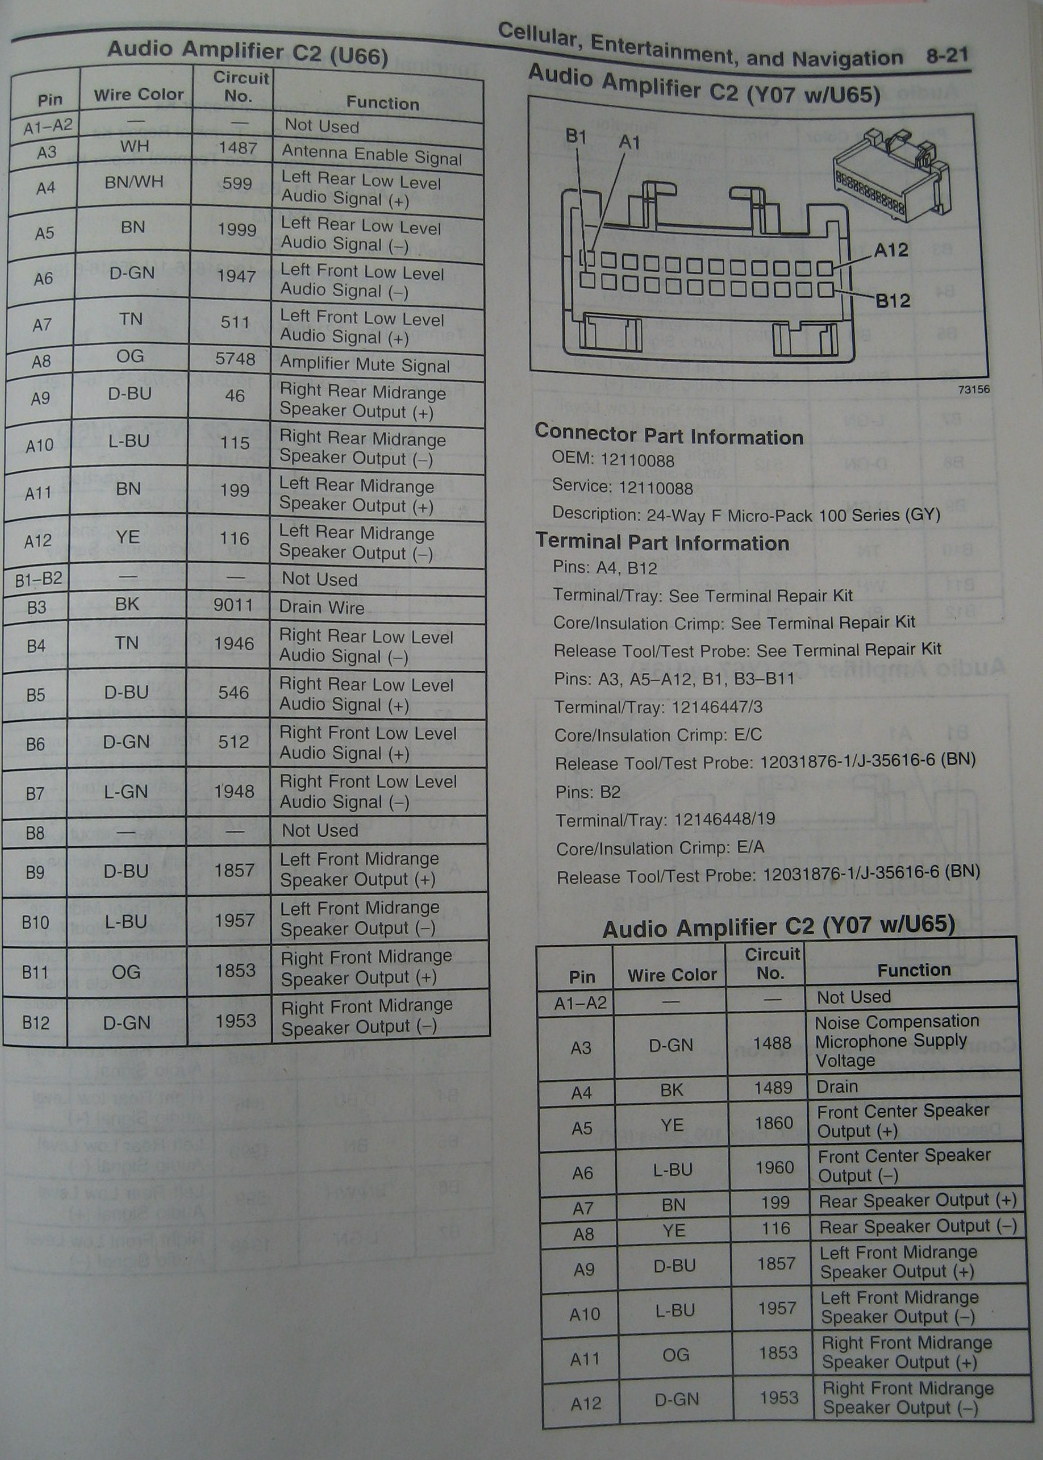
The green wire terminal plugs into the 24 pin connector on the back of the radio.
The four terminals on the right are the same Delphi Metri-Pack Series 100 terminals that plug into the 12 pin connector in back of the radio:
You can find this adapter harness on my Ordering Page as the NAV-4 Harness. All of the terminals are crimped and ready for insertion into the radio connectors. No tools are needed.
For buying the GM parts, check online or any GM dealer. But also check amazon.com for GM parts. They often have better prices than the dealers or eBay.
If you have the radio and the above parts, you are ready for installation.
Installation
1. Remove the original Radio
Installation is really pretty easy, but give yourself a few hours to do a neat job.
First, remove the center console radio surround:
Click Here for a step by step procedure.
In addition to the tools noted, you'll also want a 10mm and an 8mm nutdriver or socket.
(NOTE: Before you start, remove the Navigation DVD and CD. Once you remove power from the Nav unit, you will not be able to open the door again.)
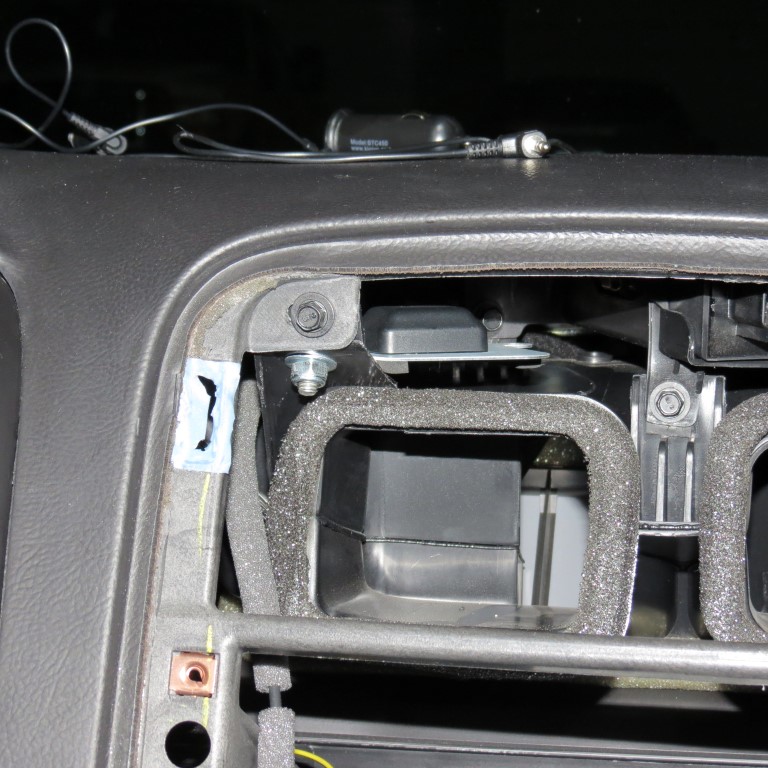
You'll get to here:
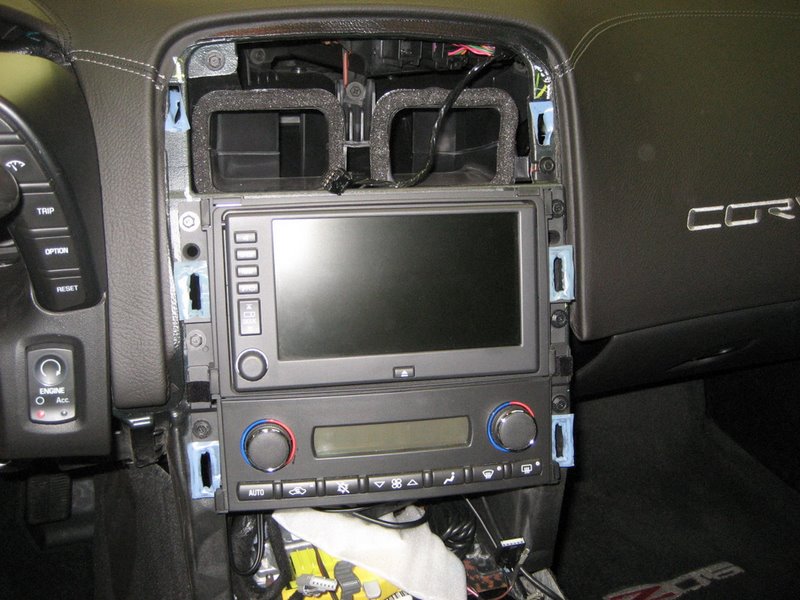
Remove the two 7mm screws holding the HVAC control and lay it down:
Remove the four 7mm screws that hold the Nav radio in place and pull it out.
NOTE: Be VERY careful you don't scratch the face of the Nav screen. Protect it with towels. If you scratch it, it is VERY expensive to have it repaired. And it's easy to take a bit of care to protect it.
Here is the back of the radio:

Remove the connector on the left, the big 24 pin connector and the 12 pin connector by pushing down on the latches. The connectors are often pretty tight, so wiggle them and pull hard.
Remove the radio antenna and the GPS antenna connectors, then the radio is free.
2. Prepare the radio wiring harnesses for the new auxiliary input wiring.
This isn't difficult, but follow it carefully.
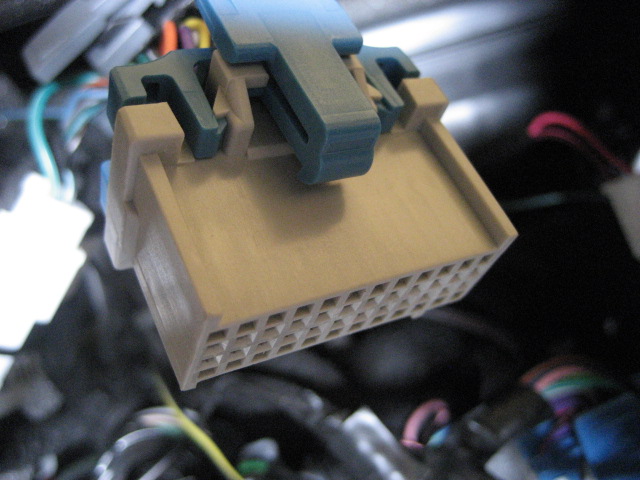
Here is the 12 pin radio connector with its TPAs (gray terminal assurance protection):
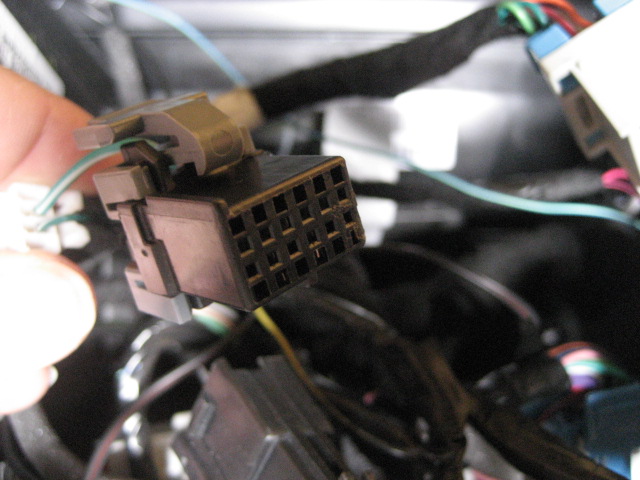
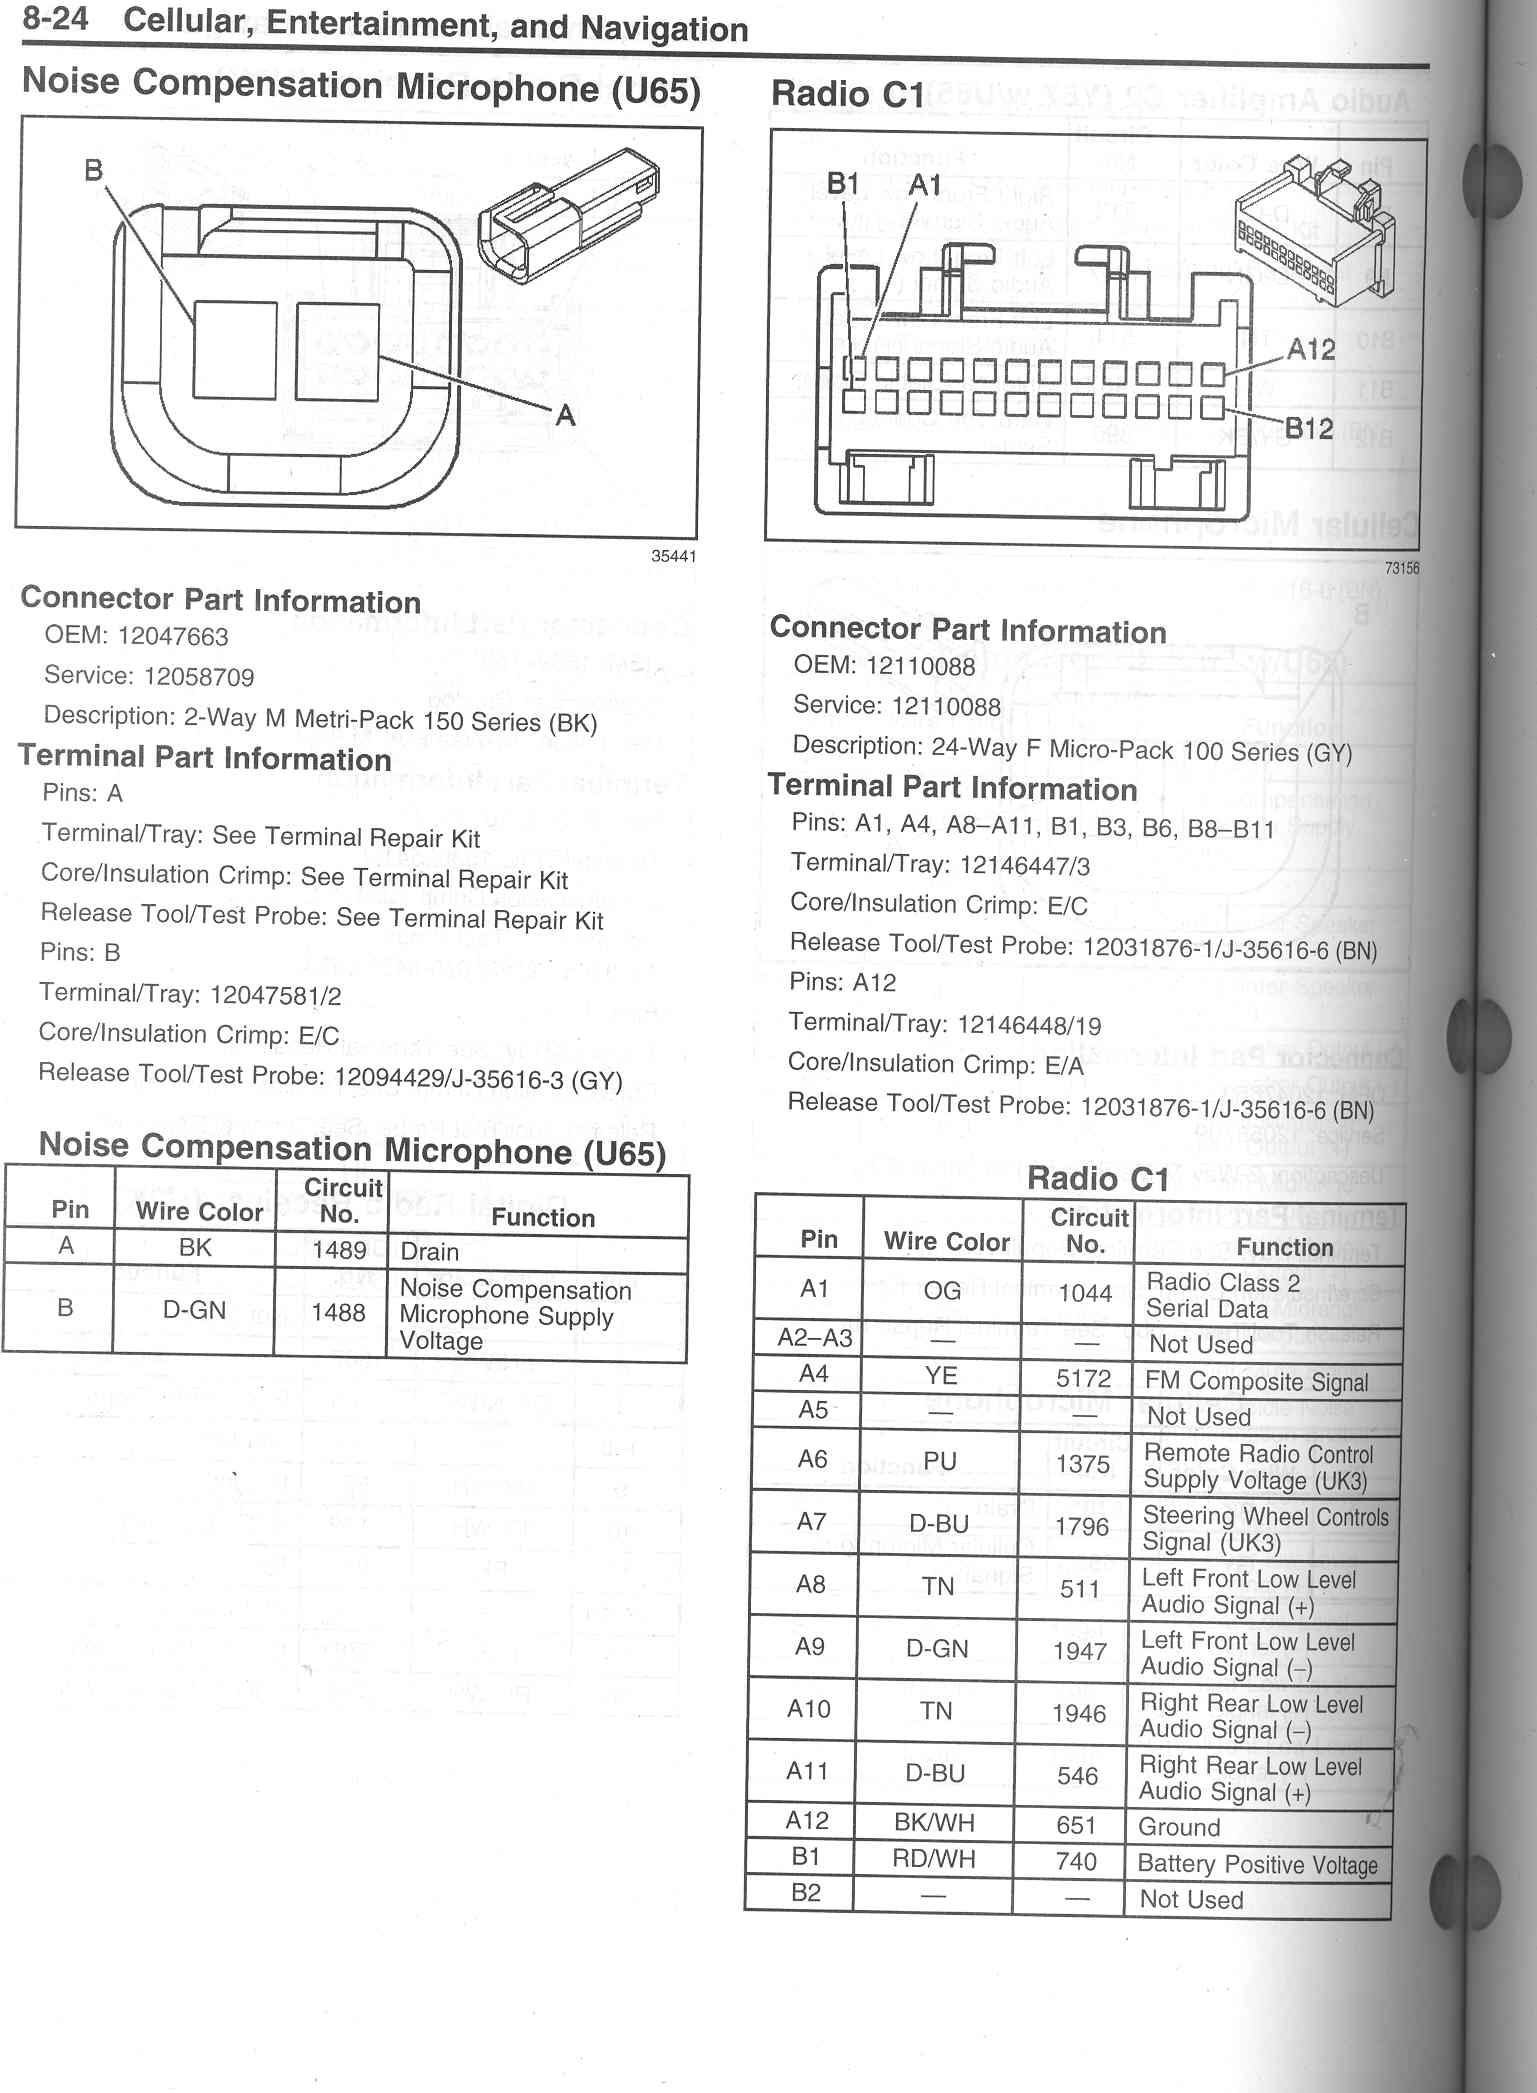
Here's the wiring for the 12 pin connector:

Here is the 12 pin radio connector with the TPAs (terminal assurance protector) removed:
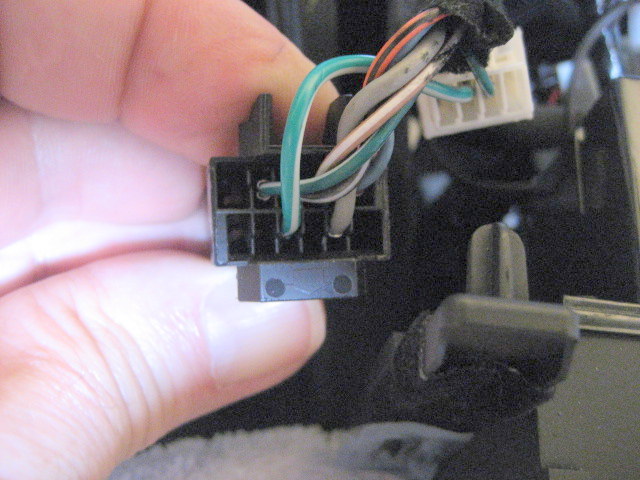
Just pry off the TPAs with a small screwdriver.
The green/white wire at the bottom is in Pin D, the speed sensor wire.
Note the Pins C, E, F, and G are empty.
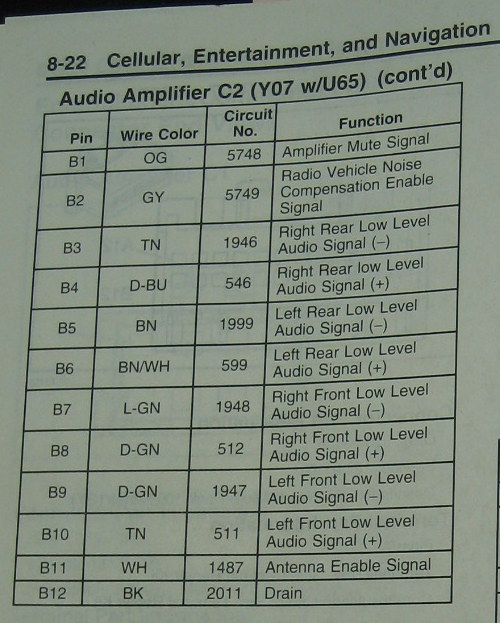
Now look at the wiring for the new USB radio:
Note that we will use these four empty pin spaces (C, E, F, and G) for the new radio.
Grab the adapter harness and examine the wires:
Ignore the green wire for now, since it will go into the 24 pin connector.
There are four wires we need to connect:
1. The black wire on the left is a bare wire insulated with heat shrink tubing. Examination will tell it from the the black wire next to it. This bare wire will go to Pin C, the Drain wire in the connector.
2. The regular black wire will go to Pin E, the Remote Radio Audio Common in the connector.
3. The red wire will go to Pin G, the Remote Radio Right Audio in the connector.
4. The white wire will go to Pin F, the Remote Radio Left Audio in the connector.
Bend the wires and get them in position to push them all into the 12 pin connector:
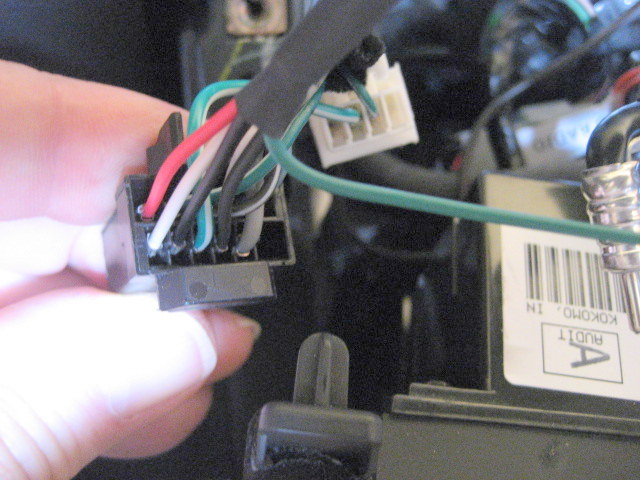
Each one will snap and lock into place.
Reinstall the TPAs:
OK, the 12 pin connector is done.
Next we'll insert the final green wire into the 24 pin connector.
Here's a closeup photo:
Here's the original wiring:
Remove the TPA (top only) with a small screwdriver, like you did with the 12 pin connector:
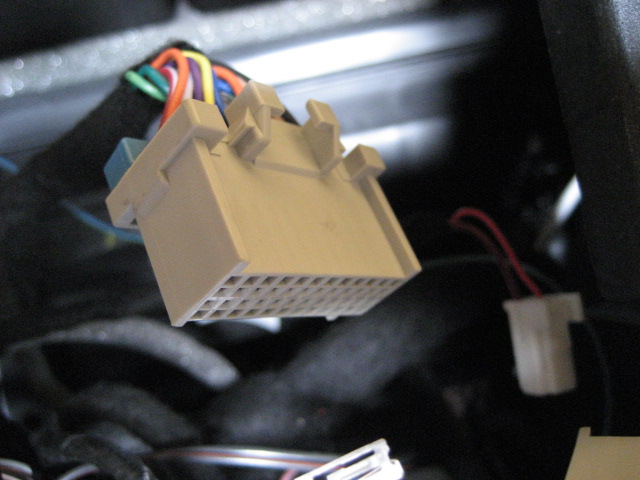
and here is the wiring:
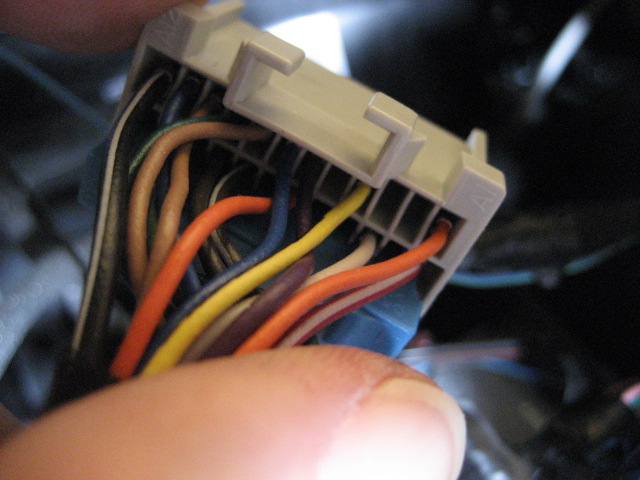
Note Pins A2 and A3 (between the orange and yellow wires) are empty.
Here is the new wiring for the USB radio:
Note that previously unused Pin A3 is now the Auxiliary Detection Signal.
Insert the green wire from the adapter harness into Pin A3:
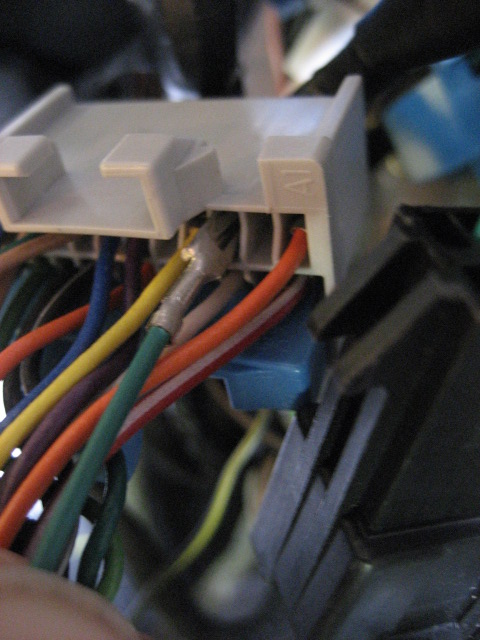
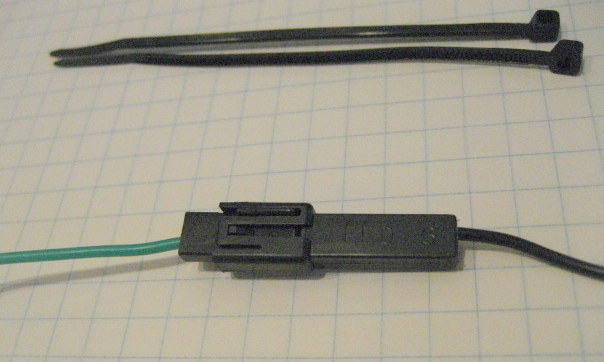
Reinstall the TPA and using the nylon tie straps included with the harness, tie the five wires to the two connector wire bundles.
The 12 pin and 24 pin radio connectors are now ready for the new USB radio.
3. Install the new USB Radio
Next, insert the USB cable into the new radio:
Install the radio by plugging in the three connectors you removed from the old radio.
And don't forget the radio and GPS antennas.
Let the new USB cable dangle and install the new radio with the four 7mm screws and the black locating pin in its hole.
Reinstall the HVAC module with the two 7 mm screws.
(Hint: push up on the radio and HVAC module as you tighten the screws. This will make sure the ash tray clears the HVAC module later.)
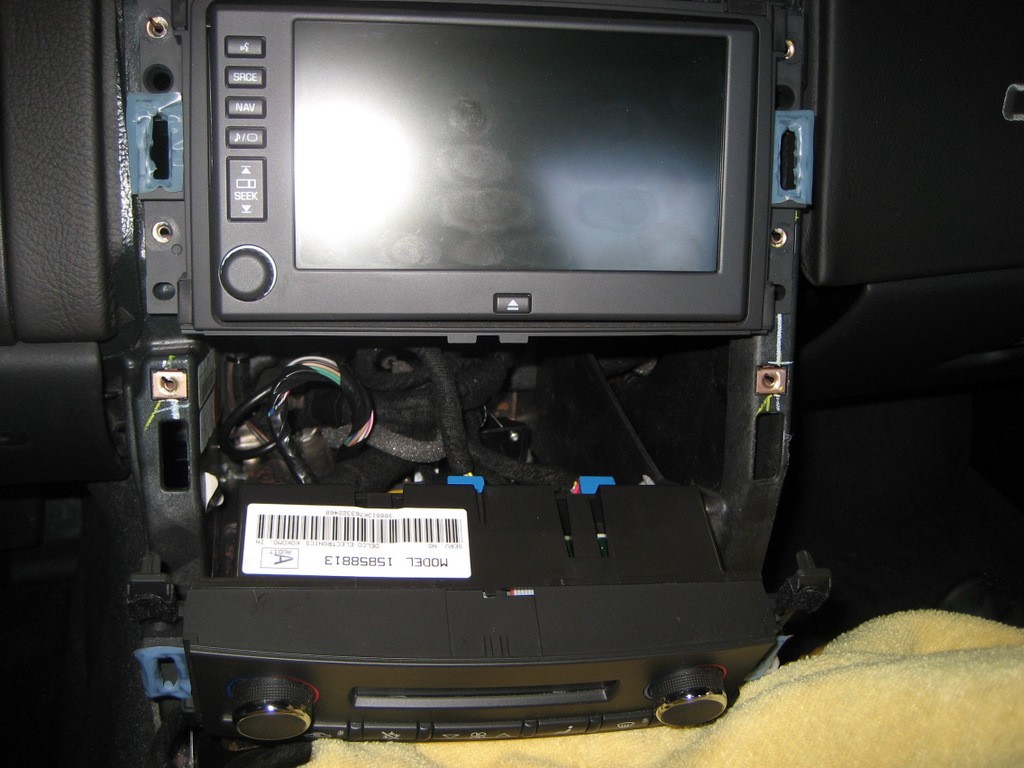
The adapter harness and the USB cable will come out below the HVAC module like this:
4. Swap consoles
This is pretty darn easy because there are only three fasteners that hold it in.
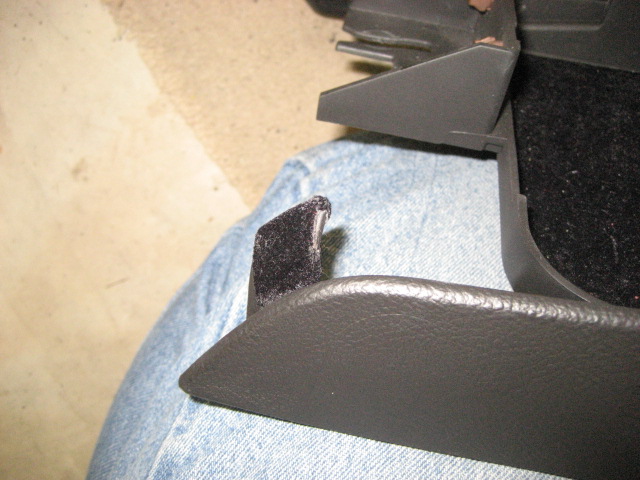
Unclip the E-brake cover from the square hole in the console - there's no need to remove the E-brake cover from the handle.
Here's the old console:
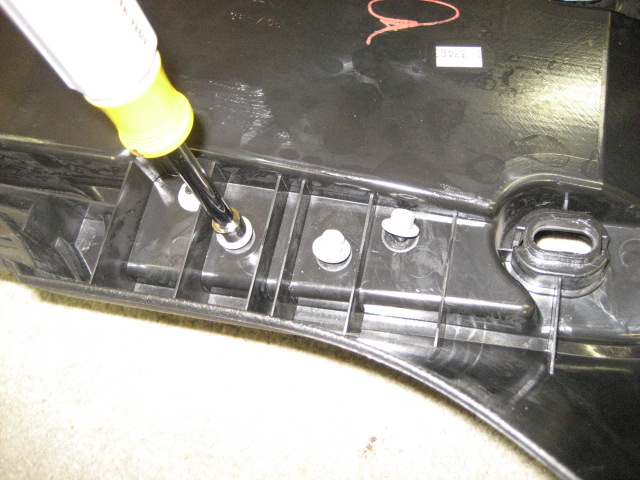
Remove the two trim covers with a small screwdriver:
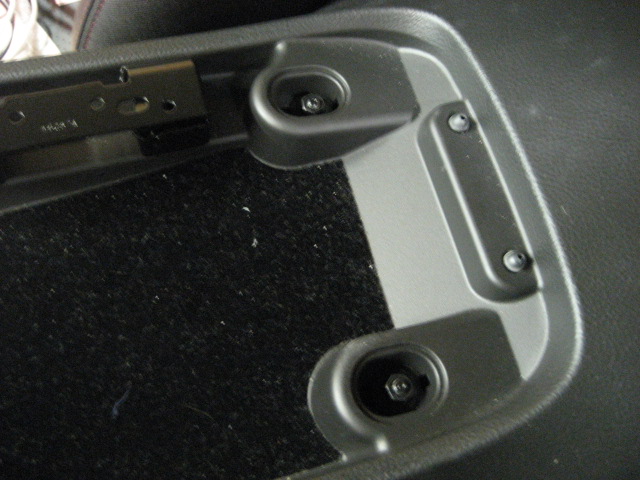
Remove the two nuts with a 10mm nutdriver or socket.
Remove the front bolt with a 10mm nutdriver or socket:
Pull the seat backs forward and remove the console.
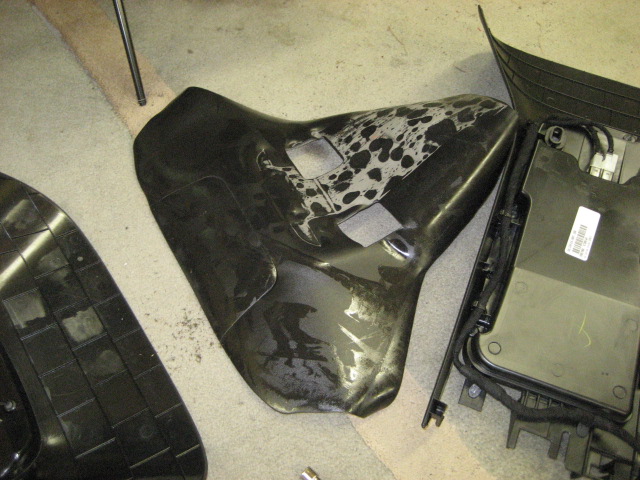
Here are the old and new consoles:
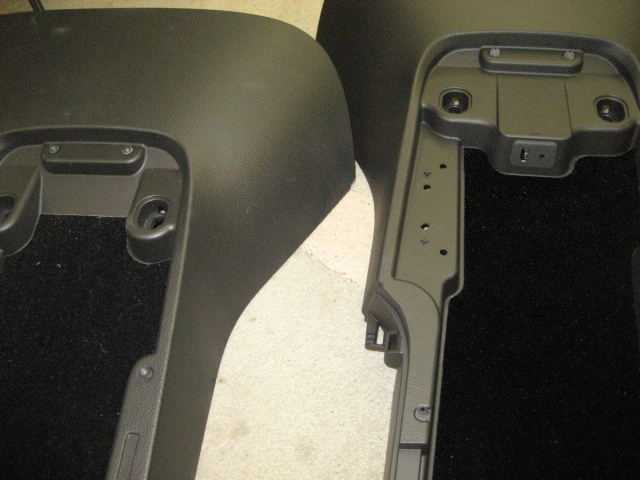
And a bottom view:
Peel off the rubber insulator from the original console:
and set it in place on the drive tunnel:
On the original console, remove the four nuts holding the console lid hinge with an 8mm nut driver or socket:
Install the hinge on the new console.
Remove the felt anti-squeak tape from the old console and install it on the new one.
Install the new console on the drive tunnel over the insulator.
Note that the holes are slotted so you can adjust the console front to back. Look at the old console to determine where the bolts were located and match the locations on the new console. This will insure the new console is in the exact same place as the old one.
Tighten the two nuts and bolt with the 10mm nutdriver or socket.
5. Connect the Harnesses
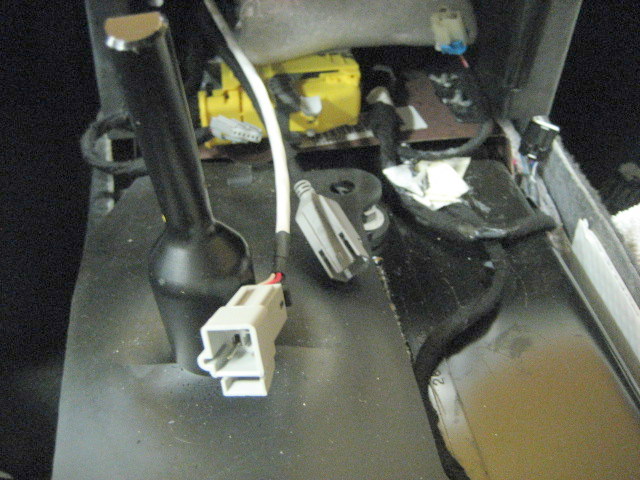
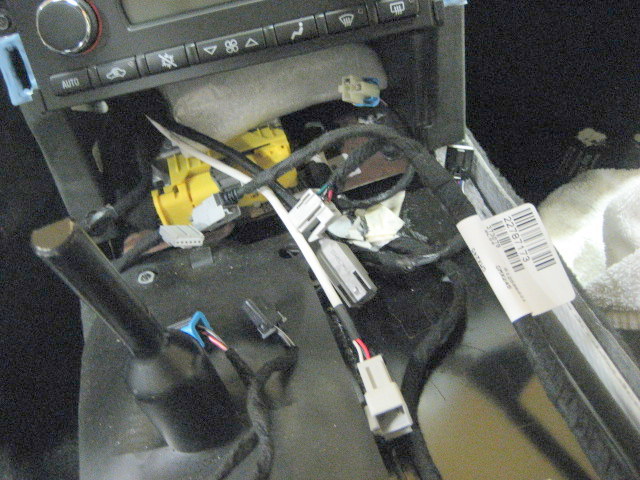
When installed, the new console harness will be located along the right:
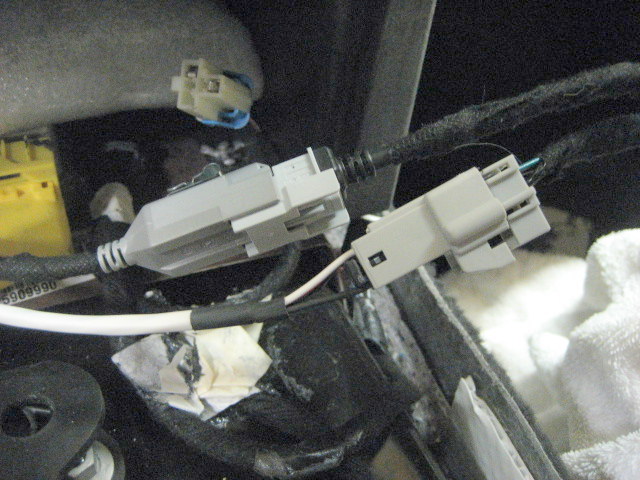
Snap the connectors together to connect the radio and console wiring:
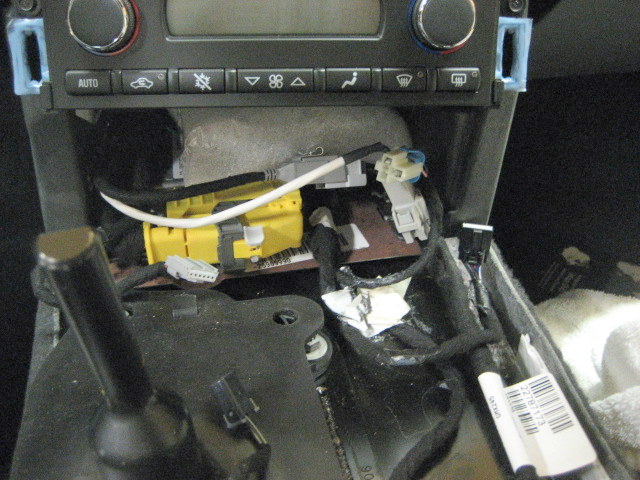
Tuck the wires under the HVAC module, taking care that the seat heater and cigarette lighter connectors will not interfere with the new radio wiring:
6. Reinstall the Radio Surround
Reinstall the radio surround console, making sure that all connectors are clipped in place. Don't forget the Traction Control switch connector at the back and the Hazard Warning connector at the top.
You're Done!
Except for one thing - if you bought a used radio, when you go to start the car, you will get a message on the radio saying "Theftlock Activated". You will need to find a friend or a dealer with a Tech 2 and have the Navigation radio relearn the VIN of your car. The Tech 2 will ask for a "body style" - that is the fourth letter in your VIN - "Y". See below for a procedure.
Enjoy your new USB Nav radio.
2012 Navigation Radio Operating Manual
Click HERE to download the manual.
Addendum for C6s without Nav
The above installation was simple, because my car already had a factory Nav radio. There might be a little more to it if you have a factory non-Nav radio. And even more to it if you have an early C6 without XM.
If your Vette doesn't have a Nav radio, you'll also need the GPS antenna, GM part number 15821094. I think they are about $60 bucks or so (but check out amazon.com's price). You can buy them from any GM dealer, but check out Bob Wendorff, the Parts Manager at Rimrock Chevrolet in Montana. Bob is a great guy to work with and he offers good prices as well. His phone number is 800-234-5284. See the notes below for the GPS antenna mounting. (Sorry to say Bob retired in 2016.)
With XM
If you don't have a factory Nav radio, your 12 pin connector C2 (or X2 in the newer Vettes) might not have a VSS (vehicle speed sensor) wire in Pin D of the connector. An owner of a 3LT Vette reported that he does have the VSS wire, but I suspect that owners of 1LT Vettes are missing the wire. It might be that if you have Bose, you have the VSS wire in place. But the Nav radios need the VSS signal (no matter where you might have heard differently) to track accurately and enable the Nav radio to calculate the ETA to your destination. I know this from a lot of experience with my "Nav Mod" described on another page on this website (Click HERE). So you will have to provide a VSS signal to Pin D. This isn't particularly difficult because the VSS green/white wire is present in one of the two instrument cluster connector harnesses. So you must pull the cluster bezel and take out the 7mm screws that hold the cluster in place, then splice in a new wire from the VSS wire over to Pin D of the Nav radio connector.
You can build your own VSS wire, but you will need this Delphi Micro Pack 100 female terminal for the C2 Connector:
I offer this wire package as the NAV-5 harness on my Ordering Page website. It has the Micro Pack 100 terminal crimped on one end of the wire and a Delphi Metri Pack 150 connector on the other end. Then a short green/white wire with a mating Metri Pack 150 connector so that you can leave the VSS wire disconnected while you splice in the short green/white wire to the instrument cluster wire harness. Although I prefer to solder the splice, I include a Scotch splice connector to make a solderless splice to the cluster green/white wire. When the splice is complete, you can simply connect the longer VSS wire, then run it over the to the radio connector area. The Micro Pack 100 terminal pushes into Pin D, similar to the wiring noted previously.

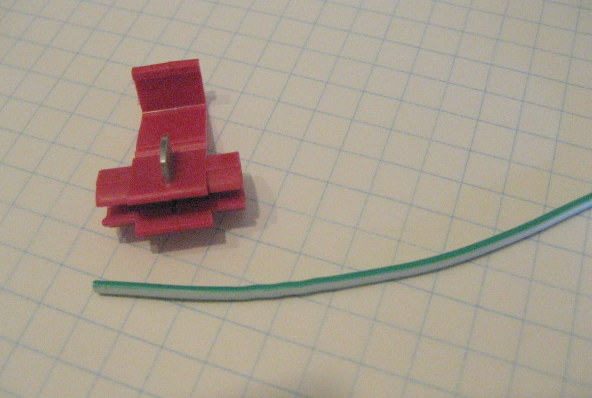
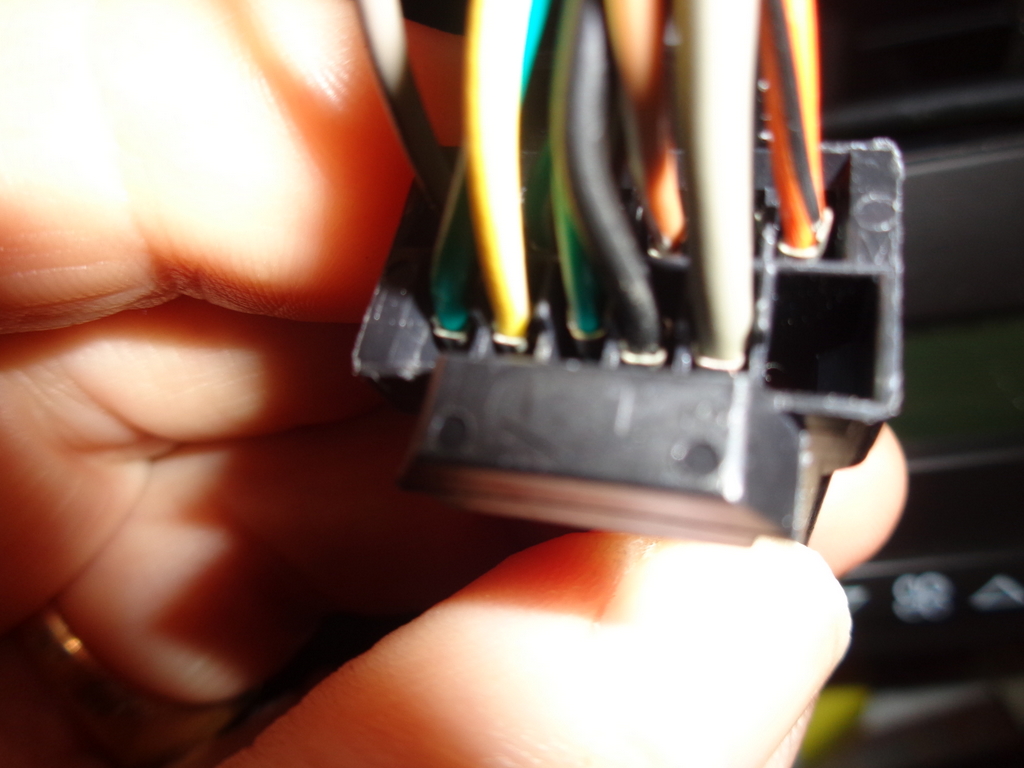
The green/white wire shown above needs to be spliced into the green/white wire in the GRAY 16 pin Delphi connector to the instrument cluster. There is an other green/white wire in the black connector - no changes should be made to the black connector wiring. You can use the Scotch splice connector shown or solder the green/white wires.
Note for 2011-13 Corvettes without Nav
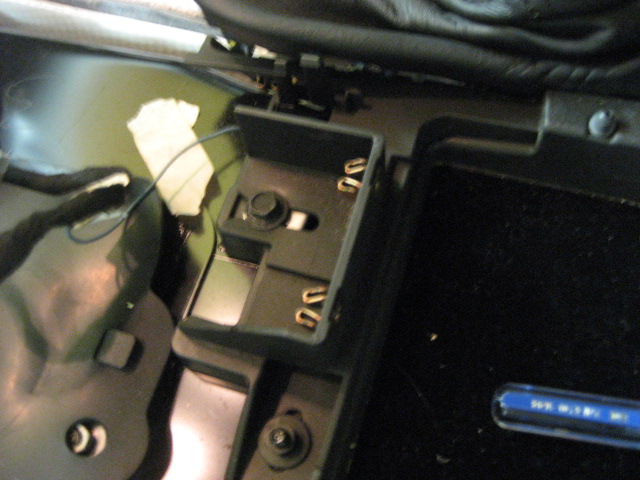
2011-13 Corvettes without Nav usually have the wiring already in place to add the USB and auxiliary input port in the console. The USB cable (GM part #22828130) isn't there, but the auxiliary input connector should be located under the HVAC console:
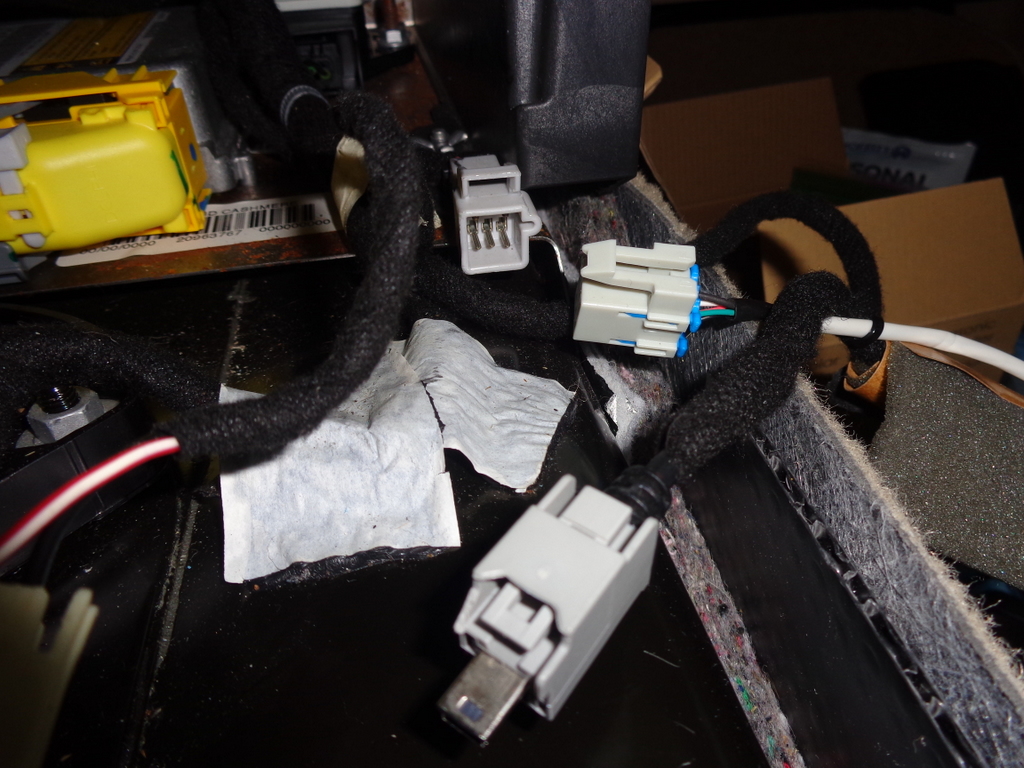
Also, you should find that the 12 pin connector at the back of the radio is already wired:
When your Vette already has this wiring, you will not need my NAV-4 harness, as described in the main web page above. You will still need to purchase the 22828130 USB cable from GM however.
Without XM
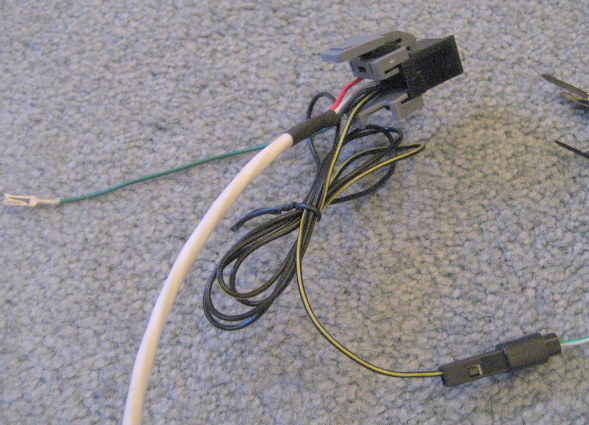
If you have an early C6 without XM, you might find you don't even have the connector C2 - the 12 pin socket on the non-Nav radio will be empty. In that case, you will need not only the VSS wire, but you will need the Delphi connector as well. If you run into this situation, I offer the complete NAV-6 harness as shown below:

This harness is a combination of the NAV-4 harness described in the first section of this website plus the NAV-5 VSS wire, all bundled into one harness with the Delphi C2 connector. Since you won't have a C2 connector, all you do is plug in this new prewired Delphi connector into the radio socket, then run the VSS wire over to the instrument cluster as described above. All of the C2 wiring is done for you. You will still have to connect the NAV-4 green wire to the 24 pin radio connector, but that is pretty darn simple - just push it into Pin A3 as described above.
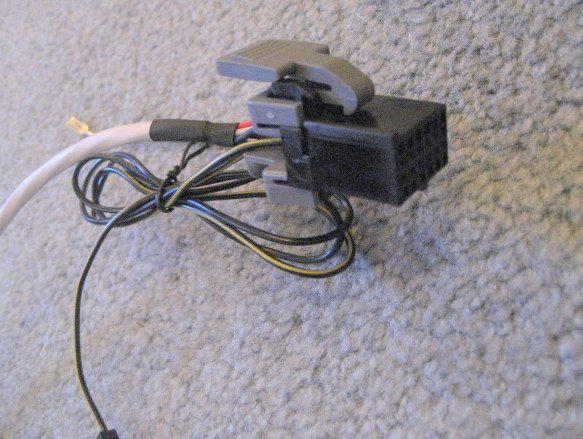
The other end of this NAV-6 harness connects to the harness coming from the new rear center console as described in the first section of this website.
GPS ANTENNA MOUNTING
Here is the factory GPS antenna location:
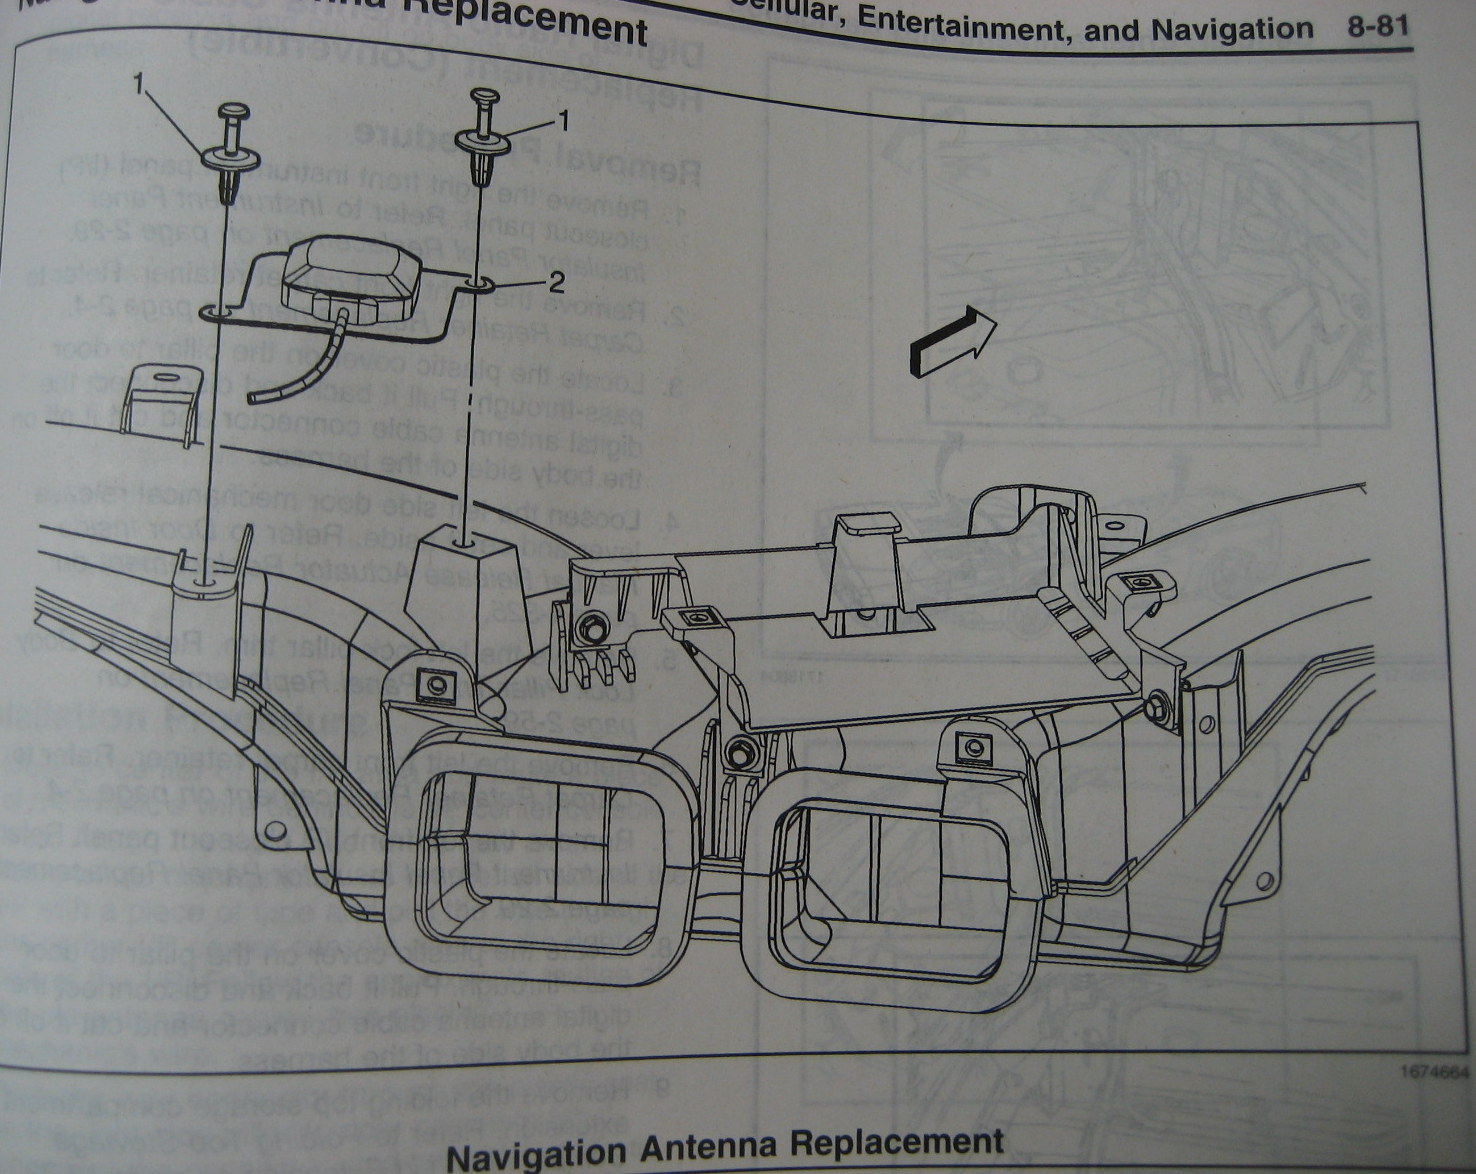
The GPS antenna is mounted under the dash pad. I've heard that you can lift the dash pad and get it into place, but since it's difficult to get the second rivet in place, some guys just mount it with one screw - it can't go anywhere. You may have to remove a few screws to lift and distort the dash pad. I haven't done this myself however, since my antenna was already in place.
I received the following email from Ron Tratch, who installed a USB radio in his 1LT Vette: